Watch Video Here
Processing videos in OpenCV is one of the most common jobs, many people already know how to leverage the VideoCapture function in OpenCV to read from a live camera or video saved on disk.
But here’s some food for thought, do you know that you can also read other video sources e.g. read a live feed from an IP Camera (Or your phone’s Camera) or even read GIFS.
Yes, you’ll learn all about reading these sources with videoCapture in today’s tutorial and I’ll also be covering some very useful additional things like getting and setting different video properties (height, width, frame count, fps, etc), manually changing current frame position to repeatedly display the same video, and capturing different key events.
This will be an excellent tutorial to help you properly get started with video processing in OpenCV.
Alright, let’s first rewind a bit and go back to the basics, What is a video?
Well, it is just a sequence of multiple still images (aka. frames) that are updated really fast creating the appearance of a motion. Below you can see a combination of different still images of some guy (You know who xD) dancing.

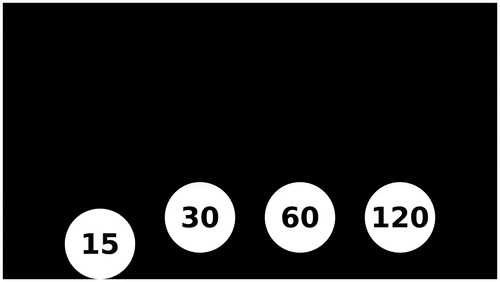
And how fast these still images are updated is measured by a metric called Frames Per Second (FPS). Different videos have different FPS and the higher the FPS, the smoother the video is. Below you can see the visualization of the smoothness in the motion of the higher FPS balls. The ball that is moving at 120 FPS has the smoothest motion, although it’s hard to tell the difference between 60fps and the 120fps ball.
Note: Consider each ball as a separate video clip.
So, a 5-second video with 15 Frames Per Second (FPS) will have a total of 75 (i.e., 15*5) frames in the whole video with each frame being updated after 60 milliseconds. While a 5-second video with 30 FPS will have 150 (i.e., 30*5) frames with each frame being updated after 30 milliseconds.
So a 30 FPS will display the same frame (still image) only for 30 milliseconds, while a 15 FPS video will display the same frame for 60 milliseconds (longer period) which will make the motion jerkier and slower and in extreme cases (< 10 FPS) may convert a video into a slideshow.

Other than FPS, there are some other properties too which determine the quality of a video like its resolution (i.e., width x height), and bitrate (i.e., amount of information in a given unit of time), etc. The higher the resolution and bitrate of a video are, the better the quality is.
This tutorial also has a video version that you can go and watch for a detailed explanation, although this blog post alone can also suffice.
Alright now we have gone through the required basic theoretical details about videos and their properties, so without further ado, let’s get started with the code.
Download Code:
[optin-monster slug=”pxnrl4t8fkursnjseege”]
Import the Libraries
We will start by importing the required libraries.
!pip install opencv-contrib-python matplotlib

import cv2
import matplotlib.pyplot as plt
from time import time
Loading a Video
To read a video, first, we will have to initialize the video capture object by using the function cv2.VideoCapture().
Function Syntax:
video_reader = cv2.VideoCapture(filename[, apiPreference])video_reader = cv2.VideoCapture(index[, apiPreference])
Parameters:
filename– It can be:- Name of video file (eg.
video.avi) - or Image sequence (eg.
img_%02d.jpg, which will read samples like img_00.jpg, img_01.jpg, img_02.jpg, ...) - or URL of video stream (eg.
protocol://host:port/script_name?script_params|auth). You can refer to the documentation of the source stream to know the right URL scheme.
- Name of video file (eg.
index– It is the id of a video capturing device to open. To open the default camera using the default backend, you can just pass0. In case of multiple cameras connected to the computer, you can select the second camera by passing 1, the third camera by passing 2, and so on.apiPreference– It is the preferred capture API backend to use. Can be used to enforce a specific reader implementation if multiple are available: e.g.cv2.CAP_FFMPEGorcv2.CAP_IMAGESorcv2.CAP_DSHOW. Its default value iscv2.CAP_ANY. Check cv2.VideoCaptureAPIs for details.
Returns:
video_reader– It is the video loaded from the source specified.
So to simply put, this cv2.VideoCapture() function opens up a webcam or a video file/images sequence or an IP video stream for video capturing with API Preference. After initializing the object, we will use .isOpened() function to check if the video is accessed successfully. It returns True for success and False for failure.
# Initialized the VideoCapture object.
video_reader = cv2.VideoCapture('media/video.mp4')
# video_reader = cv2.VideoCapture(0)
# video_reader = cv2.VideoCapture('media/internet.gif')
# video_reader = cv2.VideoCapture('http://192.168.18.134:8080/video)

# Check if video is accessed.
if (video_reader.isOpened()):

    # Display the success message.
    print("Successfully accessed the video!")
else:

    # Display the failure message.
    print("Failed to access the video!")
Reading a Frame
If the video is accessed successfully, then the next step will be to read the frames of the video one by one which can be done using the function .read().
Function Syntax:
Returns:
ret– It is a boolean value i.e.,Trueif the frame is read successfully otherwiseFalse.frame– It is a frame/image of our video.
Note: Every time we run .read() function, it will give us a new frame i.e., the next frame of the video so we can put .read() in a loop to read all the frames of a video and the ret value is really important in such scenarios since after reading the last frame, from the video this ret will be False indicating that the video has ended.
# Read the first frame.
ret, frame = video_reader.read()

# Check if frame is read properly.
if ret:

    # Specify a size of the figure.
    plt.figure(figsize = [10, 10])

    # Display the frame, also convert BGR to RGB for display.
    plt.title('The frame read Successfully!');plt.axis('off');plt.imshow(frame[:,:,::-1]);plt.show()

else:

    # Display the failure message.
    print('Failed to read the Frame!')

Get and Set Properties of the Video
Now that we know how to read a video, we will now see how to get and set different properties of a video using the functions:
cv2.VideoCapture.get(propId)– Returns the specified VideoCapture property.cv2.VideoCapture.set(propId, new_value)– Sets a property in the VideoCapture.
Here, propId is the Property ID and new_value is the value we want to set for the property.
| Property ID | Enumerator | Property |
|---|---|---|
| 0 | cv2.CAP_PROP_POS_MSEC | Current position of the video in milliseconds. |
| 1 | cv2.CAP_PROP_POS_FRAMES | 0-based index of the frame to be decoded/captured next. |
| 3 | cv2.CAP_PROP_FRAME_WIDTH | Width of the frames in the video stream. |
| 4 | cv2.CAP_PROP_FRAME_HEIGHT | Height of the frames in the video stream. |
| 5 | cv2.CAP_PROP_FPS | Frame rate of the video. |
| 7 | cv2.CAP_PROP_FRAME_COUNT | Number of frames of the video. |
I have only mentioned the most commonly used properties with their Property ID and Enumerator. You can check cv2.VideoCaptureProperties for the remaining ones. Now we will try to get the width, height, frame rate, and the number of frames of the loaded video using the .get() function.
# Check if video accessed properly.
if (video_reader.isOpened()):

    # Get and display the width.
    width = video_reader.get(cv2.CAP_PROP_FRAME_WIDTH)
    print(f'Width of the video: {width}')

    # Get and display the height.
    height = video_reader.get(cv2.CAP_PROP_FRAME_HEIGHT)
    print(f'Height of the video: {height}')

    # Get and display the frame rate of the video.
    fps = video_reader.get(cv2.CAP_PROP_FPS)
    print(f'Frame rate of the video: {int(fps)}')

    # Get and display the number of frames of the video.
    frames_count = video_reader.get(cv2.CAP_PROP_FRAME_COUNT)
    print(f'Total number of frames of the video: {int(frames_count)}')

else:
    # Display the failure message.
    print("Failed to access the video!")
Width of the video: 1280.0
Height of the video: 720.0
Frame rate of the video: 29
Total number of frames of the video: 166
Now we will use the .set() function to set a new height and width of the loaded video. The function .set() returns False if the video property is not settable. This can happen when the resolution you are trying to set is not supported by your webcam or the video you are working on. The .set() function sets to the nearest resolution if that resolution is not settable like if I try to set the resolution to 500x500, it might fail to happen and the function set the resolution to something else, like 720x480, which is supported by my webcam.
# Specify the new width and height values.
new_width = 1920
new_height = 1080

# Check if video accessed properly.
if (video_reader.isOpened()):

    # Set width of the video if it is settable.
    if (video_reader.set(cv2.CAP_PROP_FRAME_WIDTH, new_width)):

        # Display the success message with new width.
        print("Now the width of the video is {new_width}")

    else:
        # Display the failure message.
        print("Failed to set the width!")

    # Set height of the video if it is settable.
    if (video_reader.set(cv2.CAP_PROP_FRAME_HEIGHT, new_height)):

        # Display the success message with new height.
        print("Now the height of the video is {new_height}")

    else:
        # Display the failure message.
        print("Failed to set the height!")

else:
    # Display the failure message.
    print("Failed to access the video!")
Failed to set the width!
Failed to set the height!
So we cannot set the width and height to 1920x1080 of the video we are working on. An easy solution to this type of issue can be to use the cv2.resize() function on each frame of the video but it is a little less efficient approach.
Now we will put all this in a loop and read and display all the frames sequentially in a window using the function cv2.imshow(), which will look like we are playing a video, but we will be just displaying frames one after the other. We will use the function cv2.waitKey(milliseconds) to wait for one millisecond before updating a frame with the next one.
We will use the functions .get() and .set() to keep restarting the video when every time we will reach the last frame until the key q is pressed, or the close X button on the opened window is pressed. And finally, in the end, we will release the loaded video using the function cv2.VideoCapture.release() and destroy all of the opened HighGUI windows by using cv2.destroyAllWindows().
# Initialize the VideoCapture object.
# video_reader = cv2.VideoCapture(0)
video_reader = cv2.VideoCapture('media/video.mp4')
# video_reader = cv2.VideoCapture('media/internet.gif')
# video_reader = cv2.VideoCapture('http://192.168.18.134:8080/video')

# Set width and height of the video if settable.
video_reader.set(3,1280)
video_reader.set(4,960)

# Create named window for resizing purposes.
cv2.namedWindow('Video', cv2.WINDOW_NORMAL)

# Initialize a variable to store the start time of the video.
start_time = time()

# Initialize a variable to store repeat video state.
repeat_video = True

# Initialize a variable to store the frame count.
frame_count = 0

# Iterate until the video is accessed successfully.
while video_reader.isOpened():

    # Read a frame.
    ret, frame = video_reader.read()

    # Check if frame is not read properly then break the loop
    if not ret:
        break

    # Increment the frame counter.
    frame_count+=1

    # Check if repeat video is enabled and the current frame is the last frame of the video.
    if repeat_video and frame_count == video_reader.get(cv2.CAP_PROP_FRAME_COUNT):

        # Set the current frame position to first frame to restart the video.
        video_reader.set(cv2.CAP_PROP_POS_FRAMES, 0)

        # Set the video frame counter to zero.
        frame_count = 0

        # Update the start time of the video.
        start_time = time()

    # Flip the frame horizontally for natural (selfie-view) visualization.
    frame = cv2.flip(frame, 1)

    # Get the height and width of frame.
    frame_height, frame_width, _  = frame.shape

    # Calaculate average frames per second.
    ##################################################################################################

    # Get the current time.
    curr_time = time()

    # Check if the difference between the start and current time > 0 to avoid division by zero.
    if (curr_time - start_time) > 0:

        # Calculate the number of frames per second.
        frames_per_second = frame_count // (curr_time - start_time)

        # Write the calculated number of frames per second on the frame.
        cv2.putText(frame, 'FPS: {}'.format(int(frames_per_second)), (10, frame_width//25),
                    cv2.FONT_HERSHEY_PLAIN, frame_width//300, (0, 255, 0), frame_width//200)

    ##################################################################################################

    # Display the frame.
    cv2.imshow('Video', frame)

    # Wait for 1ms. If a key is pressed, retreive the ASCII code of the key.
    k = cv2.waitKey(10) & 0xFF

    # Check if q key is pressed or the close 'X' button is pressed.
    if(k == ord('q')) or cv2.getWindowProperty('Video', cv2.WND_PROP_VISIBLE) < 1:

        # Break the loop.
        break

# Release the VideoCapture Object and close the windows.
video_reader.release()
cv2.destroyAllWindows()
You can increase the delay specified in cv2.waitKey(delay) to be higher than 1 ms to control the frames per second.
Join My Course Computer Vision For Building Cutting Edge Applications Course

The only course out there that goes beyond basic AI Applications and teaches you how to create next-level apps that utilize physics, deep learning, classical image processing, hand and body gestures. Don’t miss your chance to level up and take your career to new heights
You’ll Learn about:
- Creating GUI interfaces for python AI scripts.
- Creating .exe DL applications
- Using a Physics library in Python & integrating it with AI
- Advance Image Processing Skills
- Advance Gesture Recognition with Mediapipe
- Task Automation with AI & CV
- Training an SVM machine Learning Model.
- Creating & Cleaning an ML dataset from scratch.
- Training DL models & how to use CNN’s & LSTMS.
- Creating 10 Advance AI/CV Applications
- & More
Whether you’re a seasoned AI professional or someone just looking to start out in AI, this is the course that will teach you, how to Architect & Build complex, real world and thrilling AI applications
Summary
In this tutorial, we learned what exactly videos are, how to read them from sources like IP camera, webcam, video files & gif, and display them frame by frame in a similar way an image is displayed. We also learned about the different properties of videos and how to get and set them in OpenCV.
These basic concepts we learned today are essential for many in-demand Computer Vision applications such as intelligent video analytics systems for intruder detection and much more.
You can reach out to me personally for a 1 on 1 consultation session in AI/computer vision regarding your project. Our talented team of vision engineers will help you every step of the way. Get on a call with me directly here.
Ready to seriously dive into State of the Art AI & Computer Vision?
Then Sign up for these premium Courses by Bleed AI


0 Comments