In this tutorial, we will learn how to manipulate facial expressions and create a DeepFake video out of a static image using the famous First-Order Motion Model. Yes, you heard that right, we just need a single 2D image of a person to create the DeepFake video.
Excited yet? … not that much ? .. well what if I tell you, the whole tutorial is actually on Google Colab, so you don’t need to worry about installation or GPUs to run, everything is configured.
And you know what the best part is?
Utilizing the colab that you will get in this tutorial, you can generate deepfakes in a matter of seconds, yes seconds, not weeks, not days, not hours but seconds.
What is a DeepFake?
The term DeepFake is a combination of two words; Deep refers to the technology responsible for generating DeepFake content, known as Deep learning, and Fake refers to the falsified content. The technology generates synthetic media, to create falsified content, which can be done by either replacing or synthesizing the new content (can be a video or even audio).
Below you can see the results on a few sample images:
This feels like putting your own words in a person’s mouth but on a whole new level.
Also, you may have noticed, in the results above, that we are generating the output video utilizing the whole frame/image, not just on the face ROI that people normally do.
First-Order Motion Model
We will be using the aforementioned First-Order Motion Model, so let’s start by understanding what it is and how it works?
The term First-Order Motion refers to a change in luminance over space and time, and the first-order motion model utilizes this change to capture motion in the source video (also known as the driving video).
The framework is composed of two main components: motion estimation (which predicts a dense motion field) and image generation (which predicts the resultant video). You don’t have to worry about the technical details of these modules to use this model. If you are not a computer vision practitioner, you should skip the paragraph below.
The Motion Extractor module uses the unsupervised key point detector to get the relevant key points from the source image and a driving video frame. The local affine transformation is calculated concerning the frame from the driving video. A Dense Motion Network then generates an occlusion map and a dense optical flow, which is fed into the Generator Module alongside the source image. The Generator Module generates the output frame, which is a replica of the relevant motion from the driving video’s frame onto the source image.
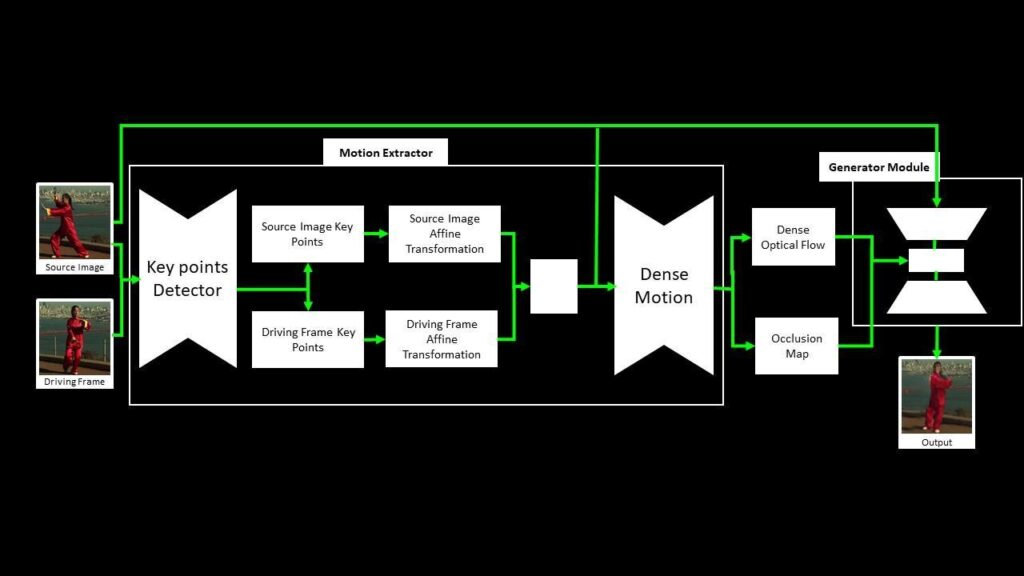
This approach can also be used to manipulate faces, human bodies, and even animated characters, given that the model is trained on a set of videos of similar object categories.
Now that we have gone through the prerequisite theory and implementation details of the approach we will be using, let’s dive into the code.
Download code:
[optin-monster slug=”n7m5f6assjorcd80egr9″]
Outline
- Setup the environment
- Prepare a driving video
- Record a video from the webcam
- Crop the face from the recorded video
Alright, let’s get started.
Step 1: Setup the environment
In the first step, we will set up an environment that is required to use the First-Order Motion model.
Step 1.1: Clone the repositories
Clone the official First-Order-Model repository.
# Discard the output of this cell.
%%capture

# Clone the First Order Motion Model Github Repository.
!git clone https://github.com/AliaksandrSiarohin/first-order-model

# Change Current Working Directory to "first-order-model".
%cd first-order-model

# Clone the Face Alignment Repository.
!git clone https://github.com/1adrianb/face-alignment

# Change Current Working Directory to "face-alignment".
%cd face-alignment
Step 1.2: Install the required Modules
Install helper modules that are required to perform the necessary pre- and post-processing.
# Discard the output of this cell.
%%capture

# Install the modules required to use the Face Alignment module.
!pip install -r requirements.txt

# Install the Face Alignment module.
!python setup.py install

# Install the mediapipe library.
!pip install mediapipe

# Move one Directory back, i.e., to first-order-model Directory.
%cd ..
Import the required libraries.
import os
import cv2
import mediapipe as mp
import numpy as np
import matplotlib.pyplot as plt
import matplotlib.animation as animation

import demo
import imageio
import warnings
warnings.filterwarnings("ignore")
import requests

from skimage.transform import resize
from skimage import img_as_ubyte
from google.colab import files

from IPython.display import display, Javascript,HTML
from google.colab.output import eval_js
from base64 import b64encode, b64decode
Step 2: Prepare a driving video
In this step, we will create a driving video and will make it ready to be passed into the model.
Step 2.1: Record a video from the webcam
Create a function record_video() that can access the webcam utilizing JavaScript.
Remember that Colab is a web IDE that runs entirely on the cloud, so that’s why JavaScript is needed to access the system Webcam.
def record_video(filename = 'Video.mp4'):
    '''
    This function will record a video, by accessing the Webcam using the javascript and store it into a Video file.
    Args:
        filename: It is the name by which recorded video will be saved. Its default value is 'Video.mp4'.
    '''

    # Java Script Code for accessing the Webcam and Recording the Video.
    js=Javascript("""
        async function recordVideo() {

            // Create a div. It is a division or a section in an HTML document.
            // This div will contain the buttons and the video.
            const div = document.createElement('div');

            // Create a start recording button.
            const capture = document.createElement('button');

            // Create a stop recording button.
            const stopCapture = document.createElement("button");

            // Set the text content, background color and foreground color of the button.
            capture.textContent = "Start Recording";
            capture.style.background = "orange";
            capture.style.color = "white";

            // Set the text content, background color and foreground color of the button.
            stopCapture.textContent = "Recording";
            stopCapture.style.background = "red";
            stopCapture.style.color = "white";

            // Append the start recording button into the div.
            div.appendChild(capture);

            // Create a video element.
            const video = document.createElement('video');
            video.style.display = 'block';

            // Prompt the user for permission to use a media input.
            const stream = await navigator.mediaDevices.getUserMedia({audio:true, video: true});

            // Create a MediaRecorder Object.
            let recorder = new MediaRecorder(stream, { mimeType: "video/webm" });

            // Append the div into the document.
            document.body.appendChild(div);

            // Append the video into the div.
            div.appendChild(video);

            // Set the video source.
            video.srcObject = stream;

            // Mute the video.
            video.muted = true;

            // Play the video.
            await video.play();

            // Set height of the output.
            google.colab.output.setIframeHeight(document.documentElement.scrollHeight, true);

            // Wait until the video recording button is pressed.
            await new Promise((resolve) => {
                capture.onclick = resolve;
            });

            // Start recording the video.
            recorder.start();

            // Replace the start recording button with the stop recording button.
            capture.replaceWith(stopCapture);

            // Stop recording automatically after 11 seconds.
            setTimeout(()=>{recorder.stop();}, 11000);

            // Get the recording.
            let recData = await new Promise((resolve) => recorder.ondataavailable = resolve);
            let arrBuff = await recData.data.arrayBuffer();

            // Stop the stream.
            stream.getVideoTracks()[0].stop();

            // Remove the div.
            div.remove();

            // Convert the recording into a binaryString.
            let binaryString = "";
            let bytes = new Uint8Array(arrBuff);
            bytes.forEach((byte) => {
                binaryString += String.fromCharCode(byte);
            })

            // Return the results.
            return btoa(binaryString);
        }
    """)

    # Create a try block.
    try:

        # Execute the javascript code and display the webcam results.
        display(js)
        data=eval_js('recordVideo({})')

        # Decode the recorded data.
        binary=b64decode(data)

        # Write the video file on the disk.
        with open(filename,"wb") as video_file:
            video_file.write(binary)

        # Display the success message.
        print(f"Saved recorded video at: {filename}")

    # Handle the exceptions.
    except Exception as err:
        print(str(err))
Now utilize the record_video() function created above, to record a video. Click the recording button, and then the browser will ask for user permission to access the webcam and microphone (if you have not allowed these by default) after allowing, the video will start recording and will be saved into the disk after a few seconds. Please make sure to have neutral facial expressions at the start of the video to get the best Deep Fake results.
You can also use a pre-recorded video if you want, by skipping this step and saving that pre-recorded video at the video_path.
# Specify the width at which the video will be displayed.
video_width = 300

# Specify the path of the video.
video_path = 'Video.mp4'

# Record the video.
record_video(video_path)

# Read the Video file.
video_file = open(video_path, "r+b").read()

# Display the Recorded Video, using HTML.
video_url = f"data:video/mp4;base64,{b64encode(video_file).decode()}"
HTML(f"""<video width={video_width} controls><source src="{video_url}"></video>""")
The video is saved, but the issue is that the video is just a set of frames with no FPS and Duration information, and this can cause issues later on, so now, before proceeding further, resolve the issue by utilizing the FFMPEG command.
# Discard the output of this cell.
%%capture

# Check if the source video already exists.
if os.path.exists('source_video.mp4'):

    # Remove the video.
    os.remove('source_video.mp4')

# Set the FPS=23 of the Video.mp4 and save it with the name source_video.mp4.
!ffmpeg -i Video.mp4 -filter:v fps=23 source_video.mp4
Step 2.2: Crop the face from the recorded video
Crop the face from the video by utilizing the crop-video.py script provided in the First-Order-Model repository.
The Script will generate a FFMPEG Command that we can use to align and crop the face region of interest after resizing it to 256x256. Note that it does not print any FFMPEG Command if it fails to detect the face in the video.
# Generate the `FFMPEG` to crop the face from the video.
!python crop-video.py --inp source_video.mp4
ffmpeg -i source_video.mp4 -ss 0.0 -t 6.913043478260869 -filter:v "crop=866:866:595:166, scale=256:256" crop.mp4
Utilize the FFMPEG command generated by the crop-video.py script to create the desired video.
# Discard the output of this cell.
%%capture

# Check if the face video already exists.
if os.path.exists('crop.mp4'):

    # Remove the video.
    os.remove('crop.mp4')

# Crop the face from the video and resize it to 256x256.
!ffmpeg -i source_video.mp4 -ss 0.0 -t 6.913043478260869 -filter:v "crop=866:866:595:166, scale=256:256" crop.mp4
Now that the cropped face video is stored in the disk, display it to make sure that we have extracted exactly what we desired.
# Read the Cropped Video file.
video_file = open('crop.mp4', "r+b").read()

# Display the Cropped Video, using HTML.
video_url = f"data:video/mp4;base64,{b64encode(video_file).decode()}"
HTML(f"""<video width={video_width} controls><source src="{video_url}"></video>""")
Perfect! The driving video looks good. Now we can start working on a source image.
Step 3: Prepare a source Image
In this step, we will make the source Image ready to be passed into the model.
Download the Image
Download the image that we want to pass to the First-Order Motion Model utilizing the wget command.
# Discard the output of this cell.
%%capture

# Specify the path of the images directory.
IMAGES_DIR = 'media'

# Check if the images directory does not already exist.
if not os.path.exists(os.getcwd()+"/"+IMAGES_DIR):

    # Download the images directory.
    !wget -O {IMAGES_DIR + '.zip'} 'https://drive.google.com/uc?export=download&id=18t14YLm0nDc7USp550pIjslcZ3g5ZJ0t'

    # Extract the compressed directory.
    !unzip {os.getcwd() + "/" + IMAGES_DIR + '.zip'}
Load the Image
Read the image using the function cv2.imread() and display it utilizing the matplotlib library.
Note: In case you want to use a different source image, make sure to use an image of a person with neutral expressions to get the best results.
%matplotlib inline

# Specify the source image name.
image_name = 'imran.jpeg'

# Read the source image.
source_image = cv2.imread(os.path.join(os.getcwd(), IMAGES_DIR , image_name))

# Resize the image to make its width 720, while keeping its aspect ratio constant.
source_image = cv2.resize(source_image, dsize=(720, int((720/source_image.shape[1])*source_image.shape[0])))

# Display the image.
plt.imshow(source_image[:,:,::-1]);plt.title("Source Image");plt.axis("off");plt.show()
Step 3.1: Detect the face
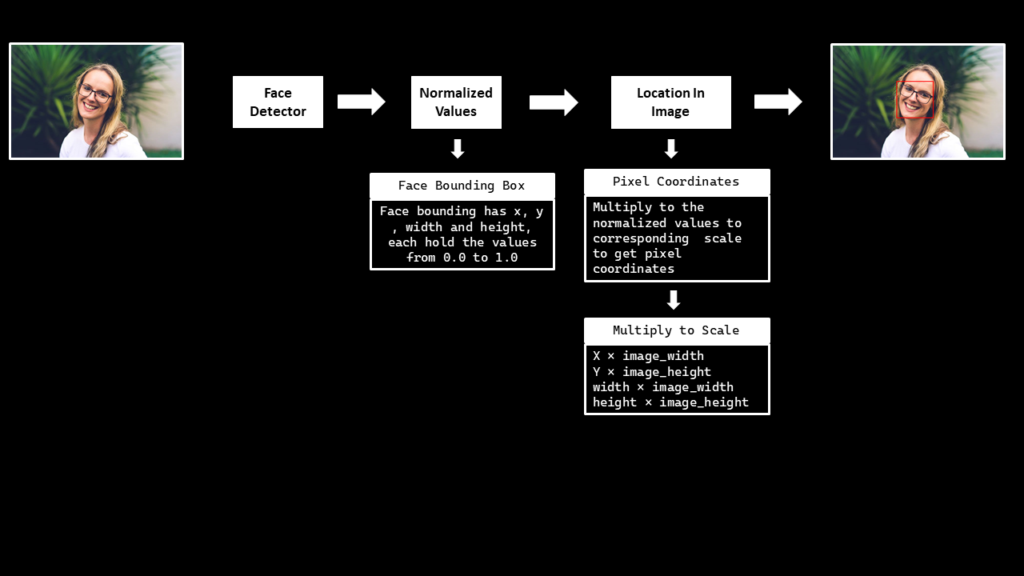
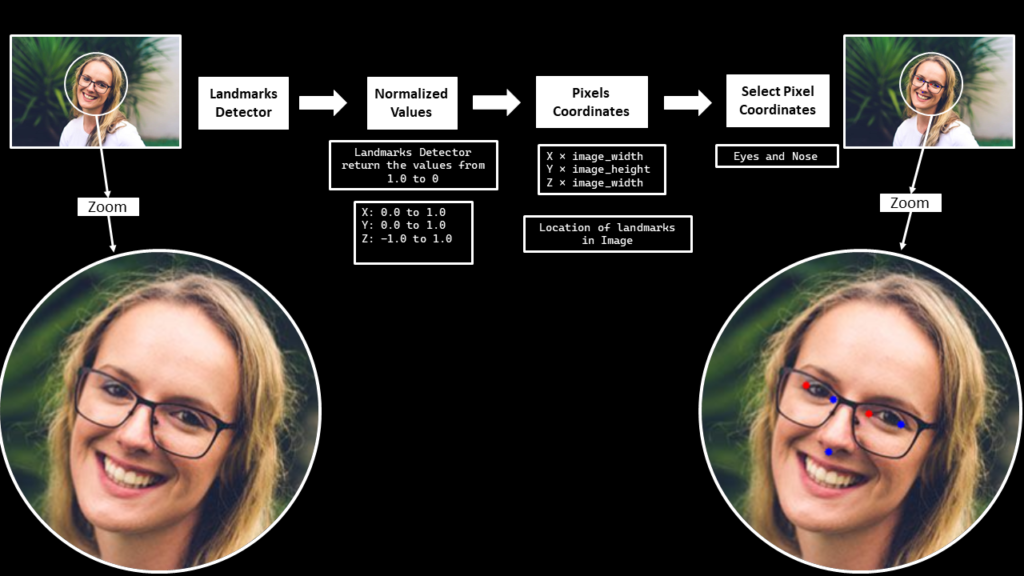
Similar to the driving video, we can’t pass the whole source image into the First-Order Motion Model, we have to crop the face from the image and then pass the face image into the model. For this we will need a Face Detector to get the Face Bounding Box coordinates and we will utilize the Mediapipe’s Face Detection Solution.
Initialize the Mediapipe Face Detection Model
To use the Mediapipe’s Face Detection solution, initialize the face detection class using the syntax mp.solutions.face_detection, and then call the function mp.solutions.face_detection.FaceDetection() with the arguments explained below:
model_selection– It is an integer index( i.e., 0 or 1 ). When set to0, a short-range model is selected that works best for faces within 2 meters from the camera, and when set to1, a full-range model is selected that works best for faces within 5 meters. Its default value is0.min_detection_confidence– It is the minimum detection confidence between([0.0, 1.0])required to consider the face-detection model’s prediction successful. Its default value is0.5( i.e., 50% ) which means that all the detections with prediction confidence less than0.5are ignored by default.
# Initialize the mediapipe face detection class.
mp_face_detection = mp.solutions.face_detection

# Setup the face detection function.
face_detection = mp_face_detection.FaceDetection(model_selection=0, min_detection_confidence=0.5)
Create a function to detect face
Create a function detect_face() that will utilize the Mediapipe’s Face Detection Solution to detect a face in an image and will return the bounding box coordinates of the detected face.
To perform the face detection, pass the image (in RGB format) into the loaded face detection model by using the function mp.solutions.face_detection.FaceDetection().process(). The output object returned will have an attribute detections that contains a list of a bounding box and six key points for each face in the image.
Note that the bounding boxes are composed of xmin and width (both normalized to [0.0, 1.0] by the image width) and ymin and height (both normalized to [0.0, 1.0] by the image height). Ignore the face key points for now as we are only interested in the bounding box coordinates.
After performing the detection, convert the bounding box coordinates back to their original scale utilizing the image width and height. Also draw the bounding box on a copy of the source image using the function cv2.rectangle().
def detect_face(image, face_detection, draw=False, display=True):
    '''
    This function performs face detection, converts the bounding box coordinates back to their original scale,
    and returns the coordinates.
    Args:
        image:          The input image of the person's face whose face needs to be detected.
        face_detection: The Mediapipe's face detection function required to perform the face detection.
        draw:           A boolean value that is if set to true the function draws the face bounding box on the output image.
        display:        A boolean value that is if set to true the function displays the output image with
                        the face bounding box drawn and returns nothing.
    Returns:
        face_bbox: A tuple (xmin, ymin, box_width, box_height) containing the face bounding box coordinates.
    '''

    # Get the height and width of the input image.
    image_height, image_width, _ = image.shape

    # Create a copy of the input image to draw a face bounding box.
    output_image = image.copy()

    # Convert the image from BGR into RGB format.
    imgRGB = cv2.cvtColor(image, cv2.COLOR_BGR2RGB)

    # Perform the face detection on the image.
    face_detection_results = face_detection.process(imgRGB)

    # Initialize a tuple to store the face bounding box coordinates.
    face_bbox = ()

    # Check if the face(s) in the image are found.
    if face_detection_results.detections:

        # Iterate over the found faces.
        for face_no, face in enumerate(face_detection_results.detections):

            # Get the bounding box coordinates and convert them back to their original scale.
            xmin = int(face.location_data.relative_bounding_box.xmin * image_width)
            ymin = int(face.location_data.relative_bounding_box.ymin * image_height)
            box_width = int(face.location_data.relative_bounding_box.width * image_width)
            box_height = int(face.location_data.relative_bounding_box.height * image_height)

            # Update the bounding box tuple values.
            face_bbox = (xmin, ymin, box_width, box_height)

            # Check if the face bounding box is specified to be drawn.
            if draw:

                # Draw the face bounding box on the output image.
                cv2.rectangle(output_image, (xmin, ymin), (xmin+box_width, ymin+box_height), (0, 0, 255), 2)

    # Check if the output image is specified to be displayed.
    if display:

        # Display the output image.
        plt.figure(figsize=[15,15])
        plt.imshow(output_image[:,:,::-1]);plt.title("Output Image");plt.axis('off');

    # Otherwise.
    else:

        # Return the face bounding box coordinates.
        return face_bbox
Utilize the detect_face() function created above to detect the face in the source image and display the results.
# Perform face detection on the image.
detect_face(source_image, face_detection, draw=True, display=True)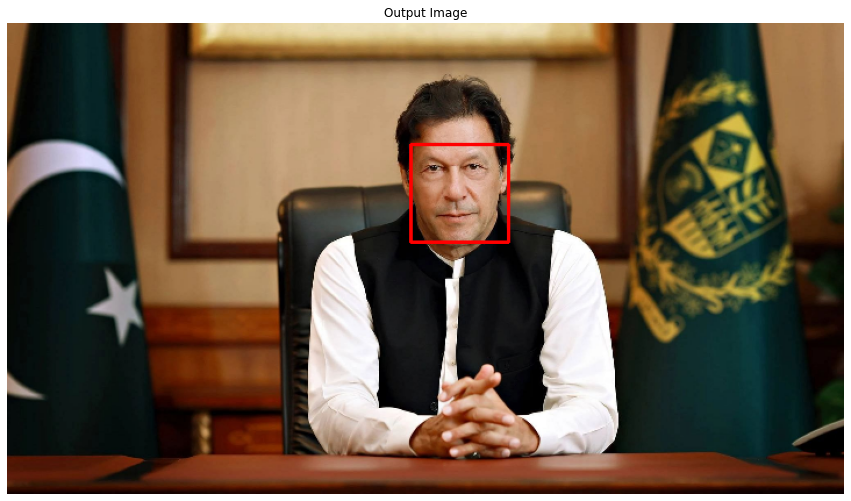
Nice! face detection is working perfectly.
Step 3.2: Align and crop the face
Another very important preprocessing step is the Face Alignment on the source image. Make sure that the face is properly aligned in the source image otherwise the model can generate weird/funny output results.
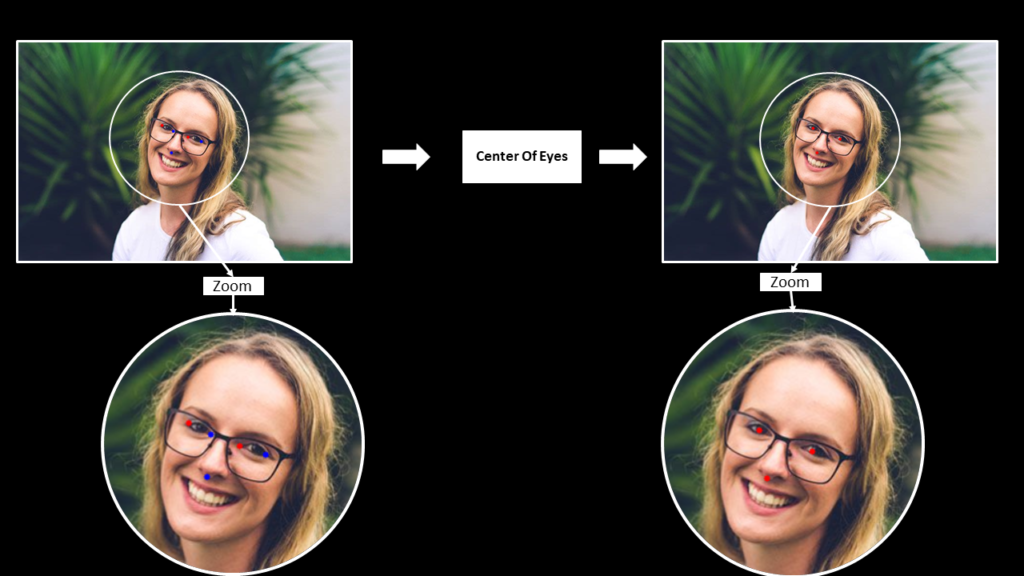
To align the face in the source image, first detect the 468 facial landmarks using Mediapipe’s Face Mesh Solution, then extract the eyes center and nose tip landmarks to calculate the face orientation and then finally rotate the image accordingly to align the face.
Initialize the Face Landmarks Detection Model
To use the Mediapipe’s Face Mesh solution, initialize the face mesh class using the syntax mp.solutions.face_mesh and call the function mp.solutions.face_mesh.FaceMesh() with the arguments explained below:
static_image_mode– It is a boolean value that is if set toFalse, the solution treats the input images as a video stream. It will try to detect faces in the first input images, and upon a successful detection further localizes the face landmarks. In subsequent images, once allmax_num_facesfaces are detected and the corresponding face landmarks are localized, it simply tracks those landmarks without invoking another detection until it loses track of any of the faces. This reduces latency and is ideal for processing video frames. If set toTrue, face detection runs on every input image, ideal for processing a batch of static, possibly unrelated, images. Its default value isFalse.max_num_faces– It is the maximum number of faces to detect. Its default value is1.refine_landmarks– It is a boolean value that is if set toTrue, the solution further refines the landmark coordinates around the eyes and lips, and outputs additional landmarks around the irises by applying the Attention Mesh Model. Its default value isFalse.min_detection_confidence– It is the minimum detection confidence([0.0, 1.0])required to consider the face-detection model’s prediction correct. Its default value is0.5which means that all the detections with prediction confidence less than 50% are ignored by default.min_tracking_confidence– It is the minimum tracking confidence([0.0, 1.0])from the landmark-tracking model for the face landmarks to be considered tracked successfully, or otherwise face detection will be invoked automatically on the next input image, so increasing its value increases the robustness, but also increases the latency. It is ignored ifstatic_image_modeisTrue, where face detection simply runs on every image. Its default value is0.5.
We will be working with images only, so we will have to set the static_image_mode to True. We will also define the eyes and nose landmarks indexes that are required to extract the eyes and nose landmarks.
# Initialize the mediapipe face mesh class.
mp_face_mesh = mp.solutions.face_mesh

# Set up the face landmarks function for images.
face_mesh = mp_face_mesh.FaceMesh(static_image_mode=True, max_num_faces=2,
                                  refine_landmarks=True, min_detection_confidence=0.5)

# Specify the nose and eyes indexes.
NOSE = 2
LEFT_EYE = [362, 263]  # [right_landmark  left_landmark]
RIGHT_EYE = [33, 133]  # [right_landmark  left_landmark]
Create a function to extract eyes and nose landmarks
Create a function extract_landmarks() that will utilize the Mediapipe’s Face Mesh Solution to detect the 468 Facial Landmarks and then extract the left and right eyes corner landmarks and the nose tip landmark.
To perform the Face(s) landmarks detection, pass the image to the face’s landmarks detection machine learning pipeline by using the function mp.solutions.face_mesh.FaceMesh().process(). But first, convert the image from BGR to RGB format using the function cv2.cvtColor() as OpenCV reads images in BGR format and the ml pipeline expects the input images to be in RGB color format.
The machine learning pipeline outputs an object that has an attribute multi_face_landmarks that contains the 468 3D facial landmarks for each detected face in the image. Each landmark has:
x– It is the landmark x-coordinate normalized to [0.0, 1.0] by the image width.y– It is the landmark y-coordinate normalized to [0.0, 1.0] by the image height.z– It is the landmark z-coordinate normalized to roughly the same scale asx. It represents the landmark depth with the center of the head being the origin, and the smaller the value is, the closer the landmark is to the camera.
After performing face landmarks detection on the image, convert the landmarks’ x and y coordinates back to their original scale utilizing the image width and height and then extract the required landmarks utilizing the indexes we had specified earlier. Also draw the extracted landmarks on a copy of the source image using the function cv2.circle(), just for visualization purposes.
def extract_landmarks(image, face_mesh, draw=False, display=True):
    '''
    This function performs face landmarks detection, converts the landmarks x and y coordinates back to their original scale,
    and extracts left and right eyes corner landmarks and the nose tip landmark.
    Args:
        image:     The input image of the person's face whose facial landmarks needs to be extracted.
        face_mesh: The Mediapipe's face landmarks detection function required to perform the landmarks detection.
        draw:      A boolean value that is if set to true the function draws the extracted landmarks on the output image.
        display:   A boolean value that is if set to true the function displays the output image with
                   the extracted landmarks drawn and returns nothing.
    Returns:
        extracted_landmarks: A list containing the left and right eyes corner landmarks and the nose tip landmark.
    '''

    # Get the height and width of the input image.
    height, width, _ = image.shape

    # Initialize an array to store the face landmarks.
    face_landmarks = np.array([])

    # Create a copy of the input image to draw facial landmarks.
    output_image = image.copy()

    # Convert the image from BGR into RGB format.
    imgRGB = cv2.cvtColor(image, cv2.COLOR_BGR2RGB)

    # Perform the facial landmarks detection on the image.
    results = face_mesh.process(imgRGB)

    # Check if facial landmarks are found.
    if results.multi_face_landmarks:

        # Iterate over the found faces.
        for face in results.multi_face_landmarks:

            # Convert the Face landmarks x and y coordinates into their original scale,
            # And store them into a numpy array.
            # For simplicity, we are only storing face landmarks of a single face,
            # you can extend it to work with multiple faces if you want.
            face_landmarks = np.array([(landmark.x*width, landmark.y*height)
                                        for landmark in face.landmark], dtype=np.int32)

        # Extract the right eye landmarks.
        right_eye_landmarks = [face_landmarks[RIGHT_EYE[0]], face_landmarks[RIGHT_EYE[1]]]

        # Extract the left eye landmarks.
        left_eye_landmarks = [face_landmarks[LEFT_EYE[0]], face_landmarks[LEFT_EYE[1]]]

        # Extract the nose tip landmark.
        nose_landmarks = face_landmarks[NOSE]

        # Initialize a list to store the extracted landmarks
        extracted_landmarks = [nose_landmarks, left_eye_landmarks, right_eye_landmarks]

        # Check if extracted landmarks are specified to be drawn.
        if draw:

            # Draw the left eye extracted landmarks.
            cv2.circle(output_image, tuple(left_eye_landmarks[0]), 3, (0, 0, 255), -1)
            cv2.circle(output_image, tuple(left_eye_landmarks[1]), 3, (255, 0, 0), -1)

            # Draw the right eye extracted landmarks.
            cv2.circle(output_image, tuple(right_eye_landmarks[0]), 3, (0, 0, 255), -1)
            cv2.circle(output_image, tuple(right_eye_landmarks[1]), 3, (255, 0, 0), -1)

            # Draw the nose landmark.
            cv2.circle(output_image, tuple(nose_landmarks), 3, (255, 0, 0), -1)

        # Check if the output image is specified to be displayed.
        if display:

            # Display the output image.
            plt.figure(figsize=[15,15])
            plt.imshow(output_image[:,:,::-1]);plt.title("Output Image");plt.axis('off');

        # Otherwise.
        else:

            # Return the extracted landamarks.
            return extracted_landmarks
Now we will utilize the extract_landmarks() function created above to detect and extract the eyes and nose landmarks and visualize the results.
# Extract the left and right eyes corner landmarks and the nose tip landmark.
extract_landmarks(source_image, face_mesh, draw=True, display=True)
Cool! it is accurately extracting the required landmarks.
Create a function to calculate eyes center
Create a function calculate_eyes_center() that will find the left and right eyes center landmarks by utilizing the eyes corner landmarks that we had extracted in the extract_landmarks() function created above.
def calculate_eyes_center(image, extracted_landmarks, draw=False, display=False):
    '''
    This function calculates the center landmarks of the left and right eye.
    Args:
        image:               The input image of the person's face whose eyes center landmarks needs to be calculated.
        extracted_landmarks: A list containing the left and right eyes corner landmarks and the nose tip landmark.
        draw:                A boolean value that is if set to true the function draws the eyes center and nose tip
                             landmarks on the output image.
        display:             A boolean value that is if set to true the function displays the output image with the
                             landmarks drawn and returns nothing.
    Returns:
        landmarks: A list containing the left and right eyes center landmarks and the nose tip landmark.
    '''

    # Create a copy of the input image to draw landmarks.
    output_image = image.copy()

    # Get the nose tip landmark.
    nose_landmark = extracted_landmarks[0]

    # Calculate the center landmarks of the left and right eye.
    left_eye_center = np.mean(extracted_landmarks[1], axis=0, dtype=np.int32)
    right_eye_center = np.mean(extracted_landmarks[2], axis=0, dtype=np.int32)

    # Initialize a list to store the left and right eyes center landmarks and the nose tip landmark.
    landmarks = [nose_landmark, left_eye_center, right_eye_center]

    # Check if the landmarks are specified to be drawn.
    if draw:

        # Draw the center landmarks of the left and right eye.
        cv2.circle(output_image, tuple(left_eye_center), 3, (0, 0, 255), -1)
        cv2.circle(output_image, tuple(right_eye_center), 3, (0, 0, 255), -1)

        # Draw the nose tip landmark.
        cv2.circle(output_image, tuple(nose_landmark), 3, (0, 0, 255), -1)

    # Check if the output image is specified to be displayed.
    if display:

        # Display the output image.
        plt.figure(figsize=[15,15])
        plt.imshow(output_image[:,:,::-1]);plt.title("Output Image");plt.axis('off');

    # Otherwise.
    else:

        # Return the left and right eyes center landmarks and the nose tip landmark.
        return landmarks
Use the extracted_landmarks() and the calculate_eyes_center() function to calculate the central landmarks of the left and right eyes on the source image.
# Get the left and right eyes center landmarks and the nose tip landmark.
extracted_landmarks = extract_landmarks(source_image, face_mesh, draw=False, display=False)
calculate_eyes_center(source_image, extracted_landmarks, draw=True, display=True)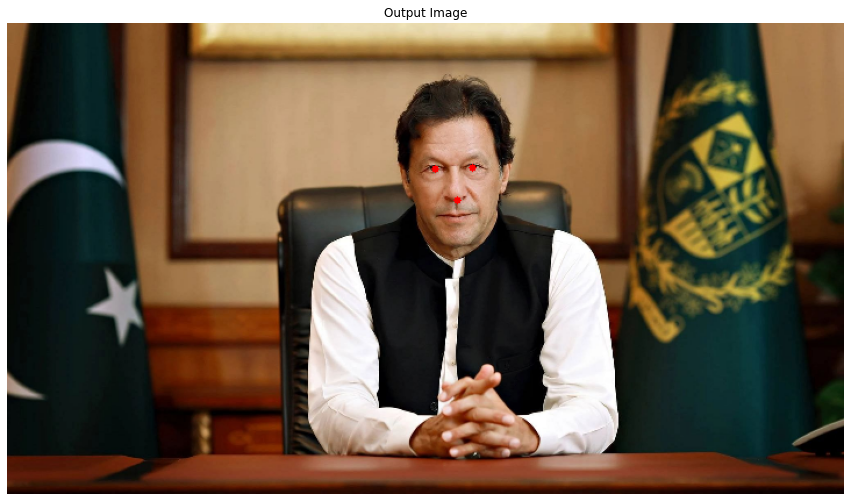
Working perfectly fine!
Create a function to rotate images
Create a function rotate_image() that will simply rotate an image in a counter-clockwise direction with a specific angle without losing any portion of the image.
def rotate_image(image, angle, display=True):
    '''
    This function rotates an image in counter-clockwise direction with a specific angle.
    Args:
        image:   The input image that needs to be rotated.
        angle:   It is the angle (in degrees) with which the image needs to be rotated. -ve values can rotate clockwise.
        display: A boolean value that is if set to true the function displays the original input image,
                 and the output rotated image and returns nothing.
    Returns:
        rotated_image: The image rotated in counter-clockwise direction with the specified angle.
    '''

    # Get the height and width of the input image.
    image_height, image_width, _ = image.shape

    # Get the center coordinate x and y values of the image.
    (center_x, center_y) = (image_width / 2, image_height / 2)

    # Get the rotation matrix to rotate the image with the specified angle at the same scale.
    rotation_matrix = cv2.getRotationMatrix2D(center=(center_x, center_y), angle=angle, scale=1.0)

    # Compute the new height and width of the image.
    new_height = int((image_height * np.abs(rotation_matrix[0, 0])) +
                     (image_width * np.abs(rotation_matrix[0, 1])))
    new_width = int((image_height * np.abs(rotation_matrix[0, 1])) +
                    (image_width * np.abs(rotation_matrix[0, 0])))

    # Adjust the rotation matrix accordingly to the new height and width.
    rotation_matrix[0, 2] += (new_width / 2) - center_x
    rotation_matrix[1, 2] += (new_height / 2) - center_y

    # Perform the actual rotation on the image.
    rotated_image = cv2.warpAffine(image.copy(), rotation_matrix, (new_width, new_height))

    # Check if the original input image and the output image are specified to be displayed.
    if display:

        # Display the original input image and the output image.
        plt.figure(figsize=[15,15])
        plt.subplot(121);plt.imshow(image[:,:,::-1]);plt.title("Original Image");plt.axis('off');
        plt.subplot(122);plt.imshow(rotated_image[:,:,::-1]);plt.title(f"Rotated Image angle:{angle}");plt.axis('off');

    # Otherwise.
    else:

        # Return the rotated image.
        return rotated_image
Utilize the rotate_image() function to rotate the source image at an angle of 45 degrees.
# Rotate the source image with an angle of 45 degrees.
rotated_img = rotate_image(source_image, 45, display= True)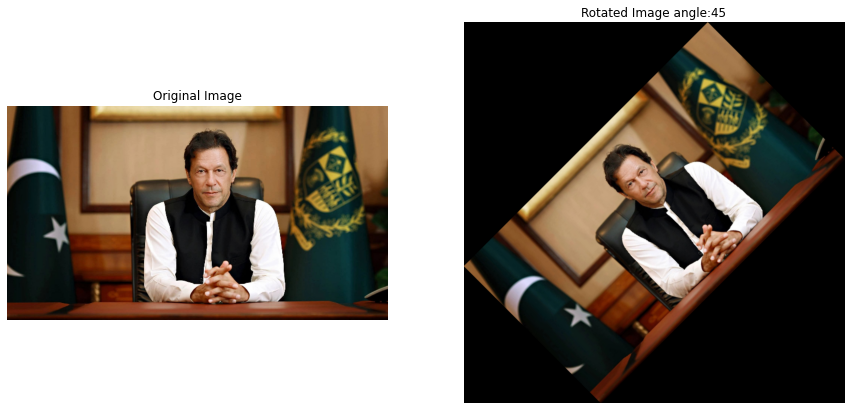
Rotation looks good, but rotating the image with a random angle will not bring us any good.
Create a function to find the face orientation
Create a function calculate_face_angle() that will find the face orientation, and then we will rotate the image accordingly utilizing the function rotate_image() created above, to appropriately align the face in the source image.
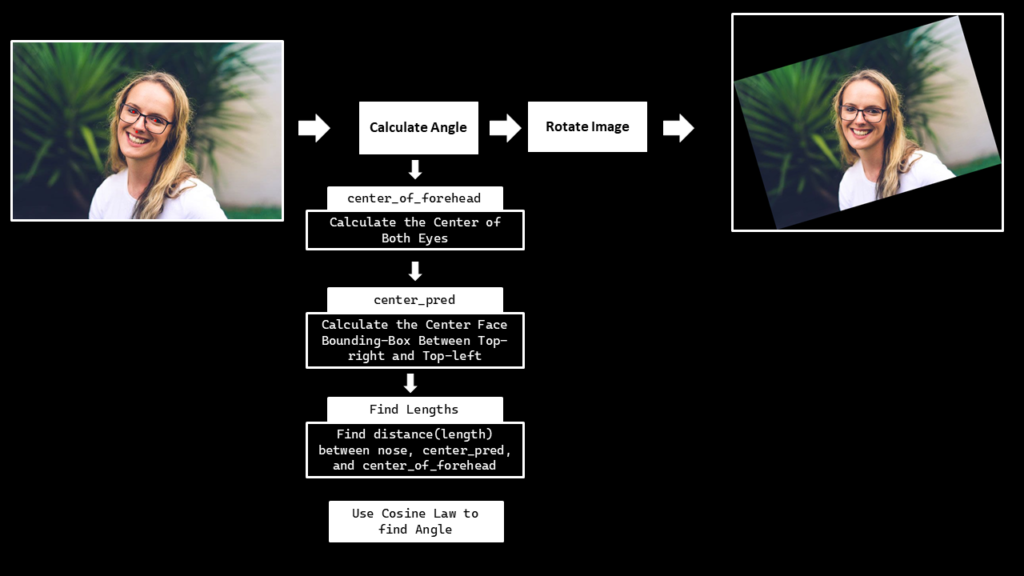
To find the face angle, first get the eyes and nose landmarks using the extract_landmarks() function then we will pass these landmarks to the calculate_eyes_center() function to get the eyes center landmarks, then utilizing the eyes center landmarks we will calculate the midpoint of the eyes i.e., the center of the forehead. And we will use the detect_face() function created in the previous step, to get the face bounding box coordinates and then utilize those coordinates to find the center_pred point i.e., the mid-point of the bounding box top-right and top_left coordinate.
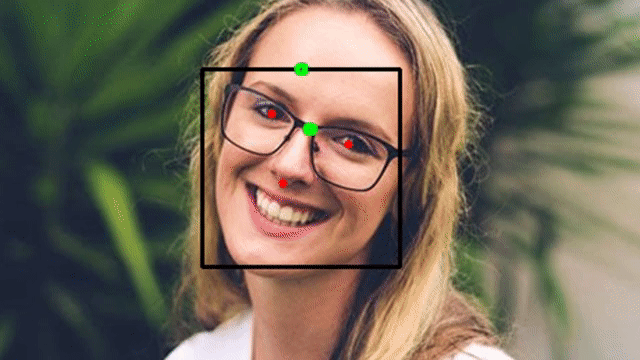
And then finally, find the distance between the nose, center_of_forehead and center_pred landmarks as shown in the gif above to calculate the face angle utilizing the famous cosine-law.
def calculate_face_angle(image, face_mesh, face_detection):
    '''
    This function calculates the face orientation in an image.
    Args:
        image:          The input image of the person whose face angle needs to be calculated.
        face_mesh:      The Mediapipe's face landmarks detection function required to perform the landmarks detection.
        face_detection: The Mediapipe's face detection function required to perform the face detection.
    Returns:
        angle: The calculated face angle in degrees.
    '''

    # Create a helper function to find distance between two points.
    def calculate_distance(point1, point2):
        '''
        This function calculates euclidean distance between two points.
        Args:
            point1: A tuple containing the x and y coordinates of the first point.
            point2: A tuple containing the x and y coordinates of the second point.
        Returns:
            distance: The distance calculated between the two points.
        '''

        # Calculate euclidean distance between the two points.
        distance = np.sqrt((point1[0] - point2[0]) ** 2 + (point1[1] - point2[1]) ** 2)

        # Return the calculated distance.
        return distance

    # Extract the left and right eyes corner landmarks and the nose tip landmark.
    nose_and_eyes_landmarks = extract_landmarks(image, face_mesh, draw=False, display=False)

    # Get the center of each eye, from Eyes Landmarks.
    nose, left_eye_center, right_eye_center = calculate_eyes_center(image, nose_and_eyes_landmarks, draw=False, display=False)

    # Calculate the midpoint of the eye center landmarks i.e., the center of the forehead.
    center_of_forehead = ((left_eye_center[0] + right_eye_center[0]) // 2,
                          (left_eye_center[1] + right_eye_center[1]) // 2,)

    # Get the face bounding box coordinates.
    xmin, ymin, box_width, box_height = detect_face(image, face_detection, display=False)

    # Get the mid-point of the bounding box top-right and top_left coordinate.
    center_pred = int(xmin + (box_width//2)), ymin

    # Find the distance between forehead and nose.
    length_line1 = calculate_distance(center_of_forehead, nose)

    # Find the distance between center_pred and nose.
    length_line2 = calculate_distance(center_pred, nose)

    # Find the distance between center_pred and center_of_forehead.
    length_line3 = calculate_distance(center_pred, center_of_forehead)

    # Use the cosine law to find the cos A.
    cos_a = -(length_line3 ** 2 - length_line2 ** 2 - length_line1 ** 2) / (2 * length_line2 * length_line1)

    # Get the inverse of the cosine function.
    angle = np.arccos(cos_a)

    # Set the nose tip landmark as the origin.
    origin_x, origin_y = nose

    # Get the center of forehead x and y coordinates.
    point_x, point_y = center_of_forehead

    # Rotate the x and y coordinates w.r.t the origin with the found angle.
    rotated_x = int(origin_x + np.cos(angle) * (point_x - origin_x) - np.sin(angle) * (point_y - origin_y))
    rotated_y = int(origin_y + np.sin(angle) * (point_x - origin_x) + np.cos(angle) * (point_y - origin_y))

    # Initialize a tuple to store the rotated points.
    rotated_point = rotated_x, rotated_y

    # Do some mathematics to find a few numbers that will help us determine whether the angle has to be positive or negative.
    c1 = ((center_of_forehead[0] - nose[0]) * (rotated_point[1] - nose[1]) - (center_of_forehead[1] - nose[1]) *
          (rotated_point[0] - nose[0]))

    c2 = ((center_pred[0] - center_of_forehead[0]) * (rotated_point[1] - center_of_forehead[1]) -
          (center_pred[1] - center_of_forehead[1]) * (rotated_point[0] - center_of_forehead[0]))

    c3 = ((nose[0] - center_pred[0]) * (rotated_point[1] - center_pred[1]) -
          (nose[1] - center_pred[1]) * (rotated_point[0] - center_pred[0]))

    # Check if the angle needs to be negative.
    if (c1 < 0 and c2 < 0 and c3 < 0) or (c1 > 0 and c2 > 0 and c3 > 0):

        # Make the angle -ve, and convert it into degrees.
        angle = np.degrees(-angle)

    # Otherwise.
    else:

        # Convert the angle into degrees.
        angle = np.degrees(angle)

    # Return the angle.
    return angle
Utilize the calculate_face_angle() function created above the find the face angle of the source image and display it.
# Calculate the face angle.
face_angle = calculate_face_angle(source_image, face_mesh, face_detection)
print(f'Face Angle: {face_angle}')
Face Angle: -8.50144759667417
Now that we have the face angle, we can move on to aligning the face in the source image.
Create a Function to Align the Face and Crop the Face Region
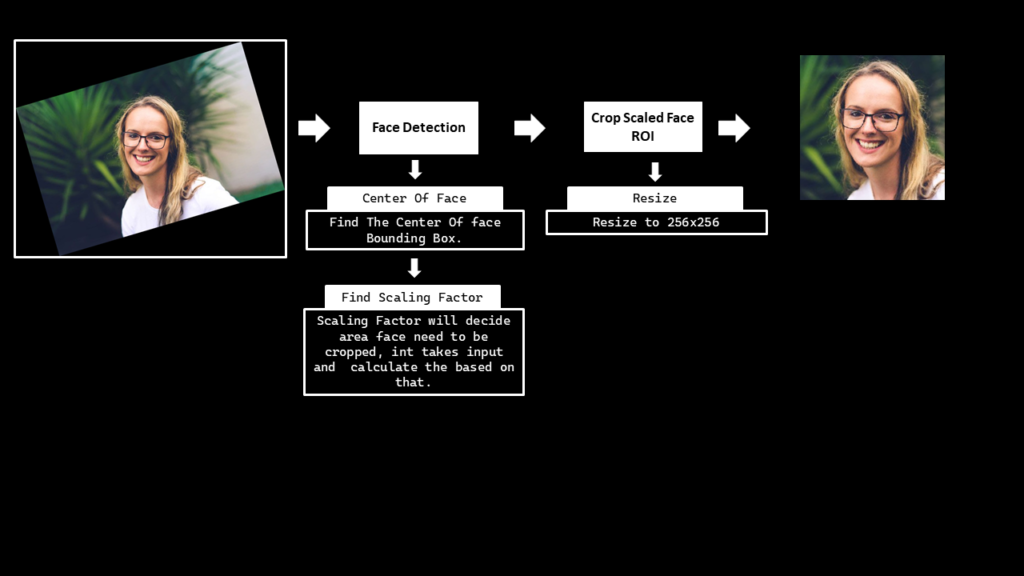
Create a function align_crop_face() that will first utilize the function calculate_face_angle() to get the face angle, then rotate the image accordingly utilizing the rotate_image() function and finally crop the face from the image utilizing the face bounding box coordinates (after scaling) returned by the detect_face() function. In the end, it will also resize the face image to the size 256x256 that is required by the First-Order Motion Model.
def align_crop_face(image, face_mesh, face_detection, face_scale_factor=1, display=True):
    '''
    This function aligns and crop the face and then resizes it into 256x256 dimensions.
    Args:
        image:             The input image of the person whose face needs to be aligned and cropped.
        face_mesh:         The Mediapipe's face landmarks detection function required to perform the landmarks detection.
        face_detection:    The Mediapipe's face detection function required to perform the face detection.
        face_scale_factor: The factor to scale up or down the face bouding box coordinates.
        display:           A boolean value that is if set to true the function displays the original input
                           image, rotated image and the face roi image.
    Returns:
        face_roi:   A copy of the aligned face roi of the input image.
        face_angle: The calculated face angle in degrees.
        face_bbox:  A tuple (xmin, ymin, xmax, ymax) containing the face bounding box coordinates.
    '''

    # Get the height and width of the input image.
    image_height, image_width, _ = image.shape

    # Get the angle of the face in the input image.
    face_angle = calculate_face_angle(image, face_mesh, face_detection)

    # Rotate the input image with the face angle.
    rotated_image = rotate_image(source_image, face_angle, display=False)

    # Perform face detection on the image.
    face_bbox = detect_face(rotated_image, face_detection, display=False)

    # Check if the face was detected in the image.
    if len(face_bbox) > 0:

        # Get the face bounding box coordinates.
        xmin, ymin, box_width, box_height  = face_bbox

        # Calculate the bottom right coordinate values of the face bounding box.
        xmax = xmin + box_width
        ymax = ymin + box_height

        # Get the face scale value according to the bounding box height.
        face_scale = int((box_height * face_scale_factor))

        # Add padding to the face bounding box.
        xmin = xmin - face_scale//2 if xmin - face_scale//2 > 0 else 0
        ymin = ymin - int(face_scale*1.8) if ymin - int(face_scale*1.8) > 0 else 0
        xmax = xmax + face_scale//2 if xmax + face_scale//2 < image_width else image_width
        ymax = ymax + int(face_scale/1.8) if ymax + int(face_scale/1.8) < image_height else image_height

        # Update the face bounding box tuple.
        face_bbox = (xmin, ymin, xmax, ymax)

        # Crop the face from the image.
        face_roi = rotated_image[ymin: ymax, xmin : xmax]

        # Resize the face region to 256x256 dimensions.
        face_roi = cv2.resize(face_roi, (256, 256), interpolation=cv2.INTER_AREA)

        # Save the image on the disk.
        cv2.imwrite('source_image.jpg', face_roi)

        # Check if the original input image, rotated image and the face roi image are specified to be displayed.
        if display:

            # Display the original input image, rotated image and the face roi image.
            plt.figure(figsize=[15,15])
            plt.subplot(131);plt.imshow(image[:,:,::-1]);plt.title("Original Image");plt.axis('off');
            plt.subplot(132);plt.imshow(rotated_image[:,:,::-1]);plt.title(f"Rotated Image angle: {round(face_angle, 2)}");plt.axis('off');
            plt.subplot(133);plt.imshow(face_roi[:,:,::-1]);plt.title(f"Face ROI");plt.axis('off');


        # Return the face roi, the face angle and the face bounding box.
        return face_roi, face_angle, face_bbox
Use the function align_crop_face() on the source image and visualize the results.
Make sure that the whole face is present in the cropped face ROI results. Increase/decrease the face_scale_factor value if you are testing this colab on a different source image. Increase the value if the face is being cropped in the source image and decrease the value if the face ROI image contains too much background.
# Perform face alignment and crop the face.
face_roi, face_angle, face_bbox = align_crop_face(source_image, face_mesh, face_detection,
                                                  face_scale_factor=0.3, display=True)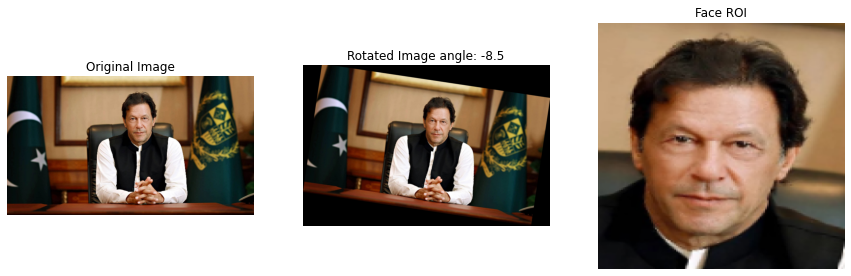
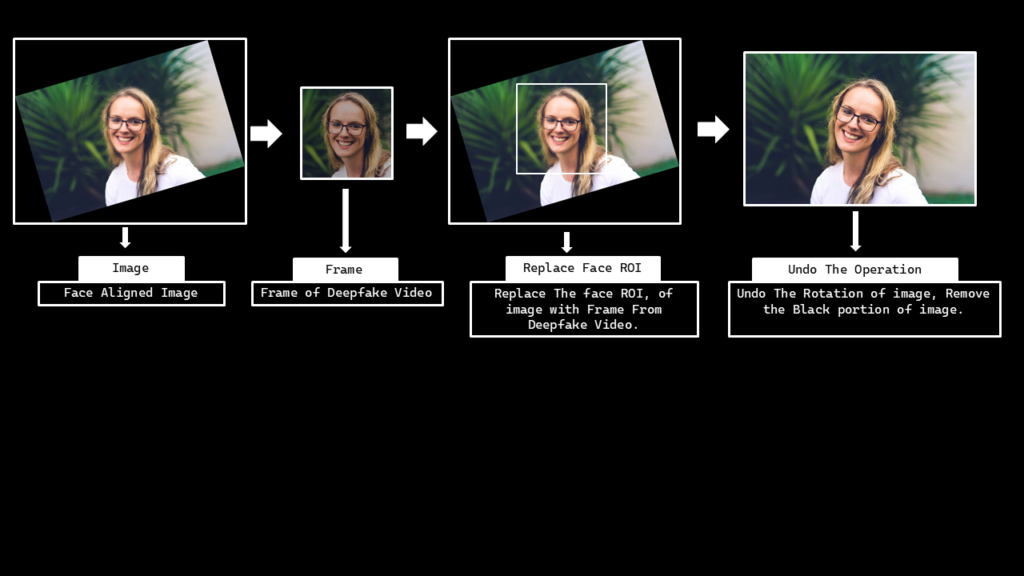
I must say its looking good! all the preprocessing steps went as we intended. But now comes a post-processing step, after generating the output from the First-Order Motion Model.
Remember that later on, we will have to embed the manipulated face back into the source image, so a function to restore the source image’s original state after embedding the output is also required.
Create a function to restore the original source image
So now we will create a function restore_source_image() that will undo the rotation we had applied on the image and will remove the black borders which appeared after the rotation.
def restore_source_image(rotated_image, rotation_angle, image_size, display=True):
    '''
    This function undoes the rotation and removes the black borders of an image.
    Args:
        rotated_image:  The rotated image which needs to be restored.
        rotation_angle: The angle with which the image was rotated.
        image_size:     A tuple containing the original height and width of the image.
        display:        A boolean value that is if set to true the function displays the original
                        input image, and the output image and returns nothing.
    Returns:
        output_image: The rotated image after being restored to its original state.
    '''

    # Get the height and width of the image.
    height, width = image_size

    # Undo the rotation of the image by rotating again with a -ve angle.
    output_image = rotate_image(rotated_image, -rotation_angle, display=False)

    # Find the center of the image.
    center_x = output_image.shape[1] // 2
    center_y = output_image.shape[0] // 2

    # Crop the undo_rotation image, and remove the black borders.
    output_image = output_image[center_y - height//2 : center_y + height//2,
                                center_x - width//2 : center_x + width//2]

    # Check if the original input image and the output image are specified to be displayed.
    if display:

        # Display the original input image and the output image.
        plt.figure(figsize=[15,15])
        plt.subplot(121);plt.imshow(rotated_image[:,:,::-1]);plt.title("Rotated Image");plt.axis('off');
        plt.subplot(122);plt.imshow(output_image[:,:,::-1]);plt.title(f"Restored Image");plt.axis('off');

    # Otherwise.
    else:

        # Return the output image.
        return output_image
Utilize the calculate_face_angle() and rotate_image() function to create a rotated image and then check if the restore_source_image() can restore the images original state by undoing the rotation and removing the black borders from image.
# Calculate the face angle and rotate the image with the face angle.
face_angle = calculate_face_angle(source_image, face_mesh, face_detection)
rotated_image = rotate_image(source_image, face_angle, display=False)

# Restore the rotated image.
restore_source_image(rotated_image, face_angle, image_size=source_image.shape[:2], display=True)
Step 4: Create the DeepFake
Now that the source image and driving video is ready, so now in this step, we will create a DeepFake video.
Step 4.1: Download the First-Order Motion Model
Now we will download the required pre-trained network from the Yandex Disk Models. We have multiple options there, but since we are only interested in face manipulation, we will only download the vox-adv-cpk.pth.tar file.
# Specify the name of the file.
filename ='vox-adv-cpk.pth.tar'

# Download the pre-trained network.
download = requests.get(requests.get('https://cloud-api.yandex.net/v1/disk/public/resources/download?public_key=https://yadi.sk/d/lEw8uRm140L_eQ&path=/' + filename).json().get('href'))

# Open the file and write the downloaded content.
with open(filename, 'wb') as checkpoint:
	checkpoint.write(download.content)
Create a function to display the results
Create a function display_results() that will concatenate the source image, driving video, and the generated video together and will show the results.
def display_results(source_image, driving_video, generated_video=None):
    '''
    This function stacks and displays the source image, driving video, and generated video together.
    Args:
        source_image: The source image ((contains facial appearance info)) that is used to create the deepfake video.
        driving_video: The driving video (contains facial motion info) that is used to create the deepfake video.
        generated_video: The deepfake video generated by combining the source image and the driving video.
    Returns:
        resultant_video: A stacked video containing the source image, driving video, and the generated video.
    '''

    # Create a figure.
    fig = plt.figure(figsize=(8 + 4 * (generated_video is not None), 6))

    # Create a list to store the frames of the resultant_video.
    frames = []

    # Iterate the number of times equal to the number of frames in the driving video.
    for i in range(len(driving_video)):

        # Create a list to store the stack elements.
        stack = [source_image]

        # Append the driving video into the stack.
        stack.append(driving_video[i])

        # Check if a valid generated video is passed.
        if generated_video is not None:

            # Append the generated video into the stack.
            stack.append(generated_video[i])

        # Concatenate all the elements in the stack.
        stacked_image = plt.imshow(np.concatenate(stack, axis=1), animated=True)

        # Turn off the axis.
        plt.axis('off')

        # Append the image into the list.
        frames.append([stacked_image])

    # Create the stacked video.
    resultant_video = animation.ArtistAnimation(fig, frames, interval=50, repeat_delay=1000)

    # Close the figure window.
    plt.close()

    # Return the results.
    return resultant_video
Step 4.2: Load source image and driving video (Face cropped)
Load the pre-processed source image and the driving video and then display them utilizing the display_results() function created above.
# Ignore the warnings.
warnings.filterwarnings("ignore")

# Load the Source Image and the driving video.
source_image = imageio.imread('source_image.jpg')
driving_video = imageio.mimread('crop.mp4')

# Resize the Source Image and the driving video to 256x256.
source_image = resize(source_image, (256, 256))[..., :3]
driving_video = [resize(frame, (256, 256))[..., :3] for frame in driving_video]

# Display the Source Image and the driving video.
HTML(display_results(source_image, driving_video).to_html5_video())
Step 4.3: Generate the video
Now that everything is ready, utilize the demo.py script that was imported earlier to finally generate the DeepFake video. First load the model file that was downloaded earlier along with the configuration file that was available in the First-Order-Model repository that was cloned. And then generate the video utilizing the demo.make_animation() function and display the results utilizing the display_results() function.
# Load the pre-trained (check points) network and config file.
generator, kp_detector = demo.load_checkpoints(config_path='config/vox-256.yaml',
                                               checkpoint_path='vox-adv-cpk.pth.tar')
# Create the deepfake video.
predictions = demo.make_animation(source_image, driving_video, generator, kp_detector, relative=True)

# Read the driving video, to get details, like FPS, duration etc.
reader = imageio.get_reader('crop.mp4')

# Get the Frame Per Second (fps) information.
fps = reader.get_meta_data()['fps']

# Save the generated video to the disk.
imageio.mimsave('results.mp4', [img_as_ubyte(frame) for frame in predictions], fps=fps)

# Display the source image, driving video and the generated video.
HTML(display_results(source_image, driving_video, predictions).to_html5_video())
Step 4.4: Embed the manipulated face into the source image
Create a function embed_face() that will simply insert the manipulated face in the generated video back to the source image.
def embed_face(source_image, source_image_data, generated_video_path, debugging=False):
    '''
    This function inserts the manipulated face in the generated video back to the source image.
    Args:
        source_image:         The original source image from which the face was cropped.
        source_image_data:    A list containing the information required to embed the face back to the source image.
        generated_video_path: The path where the video generated by the model is stored.
        debugging:            A boolean value that is if set to True, the intermediate steps are displayed.
    Returns:
        output_video_path: The path where the output video is stored.
    '''

    # Resize the image to make its width 720, while keeping its aspect ratio constant.
    source_image = cv2.resize(source_image, dsize=(720, int((720/source_image.shape[1])*source_image.shape[0])))

    # Get the height and width of the image.
    height, width, _ = source_image.shape

    # Get the face coordinates in the original image and calculate the face angle.
    (xmin, ymin, xmax, ymax), face_angle = source_image_data

    # Rotate the source image with the face angle.
    rotated_image = rotate_image(source_image, face_angle, display=False)

    # Get the height and width of the rotated image.
    rotated_height, rotated_width, _ = rotated_image.shape

    # Create a black image with size equal to the rotated image.
    mask = np.zeros(shape=(rotated_height, rotated_width), dtype=np.uint8)

    # Get the width and height of the face bounding box.
    bbox_width, bbox_height = xmax-xmin, ymax-ymin

    # Calculate the center coordinate of the face bounding box.
    center_x, center_y = xmin+(bbox_width//2), ymin+(bbox_height//2)

    # Initialize a variable to store the weight.
    weight = 1

    # Get the approximate width and height of the face in the bounding box.
    roi_width = int(bbox_width/1.3)
    roi_height = int(bbox_height/1.2)

    # Draw a white filled rectangle at the center of the face bounding box on the mask image.
    mask = cv2.rectangle(mask, (center_x-(roi_width//2), center_y-(roi_height//2)),
                             (center_x+(roi_width//2), center_y+(roi_height//2)),
                             (255*weight), thickness=-1)

    # Iterate until the roi size is less than the face bounding box.
    while roi_width<bbox_width and roi_height<bbox_height:

        # Draw a gray rectangle around the face rectangle on the mask image.
        # This will help in blending the face roi in the source image.
        mask = cv2.rectangle(mask, (center_x-(roi_width//2), center_y-(roi_height//2)),
                             (center_x+(roi_width//2), center_y+(roi_height//2)),
                             (255*weight), thickness=int(roi_height/40))

        # Check if the roi width is less than the face bounding box width.
        if roi_width<bbox_width:

            # Increment the roi width.
            roi_width+=bbox_width//40

        # Check if the roi height is less than the face bounding box height.
        if roi_height<bbox_height:

            # Increment the roi height.
            roi_height+=bbox_height//40

        # Decrement the weightage.
        weight-=0.1

    # Draw a rectangle at the edge of the face bounding box.
    mask = cv2.rectangle(mask, (center_x-(roi_width//2), center_y-(roi_height//2)),
                             (center_x+(roi_width//2), center_y+(roi_height//2)),
                             (255*weight), thickness=int(roi_height/40))


    # Load the generated video file.
    video_reader = cv2.VideoCapture(generated_video_path)

    # Define the Codec for Video Writer.
    fourcc = cv2.VideoWriter_fourcc(*"XVID")

    # Specify the path to store the final video.
    output_video_path = "final_video.mp4"

    # Initialize the video writer.
    video_writer = cv2.VideoWriter(output_video_path, fourcc, 24, (1280, int((1280/width)*height)))

    # Merge the mask three times to make it a three channel image.
    mask = cv2.merge((mask, mask, mask)).astype(float)/255

    # Iterate until the video is accessed successfully.
    while video_reader.isOpened():

        # Read a frame.
        ok, frame = video_reader.read()

        # Check if the frame is not read properly then break the loop.
        if not ok:
            break

        # Resize the frame to match the size of the cropped (face) region.
        frame = cv2.resize(frame, dsize=(xmax-xmin, ymax-ymin))

        # Create a copy of the rotated image.
        rotated_frame = rotated_image.copy()

        # Embed the face from the generated video into the rotated source image.
        rotated_frame[ymin: ymax, xmin : xmax] = frame

        # Blend the edges of the image.
        output_image = (((1-mask)) * rotated_image.astype(float)) + (rotated_frame.astype(float) * (mask))

        # Undo the rotation and remove the black borders.
        output_image = restore_source_image(output_image.astype(np.uint8), face_angle, image_size=source_image.shape[:2],
                                            display=False)

        # Resize the image to make its width 1280, while keeping its aspect ratio constant.
        output_image = cv2.resize(output_image, dsize=(1280, int((1280/width)*height)))

        # Write the frame.
        video_writer.write(output_image)

        # Check if debugging is enabled.
        if debugging:

            # Display the intermediate steps.
            plt.figure(figsize=[15,15])
            plt.subplot(121);plt.imshow(mask, cmap='gray');plt.title("Mask Image");plt.axis('off');
            plt.subplot(122);plt.imshow(output_image[:,:,::-1]);plt.title(f"Output Image");plt.axis('off');
            break


    # Release the video writer, video reader and close all the windows.
    video_writer.release()
    video_reader.release()
    cv2.destroyAllWindows()

    # Return the output video path.
    return output_video_path
Now let’s utilize the function embed_face() to insert the manipulated face into the source image.
# Discard the output of this cell.
%%capture

# Embed the face into the source image.
video_path = embed_face(cv2.imread(os.path.join(os.getcwd(), IMAGES_DIR , image_name)),
                        source_image_data=[face_bbox, face_angle], generated_video_path="results.mp4",
                        debugging=False)

# Check if the video with the FPS already exists.
if os.path.exists('final_video_with_fps.mp4'):

    # Remove the video.
    os.remove('final_video_with_fps.mp4')

# Add FPS information to the video.
!ffmpeg -i {video_path} -filter:v fps=fps=23 final_video_with_fps.mp4
The video is now stored on the disk, so now we can display it to see what the final result looks like.
# Download the video.
files.download('result_with_audio.mp4')

# Load the video.
video = open("result_with_audio.mp4", "rb").read()

# Decode the video.
data_url = "data:video/mp4;base64," + b64encode(video).decode()

# Display the video.
HTML(f"""<video width=400 controls><source src="{data_url}" type="video/mp4"></video>""")
Step 5: Add Audio (of the Driving Video) to the DeepFake Output Video
In the last step, first copy the audio from the driving video into the generated video and then download the video on the disk.
# Discard the output of this cell.
%%capture

# Check if the video with the audio already exists.
if os.path.exists('result_with_audio.mp4'):

    # Remove the video.
    os.remove('result_with_audio.mp4')

# Copy audio from the driving video into the generated video.
!ffmpeg -i crop.mp4 -i final_video_with_fps.mp4 -c copy -map 1:v:0 -map 0:a:0 -shortest result_with_audio.mp4
# Download the video.
files.download('result_with_audio.mp4')The video should have started downloading in your system.
Bonus: Generate more examples
Now let’s try to generate more videos with different source images.
# Discard the output of this cell.
%%capture

# Specify the path of the source image.
image_path = 'elon.jpeg' # face_scale_factor=0.45
# image_path = 'drstrange.jpeg' # face_scale_factor= 0.55
# image_path = 'johnny.jpeg' # face_scale_factor=0.7
# image_path = 'mark.jpeg' # face_scale_factor=0.55

# Read another source image.
source_image = cv2.imread(os.path.join(os.getcwd(), IMAGES_DIR , image_path))

# Resize the image to make its width 720, while keeping its aspect ratio constant.
source_image = cv2.resize(source_image, dsize=(720, int((720/source_image.shape[1])*source_image.shape[0])))

# Perform face alignment and crop the face.
face_roi, angle, bbox = align_crop_face(source_image, face_mesh, face_detection,
                                        face_scale_factor=0.45, display=False)

# Resize the Source Image to 256x256.
face_roi = resize(face_roi, (256, 256))[..., :3]

# Create the deepfake video.
predictions = demo.make_animation(face_roi[:,:,::-1], driving_video, generator, kp_detector, relative=True)

# Read the driving video, to get details, like FPS, duration etc.And get the Frame Per Second (fps) information.
reader = imageio.get_reader('crop.mp4')
fps = reader.get_meta_data()['fps']

# Save the generated video to the disk.
imageio.mimsave('generated_results.mp4', [img_as_ubyte(frame) for frame in predictions], fps=fps)

# Embed the face into the source image.
video_path = embed_face(source_image, source_image_data=[bbox, angle], generated_video_path="generated_results.mp4")

# Check if the video with the FPS already exists.
if os.path.exists('final_video_with_fps.mp4'):

    # Remove the video.
    os.remove('final_video_with_fps.mp4')

# Add FPS information to the video.
!ffmpeg -i {video_path} -filter:v fps=fps=23 final_video_with_fps.mp4

# Check if the video with the FPS already exists.
if os.path.exists('result_with_audio.mp4'):

    # Remove the video.
    os.remove('result_with_audio.mp4')

# Copy audio from the driving video into the generated video.
!ffmpeg -i crop.mp4 -i final_video_with_fps.mp4 -c copy -map 1:v:0 -map 0:a:0 -shortest result_with_audio.mp4
# Download the video.
files.download('result_with_audio.mp4')
# Load the video.
video = open("result_with_audio.mp4", "rb").read()
# Decode the video.
data_url = "data:video/mp4;base64," + b64encode(video).decode()
# Display the video.
HTML(f"""<video width=400 controls><source src="{data_url}" type="video/mp4"></video>""")And here are a few more results on different sample images:
After Johnny Depp, comes Mark Zuckerberg sponsoring Bleed AI.
And last but not least, of course, comes someone from the Marvel Universe, yes it’s Dr. Strange himself asking you to visit Bleed AI.
You can now share these videos that you have generated on social media. Make sure that you mention that it is a DeepFake video in the post’s caption.
Conclusion
One of the current limitations of the approach we are using is when the person is moving too much in the driving video. The final results will be terrible because we are only getting the face ROI video from the First-Order Motion Model and then embedding the face video into the source image using image processing techniques. We can’t move the body of the person in the source image if the face is moving in the generated face ROI video. So for the driving videos in which the person is moving too much, you can skip the face embedding part or just train a First-Order Motion Model to manipulate the whole body instead of just the face, I might cover that in a future post.
A Message on Deepfakes by Taha
These days, It’s not a difficult job to create a DeepFake video, as you can see, anyone with access to the colab repo (provided when you download the code) can generate deepfakes in minutes.
Now these fakes are although realistic but you should be easily be able to tell between fake manipulation and real ones, this is because the model is particularly designed for faster interference, there are other approaches where it can take hours or days to render deepfakes but those are very hard to tell from real ones.
The model I used today, is not new but it’s already been out there for a few years (Fun fact: we were actually working on this blogpost since mid of last year so yeah this got delayed for more than a year) Anyways, the point is, the deepfake technology is fast evolving and leads to two things,
1) Easier accessibility: More and more high-level tools and coming which makes the barrier to entry easier and more non-technical people can use these tools to generate deepfakes, I’m sure you know some mobile apps that let common generate these.
2) Algorithms: algorithms are getting better and better such that, you’re going to find a lot of difficulty in identifying a deepfake vs a real video. Today, professional deepfake creators actually export the output of a deepfake model to a video editor and get rid of bad frames or correct them so people are not able to easily figure out if it’s a fake and it makes sense if the model generates a 10 sec (30fps) frames then not all 300 outputs are going to be perfect.
Obviously, deepfake tech has many harmful effects, it has been used to generate fake news, spread propaganda, and create pornography but it also has its creative use cases in the entertainment industry (check wombo) and in the content industry, just check out the amazing work syntheisia.io is doing and how it had helped people and companies.
One thing you might wonder is that in these times, how should you equip yourself to spot deepfakes?
Well, there are certainly some things you can do to better prepare yourself, for one, you can learn a thing or two about digital forensics and how you can spot the fakes from anomalies, pixel manipulations, metadata, etc.
Even as a non-tech consumer you can do a lot in identifying a fake from a real video by fact-checking and finding the original source of the video. For e.g. if you find your country’s president talking about starting a nuclear war with North Korea on some random person’s Twitter, then it’s probably fake no matter how real the scene looks. An excellent resource to learn about fact-checking is this youtube series called Navigating Digital Information by Crashcourse. Do check it out.
[optin-monster slug=”n7m5f6assjorcd80egr9″]


Join My Course Computer Vision For Building Cutting Edge Applications Course

The only course out there that goes beyond basic AI Applications and teaches you how to create next-level apps that utilize physics, deep learning, classical image processing, hand and body gestures. Don’t miss your chance to level up and take your career to new heights
You’ll Learn about:
- Creating GUI interfaces for python AI scripts.
- Creating .exe DL applications
- Using a Physics library in Python & integrating it with AI
- Advance Image Processing Skills
- Advance Gesture Recognition with Mediapipe
- Task Automation with AI & CV
- Training an SVM machine Learning Model.
- Creating & Cleaning an ML dataset from scratch.
- Training DL models & how to use CNN’s & LSTMS.
- Creating 10 Advance AI/CV Applications
- & More
Whether you’re a seasoned AI professional or someone just looking to start out in AI, this is the course that will teach you, how to Architect & Build complex, real world and thrilling AI applications
Ready to seriously dive into State of the Art AI & Computer Vision?
Then Sign up for these premium Courses by Bleed AI


0 Comments