Watch the Video Tutorial for this post here
Did you know that you can actually stream a Live Video wirelessly from your phone’s camera to OpenCV’s cv2.VideoCapture() function in your PC and do all sorts of image processing on the spot like build an intruder detection system?
Cool huh?
In today’s post not only we will do just that but we will also build a robust Intruder Detection surveillance system on top of that, this will record video samples whenever someone enters your room and will also send you alert messages via Twilio API.
This post will serve as your building blocks for making a smart intruder detection system with computer vision. Although I’m making this tutorial for a home surveillance experiment, you can easily take this setup and swap the mobile camera with multiple IP Cams to create a much larger system.
Today’s tutorial can be split into 4 parts:
- Accessing the Live stream from your phone to OpenCV.
- Learning how to use the Twilio API to send Alert messages.
- Building a Motion Detector with Background Subtraction and Contour detection.
- Making the Final Application
You can watch the full application demo here
So most of the people have used the cv2.videocapture() function to read from a webcam or a video recording from a disk but only a few people know how easy it is to stream a video from a URL, in most cases this URL is from an IP camera.
By the way with cv2.VideoCapture() you can also read a sequence of images, so yeah a GIF can be read by this.
So let me list out all 4 ways to use VideoCapture() class depending upon what you pass inside the function.
1. Using Live camera feed: You pass in an integer number i.e. 0,1,2 etc e.g. cap = cv2.VideoCapture(0), now you will be able to use your webcam live stream. The number depends upon how many USB cams you attach and on which port.
2. Playing a saved Video on Disk: You pass in the path to the video file e.g. cap = cv2.VideoCapture(Path_To_video).
3. Live Streaming from URL using Ip camera or similar: You can stream from a URL e.g. cap = cv2.VideoCapture( protocol://host:port/video) Note: that each video stream or IP camera feed has its own URL scheme.
4. Read a sequence of Images: You can also read sequences of images, e.g. GIF.
Part 1: Accessing the Live stream from your phone to OpenCV For The Intruder Detection System:
For those of you who have an Android phone can go ahead and install this IP Camera application from playstore.

For people that want to try a different application or those of you who want to try on their iPhone I would say that although you can follow along with this tutorial by installing a similar IP camera application on your phones but one issue that you could face is that the URL Scheme for each application would be different so you would need to figure that out, some application makes it really simple like the one I’m showing you today.
You can also use the same code I’m sharing here to work with an actual IP Camera, again the only difference will be the URL scheme, different IP Cameras have different URL schemes. For our IP Camera, the URL Scheme is: protocol://host:port/video
After installing the IP Camera application, open it and scroll all the way down and click start server.
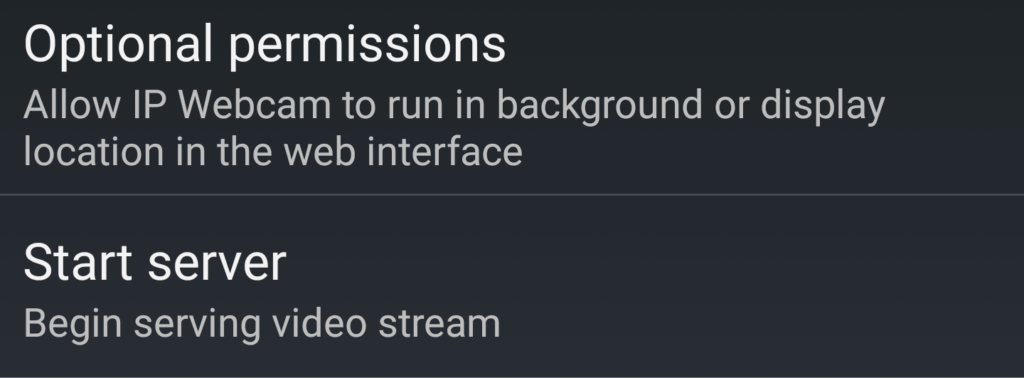
After starting the server the application will start streaming the video to the highlighted URL:

If you paste this URL in the browser of your computer then you would see this:

Note: Your computer and mobile must be connected to the same Network
Click on the Browser or the Flash button and you’ll see a live stream of your video feed:
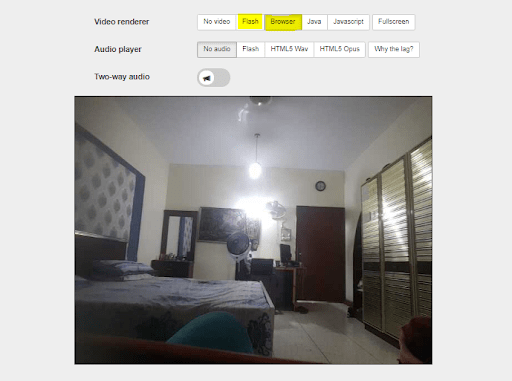
Below the live feed, you’ll see many options on how to stream your video, you can try changing these options and see effects take place in real-time.
Some important properties to focus on are the video Quality, FPS, and the resolution of the video. All these things determine the latency of the video. You can also change front/back cameras.
Try copying the image Address of the frame:

If you try pasting the address in a new tab then you will only see the video stream. So this is the address that will go inside the VideoCapture function.
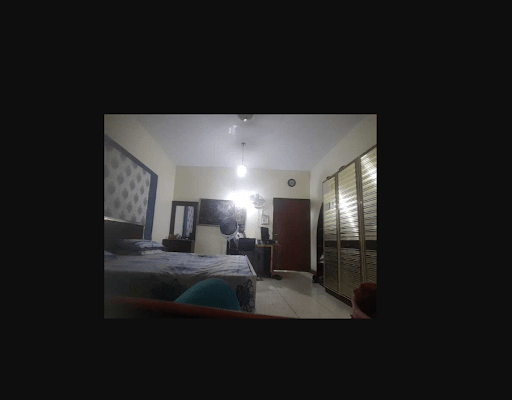
Image Address: http://192.168.18.4:8080/video
So the URL scheme in our case is : protocol://host:port/video, where protocol is “http” , host is: “192.168.18.4” and port is: “8080”
All you have to do is paste the above address inside the VideoCapture function and you’re all set.
Download Code
[optin-monster slug=”yi4hfsyqpz8k693x41yc”]
Here’s the Full Code:
# Import the required libraries
import numpy as np
import cv2
import time
import datetime
from collections import deque
# Set Window normal so we can resize it
cv2.namedWindow('frame', cv2.WINDOW_NORMAL)
# Note the starting time
start_time = time.time()
# Initialize these variables for calculating FPS
fps = 0
frame_counter = 0
# Read the video steram from the camera
cap = cv2.VideoCapture('http://192.168.18.4:8080/video')
while(True):
ret, frame = cap.read()
if not ret:
break
# Calculate the Average FPS
frame_counter += 1
fps = (frame_counter / (time.time() - start_time))
# Display the FPS
cv2.putText(frame, 'FPS: {:.2f}'.format(fps), (20, 20), cv2.FONT_HERSHEY_SIMPLEX, 0.6, (0, 0, 255),1)
# Show the Frame
cv2.imshow('frame',frame)
# Exit if q is pressed.
if cv2.waitKey(1) == ord('q'):
break
# Release Capture and destroy windows
cap.release()
cv2.destroyAllWindows()As you can see I’m able to stream video from my phone.
Now there are some options you may want to consider, for e.g you may want to change the resolution, in my case I have set the resolution to be `640×480`. Since I’m not using the web interface so I have used the app to set these settings.

There are also other useful settings that you may want to do, like settings up a password and a username so your stream is protected. Setting up a password would, of course, change the URL to something like:
cv2.VideoCapture( protocol://username:password@host:port/video)
I’ve also enabled background mode so even when I’m out of the app or my phone screen is closed the camera is recording secretly, now this is super stealth mode.
Finally here are some other URL Schemes to read this IP Camera stream, with these URLs you can even load audio and images from the stream:
- http://19412.168.3.:8080/video is the MJPEG URL.
- http://192.168.43.1:8080/shot.jpg fetches the latest frame.
- http://192.168.43.1:8080/audio.wav is the audio stream in Wav format.
- http://192.168.43.1:8080/audio.aac is the audio stream in AAC format (if supported by hardware).
Part 2: Learning how to use the Twilio API to send Alert messages for the Intruder Detection System:
What is Twilio?
Twilio is an online service that allows us to programmatically make and receive phone calls, send and receive SMS, MMS and even Whatsapp messages, using its web APIs.
Today we’ll just be using it to send an SMS, you won’t need to purchase anything since you get some free credits after you have signed up here.
So go ahead and sign up, after signing up go to the console interface and grab these two keys and your trial Number:
- ACCOUNT SID
- AUTH TOKEN

After getting these keys you would need to insert them in the credentials.txt file provided in the source code folder. You can download the folder from above.

Make sure to replace the `INSERT_YOUR_ACCOUNT_SID` with your ACCOUNT SID and also replace `INSERT_YOUR_AUTH_TOKEN` with your `AUTH TOKEN.`
There are also two other things you need to insert in the text file, this is your trail Number given to by the Twilio API and your personal number where you will receive the messages.

So replace `PERSONAL_NUMBER` with your number and `TRIAL_NUMBER` with the Twilio number, make sure to include the country code for your personal number.
Note: in the trail account the personal number can’t be any random number but its verified number. After you have created the account you can add verified numbers here.
Now you’re ready to use the twilio api, you first have to install the API by doing:
pip install twilio
Now just run this code to send a message:
from twilio.rest import Client

# Read text from the credentials file and store in data variable
with open('credentials.txt', 'r') as myfile:
  data = myfile.read()

# Convert data variable into dictionary
info_dict = eval(data)

# Your Account SID from twilio.com/console
account_sid = info_dict['account_sid']

# Your Auth Token from twilio.com/console
auth_token  = info_dict['auth_token']

# Set client and send the message
client = Client(account_sid, auth_token)
message = client.messages.create( to =info_dict['your_num'], from_ = info_dict['trial_num'], body= "What's Up Man")
Check your phone you would have received a message. Later on we’ll properly fill up the body text.
Part 3: Building a Motion Detector with Background Subtraction and Contour detection:
Now in OpenCV, there are multiple ways to detect and track a moving object, but we’re going to go for a simple background subtraction method.
What are Background Subtraction methods?
Basically these kinds of methods separate the background from the foreground in a video so for e.g. if a person walks in an empty room then the background subtraction algorithm would know there’s disturbance by subtracting the previously stored image of the room (without the person ) and the current image (with the person).
So background subtraction can be used as effective motion detectors and even object counters like a people counter, how many people went in or out of a shop.
Now what I’ve described above is a very basic approach to background subtraction, In OpenCV, you would find a number of complex algorithms that use background subtraction to detect motion, In my Computer Vision & Image Processing Course I have talked about background subtraction in detail. I have taught how to construct your own custom background subtraction methods and how to use the built-in OpenCV ones. So make sure to check out the course if you want to study computer vision in depth.
For this tutorial, I will be using a Gaussian Mixture-based Background / Foreground Segmentation Algorithm. It is based on two papers by Z.Zivkovic, “Improved adaptive Gaussian mixture model for background subtraction” in 2004 and “Efficient Adaptive Density Estimation per Image Pixel for the Task of Background Subtraction” in 2006
Here’s the code to apply background subtraction:
# load a video
cap = cv2.VideoCapture('sample_video.mp4')

# Create the background subtractor object
foog = cv2.createBackgroundSubtractorMOG2( detectShadows = True, varThreshold = 50, history = 2800)

while(1):

    ret, frame = cap.read()
    if not ret:
        break

    # Apply the background object on each frame
    fgmask = foog.apply(frame)

    # Get rid of the shadows
    ret, fgmask = cv2.threshold(fgmask, 250, 255, cv2.THRESH_BINARY)

    # Show the background subtraction frame.
    cv2.imshow('All three',fgmask)
    k = cv2.waitKey(10)
    if k == 27:
        break

cap.release()
cv2.destroyAllWindows()
The `cv2.createBackgroundSubtractorMOG2()` takes in 3 arguments:
detectsSadows: Now this algorithm will also be able to detect shadows, if we pass in `detectShadows=True` argument in the constructor. The ability to detect and get rid of shadows will give us smooth and robust results. Enabling shadow detection slightly decreases speed.
history: This is the number of frames that is used to create the background model, increase this number if your target object often stops or pauses for a moment.
varThreshold: This threshold will help you filter out noise present in the frame, increase this number if there are lots of white spots in the frame. Although we will also use morphological operations like erosion to get rid of the noise.
Now after we have our background subtraction done then we can further refine the results by getting rid of the noise and enlarging our target object.
We can refine our results by using morphological operations like erosion and dilation. After we have cleaned our image then we can apply contour detection to detect those moving big white blobs (people) and then draw bounding boxes over those blobs.
If you don’t know about Morphological Operations or Contour Detection then you should go over this Computer Vision Crash course post, I published a few weeks back.
# initlize video capture object
cap = cv2.VideoCapture('sample_video.mp4')

# you can set custom kernel size if you want
kernel= None

# initilize background subtractor object
foog = cv2.createBackgroundSubtractorMOG2( detectShadows = True, varThreshold = 50, history = 2800)

# Noise filter threshold
thresh = 1100

while(1):
    ret, frame = cap.read()
    if not ret:
        break

    # Apply background subtraction
    fgmask = foog.apply(frame)

    # Get rid of the shadows
    ret, fgmask = cv2.threshold(fgmask, 250, 255, cv2.THRESH_BINARY)

    # Apply some morphological operations to make sure you have a good mask
  # fgmask = cv2.erode(fgmask,kernel,iterations = 1)
    fgmask = cv2.dilate(fgmask,kernel,iterations = 4)

    # Detect contours in the frame
    contours, hierarchy = cv2.findContours(fgmask,cv2.RETR_EXTERNAL,cv2.CHAIN_APPROX_SIMPLE)

    if contours:

        # Get the maximum contour
        cnt = max(contours, key = cv2.contourArea)


        # make sure the contour area is somewhat hihger than some threshold to make sure its a person and not some noise.
        if cv2.contourArea(cnt) > thresh:

            # Draw a bounding box around the person and label it as person detected
            x,y,w,h = cv2.boundingRect(cnt)
            cv2.rectangle(frame,(x ,y),(x+w,y+h),(0,0,255),2)
            cv2.putText(frame,'Person Detected',(x,y-10), cv2.FONT_HERSHEY_SIMPLEX, 0.3, (0,255,0), 1, cv2.LINE_AA)


    # Stack both frames and show the image
    fgmask_3 = cv2.cvtColor(fgmask, cv2.COLOR_GRAY2BGR)
    stacked = np.hstack((fgmask_3,frame))
    cv2.imshow('Combined',cv2.resize(stacked,None,fx=0.65,fy=0.65))

    k = cv2.waitKey(40) & 0xff
    if k == ord('q'):
        break

cap.release()
cv2.destroyAllWindows()
So in summary 4 major steps are being performed above:
- Step 1: We’re Extracting moving objects with Background Subtraction and getting rid of the shadows
- Step 2: Applying morphological operations to improve the background subtraction mask
- Step 3: Then we’re detecting Contours and making sure you’re not detecting noise by filtering small contours
- Step 4: Finally we’re computing a bounding box over the max contour, drawing the box, and displaying the image.
Part 4: Creating the Final Intruder Detection System Application:
Finally, we will combine all the things above, we will also use the cv2.VideoWriter() class to save the images as a video in our disk. We will alert the user via Twilio API whenever there is someone in the room.
#time.sleep(15)

# Set Window normal so we can resize it
cv2.namedWindow('frame', cv2.WINDOW_NORMAL)

# This is a test video
cap = cv2.VideoCapture('sample_video.mp4')

# Read the video steram from the camera
#cap = cv2.VideoCapture('http://192.168.18.4:8080/video')

# Get width and height of the frame
width = int(cap.get(3))
height = int(cap.get(4))

# Read and store the credentials information in a dict
with open('credentials.txt', 'r') as myfile:
  data = myfile.read()

info_dict = eval(data)

# Initialize the background Subtractor
foog = cv2.createBackgroundSubtractorMOG2( detectShadows = True, varThreshold = 100, history = 2000)

# Status is True when person is present and False when the person is not present.
status = False

# After the person disapears from view, wait atleast 7 seconds before making the status False
patience = 7

# We don't consider an initial detection unless its detected 15 times, this gets rid of false positives
detection_thresh = 15

# Initial time for calculating if patience time is up
initial_time = None

# We are creating a deque object of length detection_thresh and will store individual detection statuses here
de = deque([False] * detection_thresh, maxlen=detection_thresh)

# Initialize these variables for calculating FPS
fps = 0
frame_counter = 0
tart_time = time.time()


while(True):

    ret, frame = cap.read()
    if not ret:
        break

    # This function will return a boolean variable telling if someone was present or not, it will also draw boxes if it
    # finds someone
    detected, annotated_image = is_person_present(frame)

    # Register the current detection status on our deque object
    de.appendleft(detected)

    # If we have consectutively detected a person 15 times then we are sure that soemone is present
    # We also make this is the first time that this person has been detected so we only initialize the videowriter once
    if sum(de) == detection_thresh and not status:
            status = True
            entry_time = datetime.datetime.now().strftime("%A, %I-%M-%S %p %d %B %Y")
            out = cv2.VideoWriter('outputs/{}.mp4'.format(entry_time), cv2.VideoWriter_fourcc(*'XVID'), 15.0, (width, height))

    # If status is True but the person is not in the current frame
    if status and not detected:

        # Restart the patience timer only if the person has not been detected for a few frames so we are sure it was'nt a
        # False positive
        if sum(de) > (detection_thresh/2):

            if initial_time is None:
                initial_time = time.time()

        elif initial_time is not None:

            # If the patience has run out and the person is still not detected then set the status to False
            # Also save the video by releasing the video writer and send a text message.
            if  time.time() - initial_time >= patience:
                status = False
                exit_time = datetime.datetime.now().strftime("%A, %I:%M:%S %p %d %B %Y")
                out.release()
                initial_time = None

                body = "Alert: n A Person Entered the Room at {} n Left the room at {}".format(entry_time, exit_time)
                send_message(body, info_dict)

    # If significant amount of detections (more than half of detection_thresh) has occured then we reset the Initial Time.
    elif status and sum(de) > (detection_thresh/2):
        initial_time = None

    # Get the current time in the required format
    current_time = datetime.datetime.now().strftime("%A, %I:%M:%S %p %d %B %Y")

    # Display the FPS
    cv2.putText(annotated_image, 'FPS: {:.2f}'.format(fps), (510, 450), cv2.FONT_HERSHEY_COMPLEX, 0.6, (255, 40, 155),2)

    # Display Time
    cv2.putText(annotated_image, current_time, (310, 20), cv2.FONT_HERSHEY_COMPLEX, 0.5, (0, 0, 255),1)

    # Display the Room Status
    cv2.putText(annotated_image, 'Room Occupied: {}'.format(str(status)), (10, 20), cv2.FONT_HERSHEY_SIMPLEX, 0.6,
                (200, 10, 150),2)

    # Show the patience Value
    if initial_time is None:
        text = 'Patience: {}'.format(patience)
    else:
        text = 'Patience: {:.2f}'.format(max(0, patience - (time.time() - initial_time)))

    cv2.putText(annotated_image, text, (10, 450), cv2.FONT_HERSHEY_COMPLEX, 0.6, (255, 40, 155) , 2)

    # If status is true save the frame
    if status:
        out.write(annotated_image)

    # Show the Frame
    cv2.imshow('frame',frame)

    # Calculate the Average FPS
    frame_counter += 1
    fps = (frame_counter / (time.time() - start_time))


    # Exit if q is pressed.
    if cv2.waitKey(30) == ord('q'):
        break

# Release Capture and destroy windows
cap.release()
cv2.destroyAllWindows()
out.release()
Here are the final results:
This is the function that detects if someone is present in the frame or not.
def is_person_present(frame, thresh=1100):

    global foog

    # Apply background subtraction
    fgmask = foog.apply(frame)

    # Get rid of the shadows
    ret, fgmask = cv2.threshold(fgmask, 250, 255, cv2.THRESH_BINARY)

    # Apply some morphological operations to make sure you have a good mask
    fgmask = cv2.dilate(fgmask,kernel,iterations = 4)

    # Detect contours in the frame
    contours, hierarchy = cv2.findContours(fgmask,cv2.RETR_EXTERNAL,cv2.CHAIN_APPROX_SIMPLE)

    # Check if there was a contour and the area is somewhat higher than some threshold so we know its a person and not noise
    if contours and cv2.contourArea(max(contours, key = cv2.contourArea)) > thresh:

            # Get the max contour
            cnt = max(contours, key = cv2.contourArea)

            # Draw a bounding box around the person and label it as person detected
            x,y,w,h = cv2.boundingRect(cnt)
            cv2.rectangle(frame,(x ,y),(x+w,y+h),(0,0,255),2)
            cv2.putText(frame,'Person Detected',(x,y-10), cv2.FONT_HERSHEY_SIMPLEX, 0.3, (0,255,0), 1, cv2.LINE_AA)

            return True, frame


    # Otherwise report there was no one present
    else:
        return False, frame
This function uses twilio to send messages.
def send_message(body, info_dict):

    # Your Account SID from twilio.com/console
    account_sid = info_dict['account_sid']

    # Your Auth Token from twilio.com/console
    auth_token  = info_dict['auth_token']


    client = Client(account_sid, auth_token)

    message = client.messages.create( to = info_dict['your_num'], from_ = info_dict['trial_num'], body= body)
Explanation of the Final Application Code:
The function is_person_present() is called on each frame and it tells us if a person is present in the current frame or not, if it is then we append True to a deque list of length 15, now if the detection has occurred 15 times consecutively we then change the Room occupied status to True. The reason we don’t change the Occupied status to True on the first detection is to avoid our system being triggered by false positives. As soon as the room status is true the VideoWriter is initialized and the video starts recording.
Now when the person is not detected anymore then we wait for `7` seconds before turning the room status to False, this is because the person may disappear from view for a moment and then reappear or we may miss detecting the person for a few seconds.
Now when the person disappears and the 7-second timer ends then we make the room status to False, we release the VideoWriter in order to save the video and then send an alert message via send_message() function to the user.
Also I have designed the code in a way that our patience timer (7 second timer) is not affected by False positives.
Here’s a high level explanation of the demo:
See how I have placed my mobile, while the screen is closed it’s actually recording and sending live feed to my PC. No one would suspect that you have the perfect intruder detection system setup in the room.

Improvements:
Right now your IP Camera has a dynamic IP so you may be interested in learning how to make your device have a static IP address so you don’t have to change the address each time you launch your IP Camera.
Another limitation you have right now is that you can only use this setup when your device and your PC are connected to the same network/WIFI so you may want to learn how to get this setup to run globally.
Both of these issues can be solved by some configuration, All the instructions for that are in a manual which you can get by downloading the source code from above for the intruder detection system.
Summary:
In this tutorial you learned how to turn your phone into a smart IP Camera, you learned how to work with URL video feeds in general.
After that we went over how to create a background subtraction based motion detector.
We also learned how to connect the twilio api to our system to enable alert messages. Right now we are sending alert messages every time there is motion so you may want to change this and make the api send you a single message each day containing a summary of all movements that happened in the room throughout the day.
Finally we created a complete application where we also saved the recording snippets of people moving about in the room.
This post was just a basic template for a surveillance system, you can actually take this and make more enhancements to it, for e.g. for each person coming in the room you can check with facial recognition if it’s actually an intruder or a family member. Similarly there are lots of other things you can do with this.
If you enjoyed this tutorial then I would love to hear your opinion on it, please feel free to comment and ask questions, I’ll gladly answer them.
You can reach out to me personally for a 1 on 1 consultation session in AI/computer vision regarding your project. Our talented team of vision engineers will help you every step of the way. Get on a call with me directly here.
Ready to seriously dive into State of the Art AI & Computer Vision?
Then Sign up for these premium Courses by Bleed AI
You can reach out to me personally for a 1 on 1 consultation session in AI/computer vision regarding your project. Our talented team of vision engineers will help you every step of the way. Get on a call with me directly here.


Great! Interesting read.
Thank you, Maria. 🙂
Great tutorial. I cannot find the link to download the source code folders
Thanks, please check the highlighted download section on top of the post and before the code starts.
thank you,
its very simlified lesson.
I’m glad you found this useful Habib. 🙂
Great post. Thank you. am a newbie, am using a code that detects and counts people. if i want to use it in a factory (or school, inventory) and add an alert like “restriction area alert or do not enter” type of alerts how can i do it (code). thank you in advance
Thank you Kahan, I’m glad you found this useful. Yes, certainly you can extend this code to other scenario’s but I would recommend you use a DL-based person detector for more robust results.