Watch Video Here
In the last Week’s tutorial, we had learned to perform real-time hands 3D landmarks detection, hands classification (i.e., either left or right), extraction of bounding box coordinates from the landmarks, and the utilization of the depth (z-coordinates) of the hands to create a customized landmarks annotation.
Yup, that was a whole lot, and we’re not coming slow in this tutorial too,
In this week’s tutorial, we’ll learn to utilize the landmarks to count and fingers (that are up) in images and videos and create a real-time hand counter. We will also create a hand finger recognition and visualization application that will display the exact fingers that are up. This will work for both hands.

Then based on the status (i.e., up/down) of the fingers, we will build a Hand Gesture Recognizer that will be capable of identifying multiple gestures.
Below are the results on a few sample images but this will also work on camera feed in real-time and on recorded videos as well.

You will not need any expensive GPU, your CPU will suffice as the whole code is highly optimized.
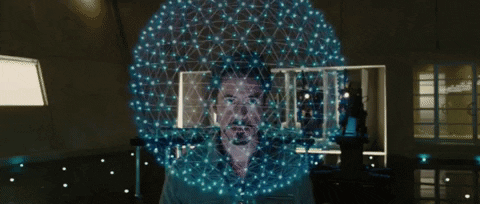
And that is not all, in the end, on top of all this, we will build a Selfie-Capturing System that will be controlled using hand gestures to enhance the user experience. So we will be able to capture images and also turn an image filter on/off without even touching our device. The image below shows a visual of what this system will be capable of.

Well 🤔, maybe not exactly that but somewhat similar.

Excited yet? I know I am! Before diving into the implementation, let me tell you that as a child, I always was fascinated with the concept of automating the interaction between people and machines and that was one of the reasons I got into programming.
To be more precise, I wanted to control my computer with my mind, yes I know how this sounds but I was just a kid back then. Controlling computers via mind with high fidelity is not feasible yet but hey Elon, is working on it.. So there’s still hope.

But for now, why don’t we utilize the options we have. I have published some other tutorials too on controlling different applications using hand body gestures.
- Controlling Subway Surfers Game via Body Gestures.
- Controlling Temple Run and a Media Player via Hand Gestures.
- Controlling the infamous Google Dino Game via Mouth Gestures.
So I can tell you that using hand gestures to interact with a system is a much better option than using some other part like the mouth since hands are capable of making multiple shapes and gestures without much effort.
Also during these crucial times of covid-19, it is very unsafe to touch the devices installed at public places like ATMs. So upgrading these to make them operable via gestures can tremendously reduce infection risk..
Tony Stark, the boy Genius can be seen in movies to control stuff with his hand gestures, so why let him have all the fun when we can join the party too.
You can also use the techniques you’ll learn in this tutorial to control any other Human-Computer Interaction based application.
The tutorial is divided into small steps with every step explained in detail in the simplest manner possible.
Outline
- Step 1: Perform Hands Landmarks Detection
- Step 2: Build the Fingers Counter
- Step 3: Visualize the Counted Fingers
- Step 4: Build the Hand Gesture Recognizer
- Step 5: Build a Selfie-Capturing System controlled by Hand Gestures
Download Code
[optin-monster-inline slug=”g3nr7xq93qd1jt8gqgwf”]
Alright, so without further ado, let’s get started.
Import the Libraries
First, we will import the required libraries.
import cv2
import time
import pygame
import numpy as np
import mediapipe as mp
import matplotlib.pyplot as plt
Initialize the Hands Landmarks Detection Model
After that, we will need to initialize the mp.solutions.hands class and then set up the mp.solutions.hands.Hands() function with appropriate arguments and also initialize mp.solutions.drawing_utils class that is required to visualize the detected landmarks. We will be working with images and videos as well, so we will have to set up the mp.solutions.hands.Hands() function two times.
Once with the argument static_image_mode set to True to use with images and the second time static_image_mode set to False to use with videos. This speeds up the landmarks detection process, and the intuition behind this was explained in detail in the previous post.
# Initialize the mediapipe hands class.
mp_hands = mp.solutions.hands

# Set up the Hands functions for images and videos.
hands = mp_hands.Hands(static_image_mode=True, max_num_hands=2, min_detection_confidence=0.5)
hands_videos = mp_hands.Hands(static_image_mode=False, max_num_hands=2, min_detection_confidence=0.5)

# Initialize the mediapipe drawing class.
mp_drawing = mp.solutions.drawing_utils
Step 1: Perform Hands Landmarks Detection
In the step, we will create a function detectHandsLandmarks() that will take an image/frame as input and will perform the landmarks detection on the hands in the image/frame using the solution provided by Mediapipe and will get twenty-one 3D landmarks for each hand in the image. The function will display or return the results depending upon the passed arguments.
The function is quite similar to the one in the previous post, so if you had read the post, you can skip this step. I could have imported it from a separate .py file, but I didn’t, as I wanted to make this tutorial with the minimal number of prerequisites possible.
def detectHandsLandmarks(image, hands, draw=True, display = True):
    '''
    This function performs hands landmarks detection on an image.
    Args:
        image:   The input image with prominent hand(s) whose landmarks needs to be detected.
        hands:   The Hands function required to perform the hands landmarks detection.
        draw:    A boolean value that is if set to true the function draws hands landmarks on the output image.
        display: A boolean value that is if set to true the function displays the original input image, and the output
                 image with hands landmarks drawn if it was specified and returns nothing.
    Returns:
        output_image: A copy of input image with the detected hands landmarks drawn if it was specified.
        results:      The output of the hands landmarks detection on the input image.
    '''

    # Create a copy of the input image to draw landmarks on.
    output_image = image.copy()

    # Convert the image from BGR into RGB format.
    imgRGB = cv2.cvtColor(image, cv2.COLOR_BGR2RGB)

    # Perform the Hands Landmarks Detection.
    results = hands.process(imgRGB)

    # Check if landmarks are found and are specified to be drawn.
    if results.multi_hand_landmarks and draw:

        # Iterate over the found hands.
        for hand_landmarks in results.multi_hand_landmarks:

            # Draw the hand landmarks on the copy of the input image.
            mp_drawing.draw_landmarks(image = output_image, landmark_list = hand_landmarks,
                                      connections = mp_hands.HAND_CONNECTIONS,
                                      landmark_drawing_spec=mp_drawing.DrawingSpec(color=(255,255,255),
                                                                                   thickness=2, circle_radius=2),
                                      connection_drawing_spec=mp_drawing.DrawingSpec(color=(0,255,0),
                                                                                     thickness=2, circle_radius=2))

    # Check if the original input image and the output image are specified to be displayed.
    if display:

        # Display the original input image and the output image.
        plt.figure(figsize=[15,15])
        plt.subplot(121);plt.imshow(image[:,:,::-1]);plt.title("Original Image");plt.axis('off');
        plt.subplot(122);plt.imshow(output_image[:,:,::-1]);plt.title("Output");plt.axis('off');

    # Otherwise
    else:

        # Return the output image and results of hands landmarks detection.
        return output_image, results
Now let’s test the function detectHandsLandmarks() created above to perform hands landmarks detection on a sample image and display the results.
# Read a sample image and perform hands landmarks detection on it.
image = cv2.imread('media/sample.jpg')
detectHandsLandmarks(image, hands, display=True)
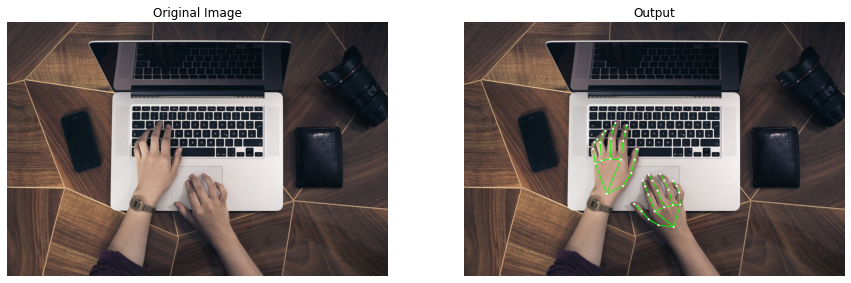
Great! got the required landmarks so the function is working accurately.
Step 2: Build the Fingers Counter
Now in this step, we will create a function countFingers() that will take in the results of the landmarks detection returned by the function detectHandsLandmarks() and will utilize the landmarks to count the number of fingers up of each hand in the image/frame and will return the count and the status of each finger in the image as well.
How will it work?
To check the status of each finger (i.e., either it is up or not), we will compare the y-coordinates of the FINGER_TIP landmark and FINGER_PIP landmark of each finger. Whenever the finger will be up, the y-coordinate of the FINGER_TIP landmark will have a lower value than the FINGER_PIP landmark.
But for the thumbs, the scenario will be a little different as we will have to compare the x-coordinates of the THUMB_TIP landmark and THUMB_MCP landmark and the condition will vary depending upon whether the hand is left or right.
For the right hand, whenever the thumb will be open, the x-coordinate of the THUMB_TIP landmark will have a lower value than the THUMB_MCP landmark, and for the left hand, the x-coordinate of the THUMB_TIP landmark will have a greater value than the THUMB_MCP landmark.
Note: You have to face the palm of your hand towards the camera.
def countFingers(image, results, draw=True, display=True):
    '''
    This function will count the number of fingers up for each hand in the image.
    Args:
        image:   The image of the hands on which the fingers counting is required to be performed.
        results: The output of the hands landmarks detection performed on the image of the hands.
        draw:    A boolean value that is if set to true the function writes the total count of fingers of the hands on the
                 output image.
        display: A boolean value that is if set to true the function displays the resultant image and returns nothing.
    Returns:
        output_image:     A copy of the input image with the fingers count written, if it was specified.
        fingers_statuses: A dictionary containing the status (i.e., open or close) of each finger of both hands.
        count:            A dictionary containing the count of the fingers that are up, of both hands.
    '''

    # Get the height and width of the input image.
    height, width, _ = image.shape

    # Create a copy of the input image to write the count of fingers on.
    output_image = image.copy()

    # Initialize a dictionary to store the count of fingers of both hands.
    count = {'RIGHT': 0, 'LEFT': 0}

    # Store the indexes of the tips landmarks of each finger of a hand in a list.
    fingers_tips_ids = [mp_hands.HandLandmark.INDEX_FINGER_TIP, mp_hands.HandLandmark.MIDDLE_FINGER_TIP,
                        mp_hands.HandLandmark.RING_FINGER_TIP, mp_hands.HandLandmark.PINKY_TIP]

    # Initialize a dictionary to store the status (i.e., True for open and False for close) of each finger of both hands.
    fingers_statuses = {'RIGHT_THUMB': False, 'RIGHT_INDEX': False, 'RIGHT_MIDDLE': False, 'RIGHT_RING': False,
                        'RIGHT_PINKY': False, 'LEFT_THUMB': False, 'LEFT_INDEX': False, 'LEFT_MIDDLE': False,
                        'LEFT_RING': False, 'LEFT_PINKY': False}


    # Iterate over the found hands in the image.
    for hand_index, hand_info in enumerate(results.multi_handedness):

        # Retrieve the label of the found hand.
        hand_label = hand_info.classification[0].label

        # Retrieve the landmarks of the found hand.
        hand_landmarks =  results.multi_hand_landmarks[hand_index]

        # Iterate over the indexes of the tips landmarks of each finger of the hand.
        for tip_index in fingers_tips_ids:

            # Retrieve the label (i.e., index, middle, etc.) of the finger on which we are iterating upon.
            finger_name = tip_index.name.split("_")[0]

            # Check if the finger is up by comparing the y-coordinates of the tip and pip landmarks.
            if (hand_landmarks.landmark[tip_index].y < hand_landmarks.landmark[tip_index - 2].y):

                # Update the status of the finger in the dictionary to true.
                fingers_statuses[hand_label.upper()+"_"+finger_name] = True

                # Increment the count of the fingers up of the hand by 1.
                count[hand_label.upper()] += 1

        # Retrieve the y-coordinates of the tip and mcp landmarks of the thumb of the hand.
        thumb_tip_x = hand_landmarks.landmark[mp_hands.HandLandmark.THUMB_TIP].x
        thumb_mcp_x = hand_landmarks.landmark[mp_hands.HandLandmark.THUMB_TIP - 2].x

        # Check if the thumb is up by comparing the hand label and the x-coordinates of the retrieved landmarks.
        if (hand_label=='Right' and (thumb_tip_x < thumb_mcp_x)) or (hand_label=='Left' and (thumb_tip_x > thumb_mcp_x)):

            # Update the status of the thumb in the dictionary to true.
            fingers_statuses[hand_label.upper()+"_THUMB"] = True

            # Increment the count of the fingers up of the hand by 1.
            count[hand_label.upper()] += 1

    # Check if the total count of the fingers of both hands are specified to be written on the output image.
    if draw:

        # Write the total count of the fingers of both hands on the output image.
        cv2.putText(output_image, " Total Fingers: ", (10, 25),cv2.FONT_HERSHEY_COMPLEX, 1, (20,255,155), 2)
        cv2.putText(output_image, str(sum(count.values())), (width//2-150,240), cv2.FONT_HERSHEY_SIMPLEX,
                    8.9, (20,255,155), 10, 10)

    # Check if the output image is specified to be displayed.
    if display:

        # Display the output image.
        plt.figure(figsize=[10,10])
        plt.imshow(output_image[:,:,::-1]);plt.title("Output Image");plt.axis('off');

    # Otherwise
    else:

        # Return the output image, the status of each finger and the count of the fingers up of both hands.
        return output_image, fingers_statuses, count
Now we will utilize the function countFingers() created above on a real-time webcam feed to count the number of fingers in the frame.
# Initialize the VideoCapture object to read from the webcam.
camera_video = cv2.VideoCapture(1)
camera_video.set(3,1280)
camera_video.set(4,960)

# Create named window for resizing purposes.
cv2.namedWindow('Fingers Counter', cv2.WINDOW_NORMAL)

# Iterate until the webcam is accessed successfully.
while camera_video.isOpened():

    # Read a frame.
    ok, frame = camera_video.read()

    # Check if frame is not read properly then continue to the next iteration to read the next frame.
    if not ok:
        continue

    # Flip the frame horizontally for natural (selfie-view) visualization.
    frame = cv2.flip(frame, 1)

    # Perform Hands landmarks detection on the frame.
    frame, results = detectHandsLandmarks(frame, hands_videos, display=False)

    # Check if the hands landmarks in the frame are detected.
    if results.multi_hand_landmarks:

        # Count the number of fingers up of each hand in the frame.
        frame, fingers_statuses, count = countFingers(frame, results, display=False)

    # Display the frame.
    cv2.imshow('Fingers Counter', frame)

    # Wait for 1ms. If a key is pressed, retreive the ASCII code of the key.
    k = cv2.waitKey(1) & 0xFF

    # Check if 'ESC' is pressed and break the loop.
    if(k == 27):
        break

# Release the VideoCapture Object and close the windows.
camera_video.release()
cv2.destroyAllWindows()
Output Video
Astonishing! the fingers are being counted very fast.
Step 3: Visualize the Counted Fingers
Now that we have built the finger counter, in this step, we will visualize the status (up or down) of each finger in the image/frame in a very appealing way. We will draw left and right handprints on the image and will change the color of the handprints in real-time depending upon the output (i.e., status (up or down) of each finger) from the function countFingers().
- The hand print will be Red if that particular hand (i.e., either right or left) is not present in the image/frame.
- The hand print will be Green if the hand is present in the image/frame.
- The fingers of the hand print, that are up, will be highlighted by with the Orange color and the fingers that are down, will remain Green.
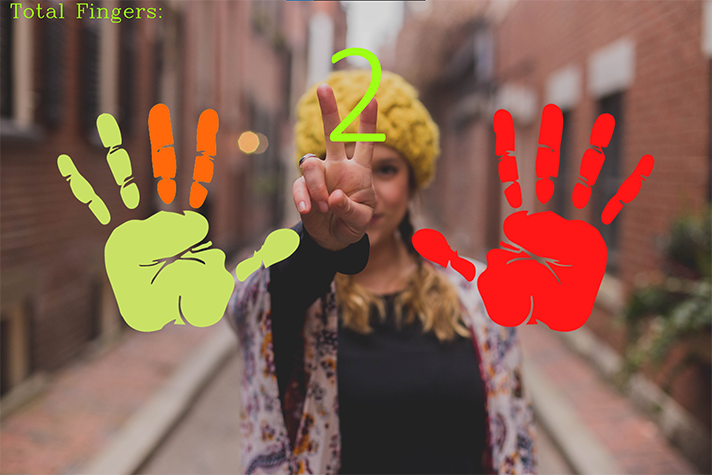
To accomplish this, we will create a function annotate() that will take in the output of the function countFingers() and will utilize it to simply overlay the required hands and fingers prints on the image/frame in the required color.
We have the .png images of the hands and fingers prints in the required colors (red, green, and orange) with transparent backgrounds, so we will only need to select the appropriate images depending upon the hands and fingers statuses and overlay them on the image/frame. You will also get these images with the code when you will download them.
def annotate(image, results, fingers_statuses, count, display=True):
    '''
    This function will draw an appealing visualization of each fingers up of the both hands in the image.
    Args:
        image:            The image of the hands on which the counted fingers are required to be visualized.
        results:          The output of the hands landmarks detection performed on the image of the hands.
        fingers_statuses: A dictionary containing the status (i.e., open or close) of each finger of both hands.
        count:            A dictionary containing the count of the fingers that are up, of both hands.
        display:          A boolean value that is if set to true the function displays the resultant image and
                          returns nothing.
    Returns:
        output_image: A copy of the input image with the visualization of counted fingers.
    '''

    # Get the height and width of the input image.
    height, width, _ = image.shape

    # Create a copy of the input image.
    output_image = image.copy()

    # Select the images of the hands prints that are required to be overlayed.
    ########################################################################################################################

    # Initialize a dictionaty to store the images paths of the both hands.
    # Initially it contains red hands images paths. The red image represents that the hand is not present in the image.
    HANDS_IMGS_PATHS = {'LEFT': ['media/left_hand_not_detected.png'], 'RIGHT': ['media/right_hand_not_detected.png']}

    # Check if there is hand(s) in the image.
    if results.multi_hand_landmarks:

        # Iterate over the detected hands in the image.
        for hand_index, hand_info in enumerate(results.multi_handedness):

            # Retrieve the label of the hand.
            hand_label = hand_info.classification[0].label

            # Update the image path of the hand to a green color hand image.
            # This green image represents that the hand is present in the image.
            HANDS_IMGS_PATHS[hand_label.upper()] = ['media/'+hand_label.lower()+'_hand_detected.png']

            # Check if all the fingers of the hand are up/open.
            if count[hand_label.upper()] == 5:

                # Update the image path of the hand to a hand image with green color palm and orange color fingers image.
                # The orange color of a finger represents that the finger is up.
                HANDS_IMGS_PATHS[hand_label.upper()] = ['media/'+hand_label.lower()+'_all_fingers.png']

            # Otherwise if all the fingers of the hand are not up/open.
            else:

                # Iterate over the fingers statuses of the hands.
                for finger, status in fingers_statuses.items():

                    # Check if the finger is up and belongs to the hand that we are iterating upon.
                    if status == True and finger.split("_")[0] == hand_label.upper():

                        # Append another image of the hand in the list inside the dictionary.
                        # This image only contains the finger we are iterating upon of the hand in orange color.
                        # As the orange color represents that the finger is up.
                        HANDS_IMGS_PATHS[hand_label.upper()].append('media/'+finger.lower()+'.png')

    ########################################################################################################################

    # Overlay the selected hands prints on the input image.
    ########################################################################################################################

    # Iterate over the left and right hand.
    for hand_index, hand_imgs_paths in enumerate(HANDS_IMGS_PATHS.values()):

        # Iterate over the images paths of the hand.
        for img_path in hand_imgs_paths:

            # Read the image including its alpha channel. The alpha channel (0-255) determine the level of visibility.
            # In alpha channel, 0 represents the transparent area and 255 represents the visible area.
            hand_imageBGRA = cv2.imread(img_path, cv2.IMREAD_UNCHANGED)

            # Retrieve all the alpha channel values of the hand image.
            alpha_channel = hand_imageBGRA[:,:,-1]

            # Retrieve all the blue, green, and red channels values of the hand image.
            # As we also need the three-channel version of the hand image.
            hand_imageBGR  = hand_imageBGRA[:,:,:-1]

            # Retrieve the height and width of the hand image.
            hand_height, hand_width, _ = hand_imageBGR.shape

            # Retrieve the region of interest of the output image where the handprint image will be placed.
            ROI = output_image[30 : 30 + hand_height,
                               (hand_index * width//2) + width//12 : ((hand_index * width//2) + width//12 + hand_width)]

            # Overlay the handprint image by updating the pixel values of the ROI of the output image at the
            # indexes where the alpha channel has the value 255.
            ROI[alpha_channel==255] = hand_imageBGR[alpha_channel==255]

            # Update the ROI of the output image with resultant image pixel values after overlaying the handprint.
            output_image[30 : 30 + hand_height,
                         (hand_index * width//2) + width//12 : ((hand_index * width//2) + width//12 + hand_width)] = ROI

    ########################################################################################################################

    # Check if the output image is specified to be displayed.
    if display:

        # Display the output image.
        plt.figure(figsize=[10,10])
        plt.imshow(output_image[:,:,::-1]);plt.title("Output Image");plt.axis('off');

    # Otherwise
    else:

        # Return the output image
        return output_image
Now we will use the function annotate() created above on a webcam feed in real-time to visualize the results of the fingers counter.
# Initialize the VideoCapture object to read from the webcam.
camera_video = cv2.VideoCapture(1)
camera_video.set(3,1280)
camera_video.set(4,960)

# Create named window for resizing purposes.
cv2.namedWindow('Counted Fingers Visualization', cv2.WINDOW_NORMAL)

# Iterate until the webcam is accessed successfully.
while camera_video.isOpened():

    # Read a frame.
    ok, frame = camera_video.read()

    # Check if frame is not read properly then continue to the next iteration to read the next frame.
    if not ok:
        continue

    # Flip the frame horizontally for natural (selfie-view) visualization.
    frame = cv2.flip(frame, 1)

    # Perform Hands landmarks detection on the frame.
    frame, results = detectHandsLandmarks(frame, hands_videos, display=False)

    # Check if the hands landmarks in the frame are detected.
    if results.multi_hand_landmarks:

        # Count the number of fingers up of each hand in the frame.
        frame, fingers_statuses, count = countFingers(frame, results, display=False)

    # Visualize the counted fingers.
    frame = annotate(frame, results, fingers_statuses, count, display=False)

    # Display the frame.
    cv2.imshow('Counted Fingers Visualization', frame)

    # Wait for 1ms. If a key is pressed, retreive the ASCII code of the key.
    k = cv2.waitKey(1) & 0xFF

    # Check if 'ESC' is pressed and break the loop.
    if(k == 27):
        break

# Release the VideoCapture Object and close the windows.
camera_video.release()
cv2.destroyAllWindows()
Output Video
Woah! that was Cool, the results are delightful.
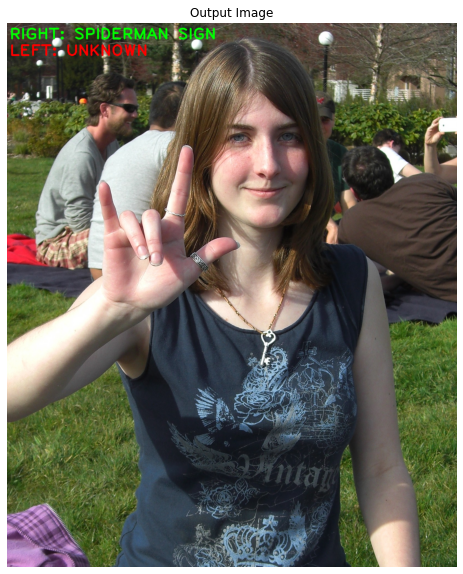
Step 4: Build the Hand Gesture Recognizer
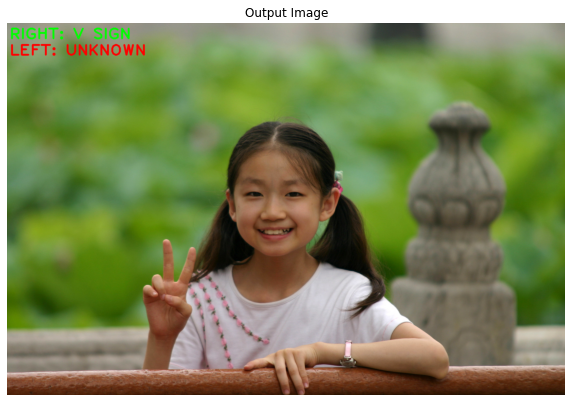
We will create a function recognizeGestures() in this step, that will use the status (i.e., up or down) of the fingers outputted by the function countFingers() to determine the gesture of the hands in the image. The function will be capable of identifying the following hand gestures:
- V Hand Gesture ✌️ (i.e., only the index and middle finger up)
- SPIDERMAN Hand Gesture 🤟 (i.e., the thumb, index, and pinky finger up)
- HIGH-FIVE Hand Gesture ✋ (i.e., all the five fingers up)
For the sake of simplicity, we are only limiting this to three hand gestures. But if you want, you can easily extend this function to make it capable of identifying more gestures just by adding more conditional statements.
def recognizeGestures(image, fingers_statuses, count, draw=True, display=True):
    '''
    This function will determine the gesture of the left and right hand in the image.
    Args:
        image:            The image of the hands on which the hand gesture recognition is required to be performed.
        fingers_statuses: A dictionary containing the status (i.e., open or close) of each finger of both hands.
        count:            A dictionary containing the count of the fingers that are up, of both hands.
        draw:             A boolean value that is if set to true the function writes the gestures of the hands on the
                          output image, after recognition.
        display:          A boolean value that is if set to true the function displays the resultant image and
                          returns nothing.
    Returns:
        output_image:   A copy of the input image with the left and right hand recognized gestures written if it was
                        specified.
        hands_gestures: A dictionary containing the recognized gestures of the right and left hand.
    '''

    # Create a copy of the input image.
    output_image = image.copy()

    # Store the labels of both hands in a list.
    hands_labels = ['RIGHT', 'LEFT']

    # Initialize a dictionary to store the gestures of both hands in the image.
    hands_gestures = {'RIGHT': "UNKNOWN", 'LEFT': "UNKNOWN"}

    # Iterate over the left and right hand.
    for hand_index, hand_label in enumerate(hands_labels):

        # Initialize a variable to store the color we will use to write the hands gestures on the image.
        # Initially it is red which represents that the gesture is not recognized.
        color = (0, 0, 255)

        # Check if the person is making the 'V' gesture with the hand.
        ####################################################################################################################

        # Check if the number of fingers up is 2 and the fingers that are up, are the index and the middle finger.
        if count[hand_label] == 2  and fingers_statuses[hand_label+'_MIDDLE'] and fingers_statuses[hand_label+'_INDEX']:

            # Update the gesture value of the hand that we are iterating upon to V SIGN.
            hands_gestures[hand_label] = "V SIGN"

            # Update the color value to green.
            color=(0,255,0)

        ####################################################################################################################

        # Check if the person is making the 'SPIDERMAN' gesture with the hand.
        ##########################################################################################################################################################

        # Check if the number of fingers up is 3 and the fingers that are up, are the thumb, index and the pinky finger.
        elif count[hand_label] == 3 and fingers_statuses[hand_label+'_THUMB'] and fingers_statuses[hand_label+'_INDEX'] and fingers_statuses[hand_label+'_PINKY']:

            # Update the gesture value of the hand that we are iterating upon to SPIDERMAN SIGN.
            hands_gestures[hand_label] = "SPIDERMAN SIGN"

            # Update the color value to green.
            color=(0,255,0)

        ##########################################################################################################################################################

        # Check if the person is making the 'HIGH-FIVE' gesture with the hand.
        ####################################################################################################################

        # Check if the number of fingers up is 5, which means that all the fingers are up.
        elif count[hand_label] == 5:

            # Update the gesture value of the hand that we are iterating upon to HIGH-FIVE SIGN.
            hands_gestures[hand_label] = "HIGH-FIVE SIGN"

            # Update the color value to green.
            color=(0,255,0)

        ####################################################################################################################

        # Check if the hands gestures are specified to be written.
        if draw:

            # Write the hand gesture on the output image.
            cv2.putText(output_image, hand_label +': '+ hands_gestures[hand_label] , (10, (hand_index+1) * 60),
                        cv2.FONT_HERSHEY_PLAIN, 4, color, 5)


    # Check if the output image is specified to be displayed.
    if display:

        # Display the output image.
        plt.figure(figsize=[10,10])
        plt.imshow(output_image[:,:,::-1]);plt.title("Output Image");plt.axis('off');

    # Otherwise
    else:

        # Return the output image and the gestures of the both hands.
        return output_image, hands_gestures
Now we will utilize the function recognizeGestures() created above to perform hand gesture recognition on a few sample images and display the results.
# Read a sample image and perform the hand gesture recognition on it after flipping it horizontally.
image = cv2.imread('media/sample1.jpg')
flipped_image = cv2.flip(image, 1)
_, results = detectHandsLandmarks(flipped_image, hands, display=False)
if results.multi_hand_landmarks:
    output_image, fingers_statuses, count = countFingers(image, results, draw=False, display = False)
    recognizeGestures(image, fingers_statuses, count)
# Read another sample image and perform the hand gesture recognition on it after flipping it horizontally.
image = cv2.imread('media/sample2.jpg')
flipped_image = cv2.flip(image, 1)
_, results = detectHandsLandmarks(flipped_image, hands, display=False)
if results.multi_hand_landmarks:
    output_image, fingers_statuses, count =countFingers(image, results, draw=False, display = False)
# Read another sample image and perform the hand gesture recognition on it after flipping it horizontally.
image = cv2.imread('media/sample3.jpg')
flipped_image = cv2.flip(image, 1)
_, results = detectHandsLandmarks(flipped_image, hands, display=False)
if results.multi_hand_landmarks:
    output_image, fingers_statuses, count =countFingers(image, results, draw=False, display = False)
    recognizeGestures(image, fingers_statuses, count)

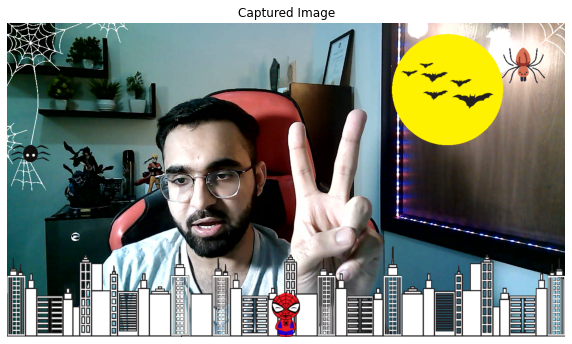
Step 5: Build a Selfie-Capturing System controlled by Hand Gestures
In the last step, we will utilize the gesture recognizer we had made in the last step to trigger a few events. As our gesture recognizer can identify only three gestures (i.e., V Hand Gesture (✌️), SPIDERMAN Hand Gesture (🤟), and HIGH-FIVE Hand Gesture (✋)).
So to get the most out of it, we will create a Selfie-Capturing System that will be controlled using hand gestures. We will allow the user to capture and store images into the disk using the ✌️ gesture. And to spice things up, we will also implement a filter applying mechanism in our system that will be controlled by the other two gestures. To apply the filter on the image/frame the 🤟 gesture will be used and the ✋ gesture will be used to turn off the filter.
# Initialize the VideoCapture object to read from the webcam.
camera_video = cv2.VideoCapture(1)
camera_video.set(3,1280)
camera_video.set(4,960)

# Create named window for resizing purposes.
cv2.namedWindow('Selfie-Capturing System', cv2.WINDOW_NORMAL)

# Read the filter image with its blue, green, red, and alpha channel.
filter_imageBGRA = cv2.imread('media/filter.png', cv2.IMREAD_UNCHANGED)

# Initialize a variable to store the status of the filter (i.e., whether to apply the filter or not).
filter_on = False

# Initialize the pygame modules and load the image-capture music file.
pygame.init()
pygame.mixer.music.load("media/cam.mp3")

# Initialize the number of consecutive frames on which we want to check the hand gestures before triggering the events.
num_of_frames = 5

# Initialize a dictionary to store the counts of the consecutive frames with the hand gestures recognized.
counter = {'V SIGN': 0, 'SPIDERMAN SIGN': 0, 'HIGH-FIVE SIGN': 0}

# Initialize a variable to store the captured image.
captured_image = None

# Iterate until the webcam is accessed successfully.
while camera_video.isOpened():

    # Read a frame.
    ok, frame = camera_video.read()

    # Check if frame is not read properly then continue to the next iteration to read the next frame.
    if not ok:
        continue

    # Flip the frame horizontally for natural (selfie-view) visualization.
    frame = cv2.flip(frame, 1)

    # Get the height and width of the frame of the webcam video.
    frame_height, frame_width, _ = frame.shape

    # Resize the filter image to the size of the frame.
    filter_imageBGRA = cv2.resize(filter_imageBGRA, (frame_width, frame_height))

    # Get the three-channel (BGR) image version of the filter image.
    filter_imageBGR  = filter_imageBGRA[:,:,:-1]

    # Perform Hands landmarks detection on the frame.
    frame, results = detectHandsLandmarks(frame, hands_videos, draw=False, display=False)

    # Check if the hands landmarks in the frame are detected.
    if results.multi_hand_landmarks:

        # Count the number of fingers up of each hand in the frame.
        frame, fingers_statuses, count = countFingers(frame, results, draw=False, display=False)

        # Perform the hand gesture recognition on the hands in the frame.
        _, hands_gestures = recognizeGestures(frame, fingers_statuses, count, draw=False, display=False)

        # Apply and Remove Image Filter Functionality.
        ####################################################################################################################

        # Check if any hand is making the SPIDERMAN hand gesture in the required number of consecutive frames.
        ####################################################################################################################

        # Check if the gesture of any hand in the frame is SPIDERMAN SIGN.
        if any(hand_gesture == "SPIDERMAN SIGN" for hand_gesture in hands_gestures.values()):

            # Increment the count of consecutive frames with SPIDERMAN hand gesture recognized.
            counter['SPIDERMAN SIGN'] += 1

            # Check if the counter is equal to the required number of consecutive frames.
            if counter['SPIDERMAN SIGN'] == num_of_frames:

                # Turn on the filter by updating the value of the filter status variable to true.
                filter_on = True

                # Update the counter value to zero.
                counter['SPIDERMAN SIGN'] = 0

        # Otherwise if the gesture of any hand in the frame is not SPIDERMAN SIGN.
        else:

            # Update the counter value to zero. As we are counting the consective frames with SPIDERMAN hand gesture.
            counter['SPIDERMAN SIGN'] = 0

        ####################################################################################################################

        # Check if any hand is making the HIGH-FIVE hand gesture in the required number of consecutive frames.
        ####################################################################################################################

        # Check if the gesture of any hand in the frame is HIGH-FIVE SIGN.
        if any(hand_gesture == "HIGH-FIVE SIGN" for hand_gesture in hands_gestures.values()):

            # Increment the count of consecutive frames with HIGH-FIVE hand gesture recognized.
            counter['HIGH-FIVE SIGN'] += 1

            # Check if the counter is equal to the required number of consecutive frames.
            if counter['HIGH-FIVE SIGN'] == num_of_frames:

                # Turn off the filter by updating the value of the filter status variable to False.
                filter_on = False

                # Update the counter value to zero.
                counter['HIGH-FIVE SIGN'] = 0

        # Otherwise if the gesture of any hand in the frame is not HIGH-FIVE SIGN.
        else:

            # Update the counter value to zero. As we are counting the consective frames with HIGH-FIVE hand gesture.
            counter['HIGH-FIVE SIGN'] = 0

        ####################################################################################################################

    # Check if the filter is turned on.
    if filter_on:

        # Apply the filter by updating the pixel values of the frame at the indexes where the
        # alpha channel of the filter image has the value 255.
        frame[filter_imageBGRA[:,:,-1]==255] = filter_imageBGR[filter_imageBGRA[:,:,-1]==255]

        ####################################################################################################################

    # Image Capture Functionality.
    ########################################################################################################################

    # Check if the hands landmarks are detected and the gesture of any hand in the frame is V SIGN.
    if results.multi_hand_landmarks and any(hand_gesture == "V SIGN" for hand_gesture in hands_gestures.values()):

        # Increment the count of consecutive frames with V hand gesture recognized.
        counter['V SIGN'] += 1

        # Check if the counter is equal to the required number of consecutive frames.
        if counter['V SIGN'] == num_of_frames:

            # Make a border around a copy of the current frame.
            captured_image = cv2.copyMakeBorder(src=frame, top=10, bottom=10, left=10, right=10,
                                                borderType=cv2.BORDER_CONSTANT, value=(255,255,255))

            # Capture an image and store it in the disk.
            cv2.imwrite('Captured_Image.png', captured_image)

            # Display a black image.
            cv2.imshow('Selfie-Capturing System', np.zeros((frame_height, frame_width)))

            # Play the image capture music to indicate the an image is captured and wait for 100 milliseconds.
            pygame.mixer.music.play()
            cv2.waitKey(100)

            # Display the captured image.
            plt.close();plt.figure(figsize=[10,10])
            plt.imshow(frame[:,:,::-1]);plt.title("Captured Image");plt.axis('off');

            # Update the counter value to zero.
            counter['V SIGN'] = 0

    # Otherwise if the gesture of any hand in the frame is not V SIGN.
    else:

        # Update the counter value to zero. As we are counting the consective frames with V hand gesture.
        counter['V SIGN'] = 0

    ########################################################################################################################

    # Check if we have captured an image.
    if captured_image is not None:

        # Resize the image to the 1/5th of its current width while keeping the aspect ratio constant.
        captured_image = cv2.resize(captured_image, (frame_width//5, int(((frame_width//5) / frame_width) * frame_height)))

        # Get the new height and width of the image.
        img_height, img_width, _ = captured_image.shape

        # Overlay the resized captured image over the frame by updating its pixel values in the region of interest.
        frame[10: 10+img_height, 10: 10+img_width] = captured_image

    # Display the frame.
    cv2.imshow('Selfie-Capturing System', frame)

    # Wait for 1ms. If a key is pressed, retreive the ASCII code of the key.
    k = cv2.waitKey(1) & 0xFF

    # Check if 'ESC' is pressed and break the loop.
    if(k == 27):
        break

# Release the VideoCapture Object and close the windows.
camera_video.release()
cv2.destroyAllWindows()
Output Video
As expected, the results are amazing, the system is working very smoothly. If you want, you can extend this system to have multiple filters and introduce another gesture to switch between the filters.
Join My Course Computer Vision For Building Cutting Edge Applications Course

The only course out there that goes beyond basic AI Applications and teaches you how to create next-level apps that utilize physics, deep learning, classical image processing, hand and body gestures. Don’t miss your chance to level up and take your career to new heights
You’ll Learn about:
- Creating GUI interfaces for python AI scripts.
- Creating .exe DL applications
- Using a Physics library in Python & integrating it with AI
- Advance Image Processing Skills
- Advance Gesture Recognition with Mediapipe
- Task Automation with AI & CV
- Training an SVM machine Learning Model.
- Creating & Cleaning an ML dataset from scratch.
- Training DL models & how to use CNN’s & LSTMS.
- Creating 10 Advance AI/CV Applications
- & More
Whether you’re a seasoned AI professional or someone just looking to start out in AI, this is the course that will teach you, how to Architect & Build complex, real world and thrilling AI applications
Summary:
In this tutorial, we have learned to perform landmarks detection on the prominent hands in images/videos, to get twenty-one 3D landmarks, and then use those landmarks to extract useful info about each finger of the hands i.e., whether the fingers are up or down. Using this methodology, we have created a finger counter and recognition system and then learned to visualize its results.
We have also built a hand gesture recognizer capable of identifying three different gestures of the hands in the images/videos based on the status (i.e., up or down) of the fingers in real-time and had utilized the recognizer in our Selfie-Capturing System to trigger multiple events.
Now here are a few limitations in our application that you should know about, for our finger counter to work properly the user has to face the palm of his hand towards the camera in front of him. As the directions of the thumbs change based upon the orientation of the hand. And the approach we are using completely depends upon the direction. See the image below.
But you can easily overcome this limitation by using accumulated angles of joints to check whether each finger is bent or straight. And for that, you can check out the tutorial I had published on Real-Time 3D Pose Detection as I had used a similar approach in it to classify the poses.
Another limitation is that we are using the finger counter to determine the gestures of the hands and unfortunately complex hand gestures can have the same fingers up/down like the victory hand gesture (✌), and crossed fingers gesture (🤞). To get around this, you can train a deep learning model on top of some target gestures.
You can reach out to me personally for a 1 on 1 consultation session in AI/computer vision regarding your project. Our talented team of vision engineers will help you every step of the way. Get on a call with me directly here.
Ready to seriously dive into State of the Art AI & Computer Vision?
Then Sign up for these premium Courses by Bleed AI


Thank you for the amazing demo 🙂 The best approach I’ve come across for solving the finger counting problem with the python mediapipe library. Gestures triggering events are the cherry on top of this fantastically baked tutorial.
Cheers!
Thank you Abhinav for your kind comments, I’m glad you loved it.
One of the best mediapipe tutorials. I downloaded the source code. However it is from your previous tutorial ” Real-Time 3D Hands Landmarks Detection & Hands Classification with Mediapipe and Python”. Would you please update the link to the source code or e-mail to me? Thanks!
Thank you thomas, I will look into this and update the source code in 1-2 days.
Hello Taha! Thanks for the course 🙂
I tried to download it also and got the same files from the previous tutorial..
Could you update this? Thank you very much!
Hi Diego, I think this issue was fixed.
Could you tell me about
def annotate(image, results, fingers_statuses, count, display=True): <<<<<<<<this function
line 93:
ROI[alpha_channel==255] = hand_imageBGR[alpha_channel==255] mean?
I try to run it but it can't be successful.
And I try to let ROI(line 88)from [BGR] to [BGRA],because ROI is come from output_image(just [BGR]).
But ROI is a range,so did it can be revise a part of output_image([BGR]) to[BGRA]?
I'm come from Taiwan and my English is not well ,I try to tell you my question by English strive as much as possible,Hope you can understand ,tank you!
The line; ROI[alpha_channel==255] = hand_imageBGR[alpha_channel==255] simply just overlays the handprint image on the ROI image by updating the pixel values of the ROI at the indexes where the alpha channel has the value 255.
ROI is just a cropped part of the output image (that is a copy of the input image). And we cannot and do not need to convert the output image into [BGRA] because we do not have an alpha channel of the output image the alpha channel we have, is of the handprint image.
Great tutorial, sir
I was confused about the last part line 122
” frame[filter image BGRA[:,:,-1]==255] = filter_imageBGR[filter_imageBGRA[:,:,-1]==255]” meaning?
Could you please explain this a little? Thanks!
Thanks, Zixuan Xu. This line updates the pixel values of the frame with the pixel values of the filter image at the indexes where the alpha channel of the filter image has the value 255. In simple words, this line will simply overlay the filter image over the webcam frame.