Watch Video Here
Note: Video Tutorial for this post will soon be released on Bleed AI’s YouTube Channel
In this tutorial, you’ll learn how to do Real-Time Selfie Segmentation using Mediapipe in Python and then build the following 4 applications.
- Background Removal/Replacement
- Background Blur
- Background Desaturation
- Convert Image to Transparent PNG
And not only will these applications work on images but I’ll show you how to apply these to your real-time webcam feed running on a CPU.
Also, the model that we’ll use is almost the same one that Google Hangouts is currently using to segment people, So Yes! We’re going to be learning a State of the Art approach for segmentation.
And on top of that, the code for building all 4 applications will be ridiculously simple.
Interested yet? Then keep reading this full post.
In the first part of this post, we’ll understand the problem of image segmentation and its types, then we’ll understand what selfie segmentation is. After that, we’ll take a look at Mediapipe and how to do selfie segmentation with it. And finally how to build all those 4 applications.
What is Image Segmentation?
If you’re somewhat familiar with computer vision basics then you might be familiar with image segmentation, a very popular problem in Computer Vision.
Just like in an object detection task where you localize objects in the image and draw boxes around it, in a segmentation task, you’re almost doing the same thing, but here instead of drawing a bounding box around each object, you’re trying to segment or draw out the exact boundary of each target Object.
In other words, in segmentation, you’re trying to divide the image into groups of pixels based on some specific criteria.
So an image segmentation algorithm will take an input image and output groups of pixels, each group will belong to some class. Normally this output is actually an image mask where each pixel consists of a single number indicating the class it belongs to.
Now the task of image segmentation can be divided into several categories, let’s understand each of them.
- Semantic Segmentation.
- Instance Segmentation
- Panoptic Segmentation
- Saliency Detection.
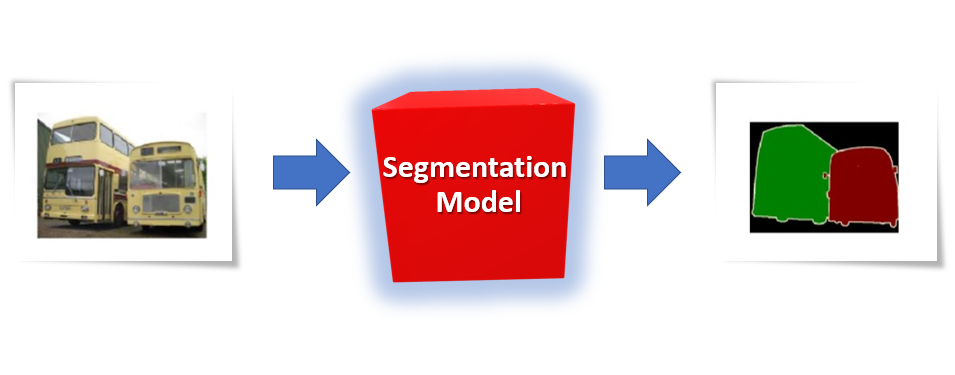
What is Semantic Segmentation?
In this type of segmentation, our task is to assign a class label (pedestrian, car, road, tree etc.) to every pixel in the image.

As you can see all the objects in the image, including the buildings, sky, sidewalk are labeled by a certain color indicating that they belong to a certain class e.g all cars are labeled blue, people are labeled red, and so on.
It’s worth noting that although we can extract any individual class, for e.g. we can say extract all cars by looking for blue pixels but we cannot distinguish between different instances of the same class, for e.g. you can’t reliably say which blue pixel belongs to which car.
What is Instance Segmentation?
Another common category of segmentation is called Instance Segmentation. Here the goal is not to label all pixels in the image but only label some selective classes, for which the model was trained on ( for e.g. cars, pedestrians, etc. ).

As you can see in the image, the algorithm ignored the roads, sky, buildings etc. so here we’re only interested in labeling specific classes.
One other major difference in this approach is that we’re also differentiating between different instances of the same classes i.e. you can tell which pixel belongs to which class and so on.
What is Panoptic Segmentation?
If you’re a curious cat like me, you might wonder, well isn’t there an approach that,
A) Labels all pixels in the image like semantic segmentation.
B) And also differentiates between instances of the same class like instance segmentation.
Well, Yes there is! And it’s called Panoptic Segmentation. Where not only every pixel is assigned a class but we can also differentiate between different instances of the same class, i.e. we can tell which pixel belongs to which car.
This type of segmentation is the combination of both instance and semantic segmentation.
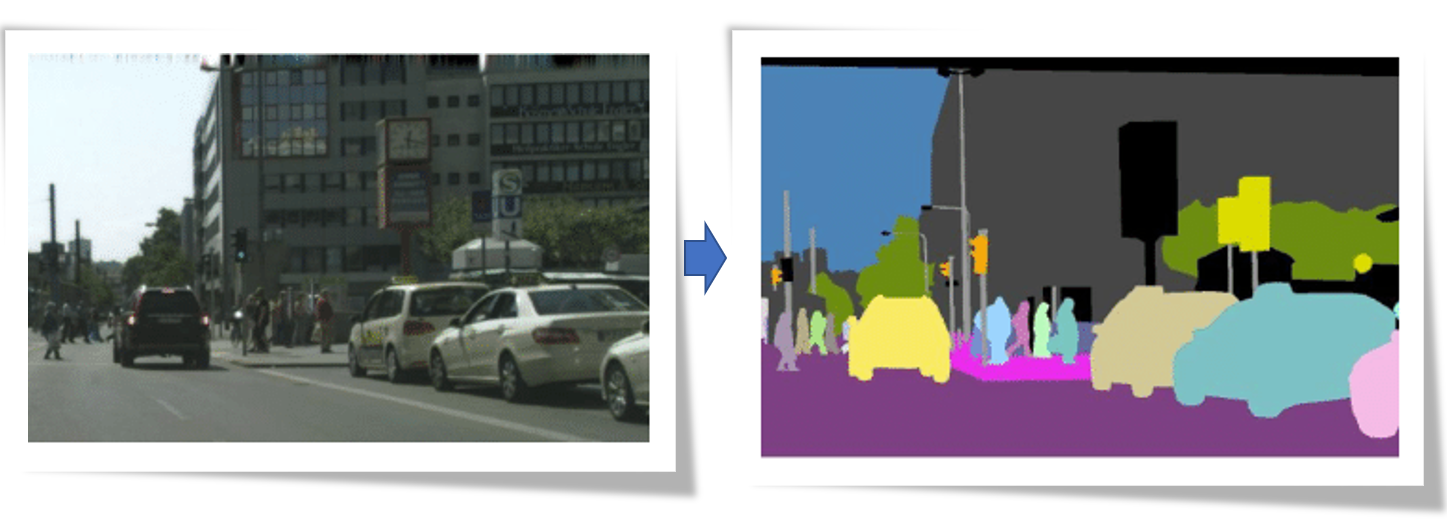
What is Saliency Detection?
Don’t be confused by the word “Detection” here, although Saliency Detection is not generally considered as one of the core segmentation methods but it’s still essentially a major segmentation technique.
So here the goal is to segment out the most salient/prominent (things that stand out ) features in the image.

And this is done regardless of the class of the object. Here’s another example.
As you can see the most obvious object in the above image is the cat, which is exactly what’s being segmented out here.
So in saliency detection where trying to segment out the most standing out features in the image.
Selfie Segmentation:
Alright now that we have understood the fundamental segmentation techniques out there, let’s try to understand what selfie segmentation is.

Well, obviously it’s a no brainer, it’s a segmentation technique that segments out people in images.

You might think, how is this different from semantic or instance Segmentation?
Well, to put it simply, you can consider selfie segmentation as a sort of a mix between semantic segmentation and Saliency detection.
What do I mean by that?
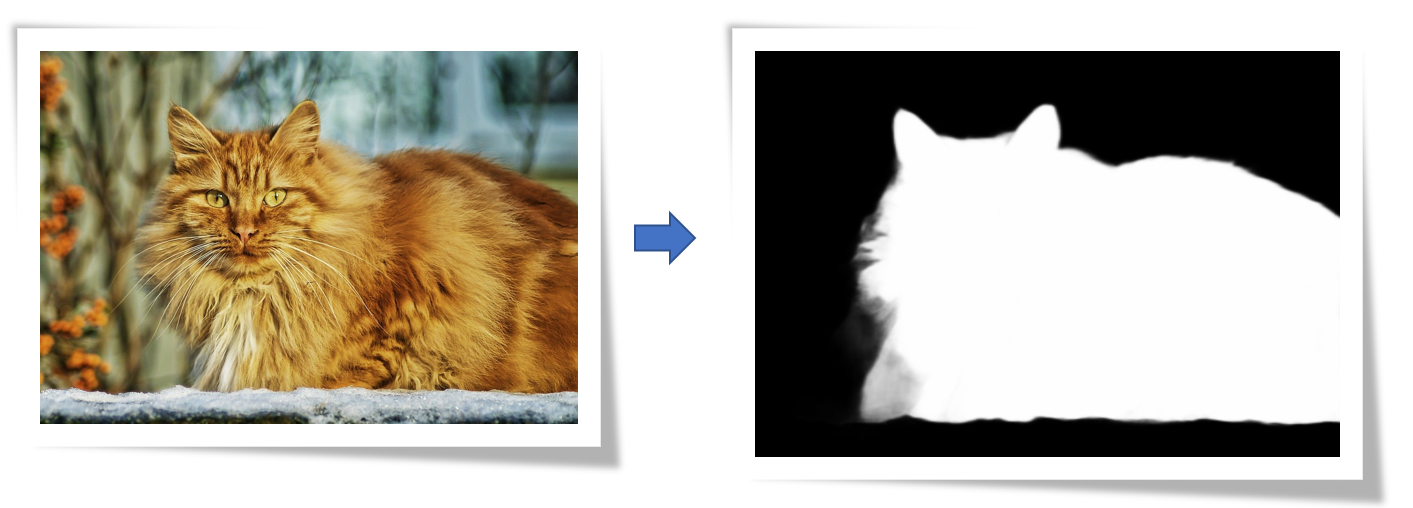
Take a look at the example output of Selfie segmentation on two images below.
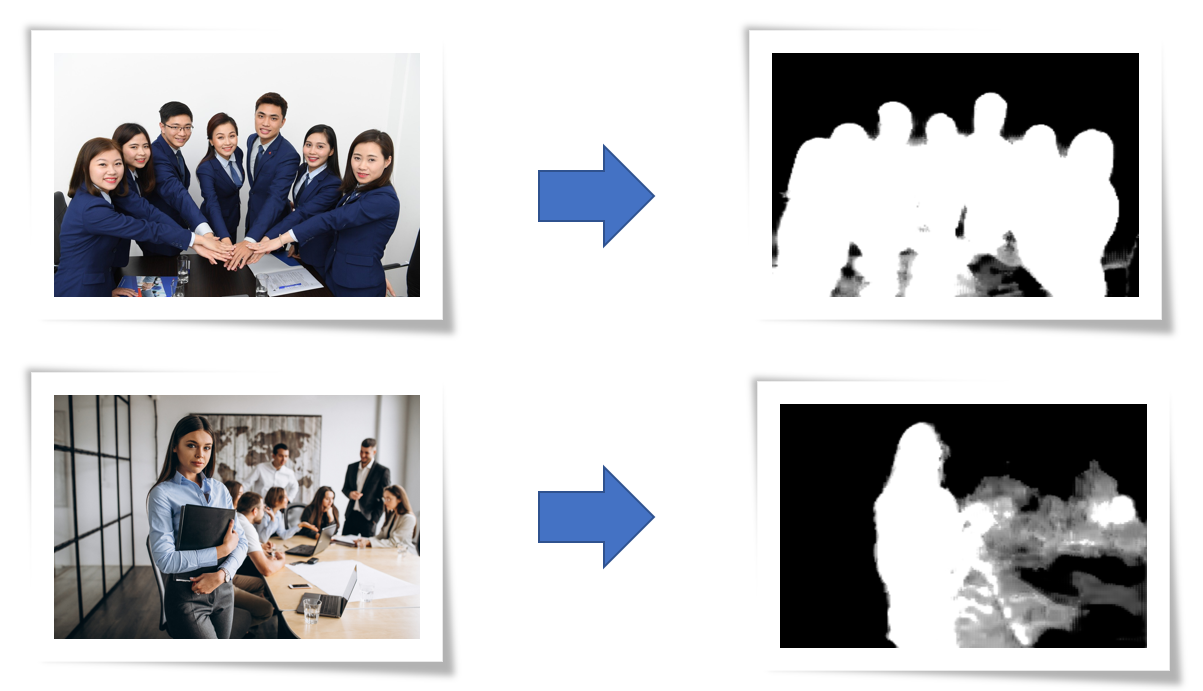
In the first image (top) the segmentation is done perfectly, as every person is on a similar scale and prominent in the image, whereas in the second image (bottom) the woman is prominent and is segmented out correctly while her colleagues in the background are not segmented properly.
This is why the technique is called selfie segmentation, it tries to segment out prominent people in the image, ideally everyone to be segmented should be on a similar scale in the image.
This is why I said that this technique is sort of a mix between saliency detection and semantic segmentation.
Now, you might think why do we even need to use another segmentation technique, why not just segment people using semantic or instance segmentation methods.
Well, Actually we could do that. Models like Mask-RCNN, DeepLabv3, and others are really good at segmenting people.
But here’s the problem.
These models although provide State of the Art results but are actually really slow, they aren’t a good fit when it comes to real-time applications especially on CPUs.
This is why the Selfie segmentation model that we’ll use today is specifically designed to segment people and also run at real-time speed on CPU and other low-end hardware. It’s built on a slight modification of the MobielNetv3 model. This model itself contains clever algorithmic innovations for maximum speed and performance gains. To understand more about these algorithmic advances in this model, you can read Google AI’s Blog post on this model.
So what are the use cases for Selfie Segmentation?
The most popular use case for this problem is Video Conferencing. In fact, Google Hangouts is using approximately the same model that we’re going to learn to use today.


You can read the Google AI Blog release about this here.
Besides Video Conferencing, there are several other use cases for this model that we’re going to explore today.
MediaPipe:
Mediapipe is a cross-platform tool that allows you to run a variety of machine learning models in real-time. It’s designed primarily for facilitating the use of ML in streaming media.

This is the tool that we’ll be using today in order to use the selfie segmentation model. In future tutorials I’ll also be covering the usage of a few other models and make interesting applications out of them. So Stay tuned for those blog posts at Bleed AI.
Alright Now let’s start with the Code!
Selfie Segmentation Code:
[optin-monster slug=”o79lb1j7tdwib0khs6fc”]
To get started with Mediapipe, you first need to run the following command to install it
Import the Libraries
Now let’s start by importing the required libraries.
import os
import cv2
import numpy as np
import mediapipe as mp
import matplotlib.pyplot as plt
from time import time
Initialize the Selfie Segmentation Model
The first thing that you need to do is initialize the selfie segmentation class using the mp.solutions.selfie_segmentation function and then you need to call the setup function using .SelfieSegmentation(0) now there are two models for segmentation in mediapipe, by passing in 0 you will be using the general model i.e. input is resized to: 256x256x3 (Height, width, columns) and by passing 1 you will be using the landscape model i.e. input resized to: 144x256x3 (Height, width, columns).
You should select the type of model by taking into account the aspect ratio of the original image, although the landscape model is a bit faster. These models automatically resize the input image before passing it through the network and the size of the output image representing the segmentation mask for both models will be the same as the input that is 256x256x1 or 144x256x1.
# Initializing mediapipe segmentation class.
mp_selfie_segmentation = mp.solutions.selfie_segmentation

# Setting up Segmentation function.
segment = mp_selfie_segmentation.SelfieSegmentation(0)
Read an Image
Now let’s read a sample image using the function cv2.imread() and display the image using the matplotlib library.
# Read an image from the specified path.
sample_img = cv2.imread('media/sample.jpg')

# Specify a size of the figure.
plt.figure(figsize = [10, 10])

# Display the sample image, also convert BGR to RGB for display.
plt.title("Sample Image");plt.axis('off');plt.imshow(sample_img[:,:,::-1]);plt.show()
Application 1: Remove/Replace Background
We will start by learning to use selfie segmentation to change the background of images. But first, we will have to convert the image into RGB format as the MediaPipe library expects the images in this format but the function cv2.imread() reads the images in BGR format and we will use the function cv2.cvtColor() to do this conversion.
Then we will pass the image to the MediaPipe Segmentation function which will perform the segmentation process and will return a probability map with pixel values near 1 for the indexes where the person is located in the image and pixel values near 0 for the background.
# Convert the sample image from BGR to RGB format.
RGB_sample_img = cv2.cvtColor(sample_img, cv2.COLOR_BGR2RGB)

# Perform the segmentation.
result = segment.process(RGB_sample_img)

# Specify a size of the figure.
plt.figure(figsize=[22,22])

# Display the original sample image and the segmentation result with appropriate titles.
plt.subplot(121);plt.imshow(sample_img[:,:,::-1]);plt.title("Original Image");plt.axis('off');
plt.subplot(122);plt.imshow(result.segmentation_mask, cmap='gray');plt.title("Probability Map");plt.axis('off');
Notice that we have some gray areas in the map, this signifies that there are areas where the model was not sure if it was the background or the person. So now what we need to do is do some thresholding and set all pixels above certain confidence to white and all other pixels to black.CodeText
So in this step, we’re going to be thresholding the mask above to get a binary black and white mask with a pixel value 1 for the indexes where the person is located and 0 for the background.CodeText
# Get a binary mask having pixel value 1 for the person and 0 for the background.
# Pixel values greater than the threshold value 0.9 (90% Confidence) will become 1 and the remaining will become 0.
binary_mask = result.segmentation_mask > 0.9


# Display the original sample image and the binary mask with appropriate titles.
plt.figure(figsize=[22,22])
plt.subplot(121);plt.imshow(sample_img[:,:,::-1]);plt.title("Original Image");plt.axis('off');
plt.subplot(122);plt.imshow(binary_mask, cmap='gray');plt.title("Binary Mask");plt.axis('off');
Now we will use the numpy.where() function to create a new image which will have the pixel values from the original sample image at the indexes where the mask image have value 1 (white areas) and replace areas where mask have value 0 (black areas) with 255, to give a white background to the object of the sample image. Right now we’re just adding whtie (255) background but later on we’ll add a separate image as background.
But to create the required output image we will first have to convert the mask image (one channel) into a three-channel image using the function numpy.dstack() as the function numpy.where() will need to have all images to have equal number of channels.
# Stack the same mask three times to make it a three channel image.
binary_mask_3 = np.dstack((binary_mask,binary_mask,binary_mask))

# Create the output image to have white background where ever black is present in the mask.
output_image = np.where(binary_mask_3, sample_img, 255)

# Specify a size of the figure.
plt.figure(figsize=[22,22])

# Display the original sample image and the resultant image.
plt.subplot(121);plt.imshow(sample_img[:,:,::-1]);plt.title("Original Image");plt.axis('off');
plt.subplot(122);plt.imshow(output_image[:,:,::-1]);plt.title("Output Image");plt.axis('off');
Now instead of having a white background if you need to add another background image, you just need to replace 255 with a background image in np.where function
# Read a background image from the specified path.
bg_img = cv2.imread('media/background.jpg')

# Create an output image with the pixel values from the original sample image at the indexes where the mask have
# value 1 and replace the other pixel values (where mask have zero) with the new background image.
output_image = np.where(binary_mask_3, sample_img, bg_img)

# Display the original sample image and the segmentation result
plt.figure(figsize=[22,22])
plt.subplot(131);plt.imshow(sample_img[:,:,::-1]);plt.title("Original Image");plt.axis('off');
plt.subplot(132);plt.imshow(binary_mask, cmap='gray');plt.title("Binary Mask");plt.axis('off');
plt.subplot(133);plt.imshow(output_image[:,:,::-1]);plt.title("Output Image");plt.axis('off');
Create a Background Modification Function
Now we will create a function that will use the selfie segmentation to modify the background of an image depending upon the passed arguments. The followings will be the modifications that the function will be capable of:
- Change Background: The function will replace the background of the image with a different provided background image OR it will make the background white for the cases when a separate background image is not provided.
- Blur Background: The function will segment out the prominent person and then blur out the background.
- Desaturate Background: The function will desaturate (convert to grayscale) the background of the image, giving the image a very interesting effect.
- Transparent Background: The function will make the background of the image transparent.
def modifyBackground(image, background_image = 255, blur = 95, threshold = 0.3, display = True, method='changeBackground'):
    '''
    This function will replace, blur, desature or make the background transparent depending upon the passed arguments.
    Args:
        image: The input image with an object whose background is required to modify.
        background_image: The new background image for the object in the input image.
        threshold: A threshold value between 0 and 1 which will be used in creating a binary mask of the input image.
        display: A boolean value that is if true the function displays the original input image and the resultant image
                 and returns nothing.
        method: The method name which is required to modify the background of the input image.
    Returns:
        output_image: The image of the object from the input image with a modified background.
        binary_mask_3: A binary mask of the input image.
    '''

    # Convert the input image from BGR to RGB format.
    RGB_img = cv2.cvtColor(image, cv2.COLOR_BGR2RGB)

    # Perform the segmentation.
    result = segment.process(RGB_img)

    # Get a binary mask having pixel value 1 for the object and 0 for the background.
    # Pixel values greater than the threshold value will become 1 and the remainings will become 0.
    binary_mask = result.segmentation_mask > threshold

    # Stack the same mask three times to make it a three channel image.
    binary_mask_3 = np.dstack((binary_mask,binary_mask,binary_mask))

    if method == 'changeBackground':

        # Resize the background image to become equal to the size of the input image.
        background_image = cv2.resize(background_image, (image.shape[1], image.shape[0]))

        # Create an output image with the pixel values from the original sample image at the indexes where the mask have
        # value 1 and replace the other pixel values (where mask have zero) with the new background image.
        output_image = np.where(binary_mask_3, image, background_image)

    elif method == 'blurBackground':

        # Create a blurred copy of the input image.
        blurred_image = cv2.GaussianBlur(image, (blur, blur), 0)

        # Create an output image with the pixel values from the original sample image at the indexes where the mask have
        # value 1 and replace the other pixel values (where mask have zero) with the new background image.
        output_image = np.where(binary_mask_3, image, blurred_image)

    elif method == 'desatureBackground':

        # Create a gray-scale copy of the input image.
        grayscale = cv2.cvtColor(src = image, code = cv2.COLOR_BGR2GRAY)

        # Stack the same grayscale image three times to make it a three channel image.
        grayscale_3 = np.dstack((grayscale,grayscale,grayscale))

        # Create an output image with the pixel values from the original sample image at the indexes where the mask have
        # value 1 and replace the other pixel values (where mask have zero) with the new background image.
        output_image = np.where(binary_mask_3, image, grayscale_3)

    elif method == 'transparentBackground':

        # Stack the input image and the mask image to get a four channel image.
        # Here the mask image will act as an alpha channel.
        # Also multiply the mask with 255 to convert all the 1s into 255.
        output_image = np.dstack((image, binary_mask * 255))

    else:
        # Display the error message.
        print('Invalid Method')

        # Return
        return

    # Check if the original input image and the resultant image are specified to be displayed.
    if display:

        # Display the original input image and the resultant image.
        plt.figure(figsize=[22,22])
        plt.subplot(121);plt.imshow(image[:,:,::-1]);plt.title("Original Image");plt.axis('off');
        plt.subplot(122);plt.imshow(output_image[:,:,::-1]);plt.title("Output Image");plt.axis('off');

    # Otherwise
    else:

        # Return the output image and the binary mask.
        # Also convert all the 1s in the mask into 255 and the 0s will remain the same.
        # The mask is returned in case you want to troubleshoot.
        return output_image, (binary_mask_3 * 255).astype('uint8')
Now we will utilize the function created above with the argument method='changeBackground' to change the backgrounds of a few sample images and check the results.
# Read a sample image and change background
image2 = cv2.imread('media/sample5.jpg')
modifyBackground(image2, bg_img.copy(), method='changeBackground')
# Read another sample image and a new background and change it.
image3 = cv2.imread('media/sample6.jpg')
bg_img2 = cv2.imread('media/backgroundimages/2.jpg')
modifyBackground(image3, bg_img2, 0.7, method='changeBackground')
# Read another sample image and a new background and change it.
image4 = cv2.imread('media/sample4.jpg')
bg_img3 = cv2.imread('media/backgroundimages/3.jpg')
modifyBackground(image4, bg_img3, 0.55, method='changeBackground')
Change Background On Real-Time Web-cam Feed
The results on the images look great, but how will the function we created above fare when applied to our real-time webcam feed. Well, let’s check it out. In the code below we will swap out different background images by pressing the key b on keyboard.
 Initialize the VideoCapture object to read from the webcam.
camera_video = cv2.VideoCapture(0)

# Set width of the frames in the video stream.
camera_video.set(3, 1280)

# Set height of the frames in the video stream.
camera_video.set(4, 720)

# Initialize a list to store the background images.
background_images = []

# Specify the path of the folder which contains the background images.
background_folder = 'media/backgroundimages/'

# Iterate over the images in the background folder.
for img_path in os.listdir(background_folder):

    # Read a image.
    image = cv2.imread(f"{background_folder}/{img_path}")

    # Append the image into the list.
    background_images.append(image)

# Initialize a variable to store the index of the background image.
bg_img_index = 0

# Initialize a variable to store the time of the previous frame.
time1 = 0

# Iterate until the webcam is accessed successfully.
while camera_video.isOpened():

    # Read a frame.
    ok, frame = camera_video.read()

    # Check if frame is not read properly.
    if not ok:

        # Continue to the next iteration to read the next frame.
        continue

    # Flip the frame horizontally for natural (selfie-view) visualization.
    frame = cv2.flip(frame, 1)

    # Change the background of the frame.
    output_frame,_ = modifyBackground(frame, background_image = background_images[bg_img_index % len(background_images)],
                                      threshold = 0.3, display = False, method='changeBackground')

    # Set the time for this frame to the current time.
    time2 = time()

    # Check if the difference between the previous and this frame time > 0 to avoid division by zero.
    if (time2 - time1) > 0:

        # Calculate the number of frames per second.
        frames_per_second = 1.0 / (time2 - time1)

        # Write the calculated number of frames per second on the frame.
        cv2.putText(output_frame, 'fps: {}'.format(int(frames_per_second)), (10, 30),cv2.FONT_HERSHEY_PLAIN, 2, (0, 255, 0), 3)

    # Update the previous frame time to this frame time.
    # As this frame will become previous frame in next iteration.
    time1 = time2

    # Display the frame with changed background.
    cv2.imshow('Video', output_frame)

    # Wait until a key is pressed.
    # Retreive the ASCII code of the key pressed
    k = cv2.waitKey(1) & 0xFF

    # Check if 'ESC' is pressed.
    if (k == 27):

        # Break the loop.
        break

    elif (k == ord('b')):
        bg_img_index = bg_img_index + 1


# Release the VideoCapture Object.
camera_video.release()

# Close the windows.
cv2.destroyAllWindows()
Output:
Woah! that was Cool, not only the results are great but the model is pretty fast.
Video on Video Background Replacement:
Let’s take this one step further and instead of changing the background by an image, let’s replace it with a video loop.
# Initialize the VideoCapture object to read from the webcam.
camera_video = cv2.VideoCapture(0)

# Set width of the frames in the video stream.
camera_video.set(3, 1280)

# Set height of the frames in the video stream.
camera_video.set(4, 720)

# Initialize the VideoCapture object to read from the background video stored in the disk.
background_video = cv2.VideoCapture('media/backgroundvideos/1.mp4')

# Set the background video frame counter to zero.
background_frame_counter = 0

# Initialize a variable to store the time of the previous frame.
time1 = 0

# Iterate until the webcam is accessed successfully.
while camera_video.isOpened():

    # Read a frame.
    ok, frame = camera_video.read()

    # Check if frame is not read properly.
    if not ok:

        # Continue to the next iteration to read the next frame.
        continue

    # Read a frame from background video
    _, background_frame = background_video.read()

    # Increment the background video frame counter.
    background_frame_counter = background_frame_counter + 1

    # Check if the current frame is the last frame of the background video.
    if background_frame_counter == background_video.get(cv2.CAP_PROP_FRAME_COUNT):

        # Set the current frame position to first frame to restart the video.
        background_video.set(cv2.CAP_PROP_POS_FRAMES, 0)

        # Set the background video frame counter to zero.
        background_frame_counter = 0

    # Flip the frame horizontally for natural (selfie-view) visualization.
    frame = cv2.flip(frame, 1)

    # Change the background of the frame.
    output_frame,_ = modifyBackground(frame, background_image=background_frame, threshold=0.3,
                                      display=False, method='changeBackground')

    # Set the time for this frame to the current time.
    time2 = time()

    # Check if the difference between the previous and this frame time > 0 to avoid division by zero.
    if (time2 - time1) > 0:

        # Calculate the number of frames per second.
        frames_per_second = 1.0 / (time2 - time1)

        # Write the calculated number of frames per second on the frame.
        cv2.putText(output_frame, 'fps: {}'.format(int(frames_per_second)), (10, 30),cv2.FONT_HERSHEY_PLAIN, 2, (0, 255, 0), 3)

    # Update the previous frame time to this frame time.
    # As this frame will become previous frame in next iteration.
    time1 = time2


    # Display the frame with changed background.
    cv2.imshow('Video', output_frame)

    # Wait until a key is pressed.
    # Retreive the ASCII code of the key pressed
    k = cv2.waitKey(1) & 0xFF

    # Check if 'ESC' is pressed.
    if (k == 27):

        # Break the loop.
        break

# Release the VideoCapture Object.
camera_video.release()

# Close the windows.
cv2.destroyAllWindows()
Output:
That was pretty interesting, now that you’ve learned how to segment the background successfully it’s time to make use of this skill and create some other exciting applications out of it.
Application 2: Apply Background Blur
Now this application will actually save you a lot of money.
How?
Well, remember those expensive DSLR or mirrorless cameras that blur out the background, today you’ll learn to achieve the same effect, infact even better by just using your webcam.
So now we will use the function created above to segment out the prominent person and then blur out the background.
All we need to do is just blur the original image using cv2.GaussianBlur() and then instead of replacing the background with a new image (like we did in the previous application) we’ll just replace it with this blur version of the image. This way the segmented person will retain it’s original form but the rest of the parts will be blurred out.
Now let’s call the function with the argument method='blurBackground' over some samples. You can control the amount of blur by controling the blur variable.
# Read another sample image and blur the background
image2 = cv2.imread('media/sample2.jpg')
modifyBackground(image2, method='blurBackground')
# Read another sample image and blur the background
image3 = cv2.imread('media/sample.jpg')
modifyBackground(image3, method='blurBackground')
# Read another sample image and blur the background
image4 = cv2.imread('media/sample1.jpg')
modifyBackground(image4, blur=51, method='blurBackground')
Background Blur On Video
Now we will utilize the function created above in a real-time webcam feed where we will be able to blur the background.
# Initialize the VideoCapture object to read from the webcam.
camera_video = cv2.VideoCapture(0)

# Set width of the frames in the video stream.
camera_video.set(3, 1280)

# Set height of the frames in the video stream.
camera_video.set(4, 720)

# Initialize a variable to store the time of the previous frame.
time1 = 0

# Iterate until the webcam is accessed successfully.
while camera_video.isOpened():

    # Read a frame.
    ok, frame = camera_video.read()

    # Check if frame is not read properly.
    if not ok:

        # Continue to the next iteration to read the next frame.
        continue

    # Flip the frame horizontally for natural (selfie-view) visualization.
    frame = cv2.flip(frame, 1)

    # Blur the background of the frame.
    output_frame,_ = modifyBackground(frame, threshold = 0.3, display = False, method='blurBackground')

    # Set the time for this frame to the current time.
    time2 = time()

    # Check if the difference between the previous and this frame time > 0 to avoid division by zero.
    if (time2 - time1) > 0:

        # Calculate the number of frames per second.
        frames_per_second = 1.0 / (time2 - time1)

        # Write the calculated number of frames per second on the frame.
        cv2.putText(output_frame, 'fps: {}'.format(int(frames_per_second)), (10, 30),cv2.FONT_HERSHEY_PLAIN, 2,
                    (0, 255, 0), 3)

    # Update the previous frame time to this frame time.
    # As this frame will become previous frame in next iteration.
    time1 = time2

    # Display the frame with blurred background.
    cv2.imshow('Video', output_frame)

    # Wait until a key is pressed.
    # Retreive the ASCII code of the key pressed
    k = cv2.waitKey(1) & 0xFF

    # Check if 'ESC' is pressed.
    if (k == 27):

        # Break the loop.
        break


# Release the VideoCapture Object.
camera_video.release()

# Close the windows.
cv2.destroyAllWindows()
Output:
Application 3: Desaturate Background
Now we will use the function created above to desaturate (convert to grayscale) the background of the image. Again the only new thing that we’re doing here is just replacing the black parts of the segmented mask with the grayscale version of the original image.
We will have to pass the argument method='desatureBackground' this time, to desaturate the backgrounds of a few sample images.
# Read a sample image and apply the desaturation effect.
image2 = cv2.imread('media/sample6.jpg')
modifyBackground(image2, method='desatureBackground')
# Read a sample image and apply the desaturation effect.
image3 = cv2.imread('media/sample4.jpg')
modifyBackground(image3, method='desatureBackground')
# Read a sample image and apply the desaturation effect.
image4 = cv2.imread('media/sample5.jpg')
modifyBackground(image4, method='desatureBackground')
Background Desaturation On Video
Now we will utilize the function created above in a real-time webcam feed where we will be able to desaturate the background of the video.
# Initialize the VideoCapture object to read from the webcam.
camera_video = cv2.VideoCapture(0)

# Set width of the frames in the video stream.
camera_video.set(3, 1280)

# Set height of the frames in the video stream.
camera_video.set(4, 720)

# Initialize a variable to store the time of the previous frame.
time1 = 0

# Iterate until the webcam is accessed successfully.
while camera_video.isOpened():

    # Read a frame.
    ok, frame = camera_video.read()

    # Check if frame is not read properly.
    if not ok:

        # Continue to the next iteration to read the next frame.
        continue

    # Flip the frame horizontally for natural (selfie-view) visualization.
    frame = cv2.flip(frame, 1)

    # Desature the background of the frame.
    output_frame,_ = modifyBackground(frame, threshold = 0.3, display = False, method='desatureBackground')

    # Set the time for this frame to the current time.
    time2 = time()

    # Check if the difference between the previous and this frame time > 0 to avoid division by zero.
    if (time2 - time1) > 0:

        # Calculate the number of frames per second.
        frames_per_second = 1.0 / (time2 - time1)

        # Write the calculated number of frames per second on the frame.
        cv2.putText(output_frame, 'fps: {}'.format(int(frames_per_second)), (10, 30),cv2.FONT_HERSHEY_PLAIN, 2,
                    (0, 255, 0), 3)

    # Update the previous frame time to this frame time.
    # As this frame will become previous frame in next iteration.
    time1 = time2

    # Display the frame with desatured background.
    cv2.imshow('Video', output_frame)

    # Wait until a key is pressed.
    # Retreive the ASCII code of the key pressed
    k = cv2.waitKey(1) & 0xFF

    # Check if 'ESC' is pressed.
    if (k == 27):

        # Break the loop.
        break

# Release the VideoCapture Object.
camera_video.release()

# Close the windows.
cv2.destroyAllWindows()
Output:
Application 4: Convert an Image to have a Transparent Background
Now we will use the function created above to segment out the prominent person and then make the background of the image transparent and after that we will store the resultant image into the disk using the function cv2.imwrite().
To create an image with a transparent background (four-channel image) we will need to add another channel called alpha channel to the original image, this channel is a mask which decides which part of the image needs to be transparent and can have values from 0 (black) to 255 (white) which determine the level of visibility. Black (0) acts as the transparent area and white (255) acts as the visible area.
So we just need to add the segmentation mask to the original image.
We will have to pass the argument method='transparentBackground' to the function to get an image with transparent background.
# Specify the path of a sample image.
img_path = 'media/sample.jpg'

# Read the input image from the specified path.
image = cv2.imread(img_path)

# Make the background of the sample image transparent.
trans_background_img, _ = modifyBackground(image, threshold = 0.9, display=False, method='transparentBackground')

# Specify the path to store the resultant image
resultant_img_path = 'output/transparent background ' + img_path.split('/')[-1].split('.')[0]

# Store the resultant image into the disk. Make sure it's stored as `PNG`
cv2.imwrite(resultant_img_path + ".png", trans_background_img)

# Show a success message.
print('The Image with transparent background is successfully stored in the disk')
You can go to the location where the image is saved, open it up with an image viewer and you’ll see that the background is transparent.
Further Resources
- Selfie Segmentation Documentation
- MobileNet Paper
- Google AI Blog on MobileNet
- Model Information
- Hangout release
Note: These models work best for the scenarios where the person is close (< 2m) to the camera.
Bleed AI Needs Your Support!
Hi Everyone, Taha Anwar (Founder Bleed AI) here. If my blog posts or videos have helped you in any way in your Computer Vision/AI/ML/DL Learning journey then remember you can help us out too.
Publishing Free high-quality Computer Vision tutorials for you guys so that you can build projects, or land your dream job, or maybe build a startup is our core mission at Bleed AI. But every single post takes a lot of effort and man-hours, and in order to keep publishing Free high-end Tutorials, and me & my team need your support on Patreon, plus you will get some extra perks too.
Summary:
Alright, So today we did a lot!
We Understand the basic terminology regarding different segmentation techniques, in summary:
- Image Segmentation: The task of dividing pixels into groups of pixels based on some criteria
- Semantic Segmentation: In this type we assign a class label to every pixel in the image.
- Instance Segmentation: Here we assign a class label to only selective classes in the image.
- Panoptic Segmentation: This approach combines both semantic and instance segmentation.
- Saliency Detection: Here we’re just interested in segmenting prominent objects in the image regardless of the class.
- Selfie Segmentation: Here we want to segment prominent people in the image.
We also learned that Mediapipe is an awesome tool to use various ML models in real-time. Then we learned how to perform selfie segmentation with this tool and build 4 different useful applications from it. These applications were:
- How to remove/replace backgrounds in images & videos.
- How to desaturate the background to make the person pop out in an image or a video.
- How to blur out the background.
- How to give an image a transparent background and save it.
This was my first Mediapipe tutorial and I’m planning to write a tutorial on a few other models too. If you enjoyed this tutorial then do let me know in the comments! You’ll definitely get a reply from me


0 Comments