Watch Video Here
In this tutorial, you will learn to create a Python + OpenCV script that will generate the Squid Game memes automatically without using photoshop or other editors.
If you’re not living in the Stone Age, then I’m willing to bet you must have witnessed the hype of the NetFlix latest hit TV show called the Squid Game. Nowadays every other post on the internet is about it and feels like a storm that has taken over the internet, now if you haven’t watched that show already then I will definitely recommend you to check it out! Otherwise, society may not accept you 😂 … just kidding!
Also, I’m not going to be revealing any spoilers for the show, so don’t worry 🙂.
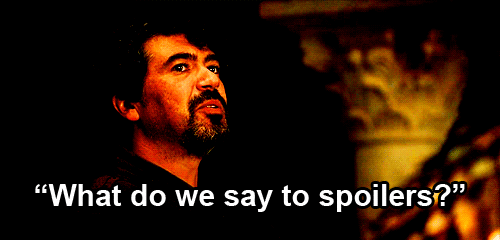
So in the last couple of weeks, I’ve been seeing a lot of memes related to this show, and have found some of the memes absolutely hilarious like this one:
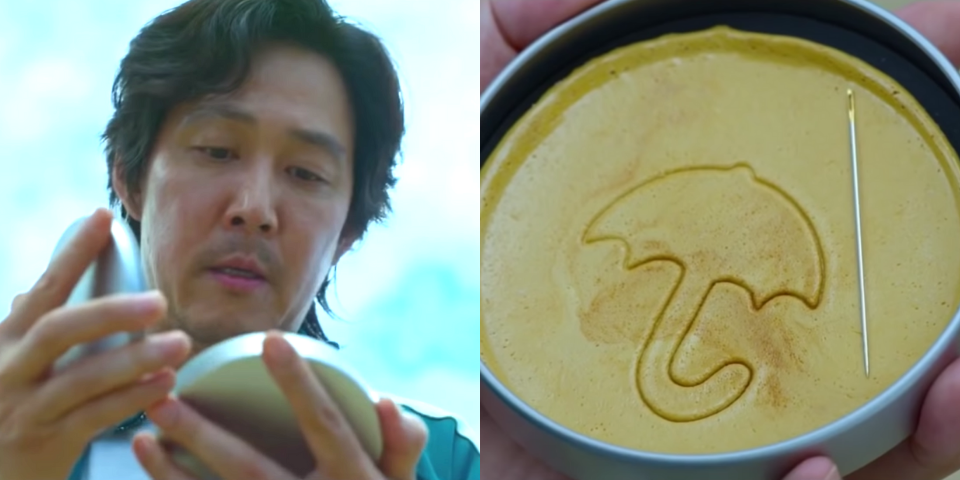
You need context to get this but as promised I won’t be giving any spoilers but just to summarize the characters had to carve out shapes from the candy above, the more difficult the shapes the harder this challenge was. Now people online have been replacing the original umbrella with all sorts of things.
And I thought why not embed the Bleed AI logo here using photoshop and post it on my Facebook page, but then I got an even better idea, why not create a python script capable of generating a new meme automatically, given this meme template and any logo. Something like this:

And I ended up creating this tutorial that will teach you to automatically generate these Squid Game memes in a step-by-step manner with each step explained in detail using just OpenCV and Python.

So to start learning just press the green button in the image above … or keep reading 😏.
Outline:
- Retrieve the Candy ROI
- Remove the Umbrella Design from the Candy
- Read and Preprocess the Design Image
- Embed the new Design Image
- Display and Save the Output Image
Download Code:
[optin-monster slug=”s8aqbbu3pp5cme0mydr7″]
Import the Libraries
We will start by importing the required libraries.
import cv2
import numpy as np
import matplotlib.pyplot as plt
Read an Image
Now we will use the function cv2.imread() to read a sample image and then display the image using the matplotlib library, after converting it into RGB from BGR format.
# Read the input image from the specified path.
input_image = cv2.imread('media/Dalgona Candy.png')

# Specify a size of the figure.
plt.figure(figsize = [10, 10])

# Display the input image, also convert BGR to RGB for display.
plt.title("Input Image");plt.axis('off');plt.imshow(input_image[:,:,::-1]);plt.show()

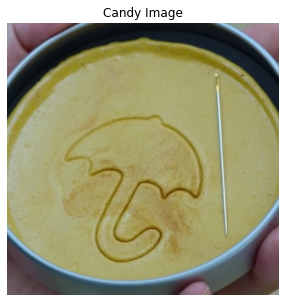
Retrieve the Candy ROI
Now we will simply crop the candy ROI from the input image we read and then display the ROI using the matplotlib library.
# Retrieve the height and width of the input image.
image_height, image_width, _ = input_image.shape

# Perform array slicing to retrieve the candy ROI from the input image.
candy_image = input_image[:,image_width//2:]

# Display the cropped candy image, also convert BGR to RGB for display.
plt.figure(figsize=[5,5]);plt.title("Candy Image");plt.axis('off');plt.imshow(candy_image[:,:,::-1]);plt.show()
Remove the Umbrella Design from the Candy
Now that we have the required ROI, we will smoothen out the umbrella design from it using cv2.medianBlur() function. For this, we will perform:
- Canny Edge Detection to detect the umbrella design regions, using the function
cv2.Canny(). - Dilation to increase size of the detected design edges, using the function
cv2.dilate().
And get a mask image of the ROI, with pixel values 255 at the indexes where the umbrella design is present and pixel values 0 at the remaining indexes, which we will utilize to smoothen out only the exact regions where the umbrella design is present in the candy ROI. So we will get rid of the umbrella design while retaining the candy texture.
# Retrieve the height and width of the candy image.
candy_height, candy_width, _ = candy_image.shape

# Create copies of the candy image.
clear_candy = candy_image.copy()
clear_candy_wm = candy_image.copy()

# Perform array slicing to retrieve the umbrella ROI from the candy image.
umbrella = candy_image[int(candy_height/3):int(candy_height/1.12),int(candy_width/5):int(candy_width/1.35)].copy()

# Blur the image to smoothen out the umbrella design.
blurred = cv2.medianBlur(umbrella, 31).copy()

# Perform canny edge detection on the umbrella image to create a mask of the umbrella design.
edges = cv2.Canny(image=umbrella, threshold1=40, threshold2=210)

# Apply Dilation on the output of the canny edge detection with an iteration of 4.
mask = cv2.dilate(edges, np.ones((7, 7), np.uint8), iterations = 4)

# Overlay the blurred umbrella image over the umbrella design in the candy image, only at the indexes,
# where the umbrella is present utilizing the umbrella mask.
umbrella[mask!=0] = blurred[mask!=0]

# Update the copy of the candy image with resultant ROI having the exact umbrella region blurred utilizing the umbrella mask.
clear_candy[int(candy_height/3):int(candy_height/1.12),int(candy_width/5):int(candy_width/1.35)] = umbrella

# Update the copy of the candy image with resultant ROI having the whole umbrella ROI blurred without using mask.
clear_candy_wm[int(candy_height/3):int(candy_height/1.12),int(candy_width/5):int(candy_width/1.35)]  = blurred

# Display the mask image, cleared candy image without mask, and cleared candy image using mask.
plt.figure(figsize=[15,15])
plt.subplot(131);plt.title("Mask");plt.axis('off');plt.imshow(mask, cmap ='gray')
plt.subplot(132);plt.title("Cleared Candy Image without Mask");plt.axis('off');plt.imshow(clear_candy_wm[:,:,::-1])
plt.subplot(133);plt.title("Cleared Candy Image using Mask");plt.axis('off');plt.imshow(clear_candy[:,:,::-1]);plt.show()

After clearing the previous design from the candy, our next step will be to embed a new one on the candy to create the meme we want.
Read and Preprocess the Design Image
But For this purpose, we will first have to load the new design image from the disk and perform the required preprocessing on it. We will perform:
- Resizing the design image to an appropriate size, using the function
cv2.resize() - Canny Edge Detection on the resized image, to get the design edges, using the function
cv2.Canny(). - Dilation to increase size of the detected design edges, using the function
cv2.dilate(). - Median Blur to smoothen the detected design edges, using the function
cv2.medianBlur().
To get a preprocessed mask of the design image that we will need to create that original umbrella-like effect on the candy.
# Read the design image from the specified path.
design_image = cv2.imread('media/Bleedai.png')
# design_image = cv2.imread('media/batman.png')
# design_image = cv2.imread('media/android.png')
# design_image = cv2.imread('media/trump.png')

# Retrieve the height and width of the design image.
design_height, design_width, _ = design_image.shape

# Perform the required preprocessings on the design image.
#############################################################################################################################

# Resize the design image to the 1/2th width of the candy image while keeping the aspect ratio constant.
design_image = cv2.resize(design_image, (candy_width//2, int(((candy_width//2) / design_width) * design_height)))

# Perform Canny Edge Detection on the design image.
design_mask = cv2.Canny(image=design_image, threshold1=100, threshold2=200)

# Apply Dilation on the output of the canny edge detection with an iteration of 1.
design_mask = cv2.dilate(design_mask, np.ones((3,3),np.uint8),iterations = 1)

# Perform median blur to smoothen the edges of the design.
design_mask = cv2.medianBlur(design_mask,5)

# Invert the design mask image.
# This will replace the pixel values that are 255 with 0,
# And the pixel values that are 0 with 255.
design_mask = ~design_mask

#############################################################################################################################

# Display the original design image, and the preprocessed design image.
plt.figure(figsize=[10,10])
plt.subplot(121);plt.imshow(design_image[:,:,::-1]);plt.title("Original Design");plt.axis('off');
plt.subplot(122);plt.imshow(design_mask, cmap='gray');plt.title("Preprocessed Design");plt.axis('off');

Embed the new Design Image
Now we will overlay this preprocessed design over the region of interest of the cleared candy image. For this, we will first retrieve the ROI using the array slicing technique, and then we will modify the ROI by replacing some pixels values with the processed design pixel values, utilizing the mask of the design to find the indexes of the pixels to replace. And then, we will use the function cv2.addWeighted() to perform the weighted addition between the modified and the original ROI to get a transparency effect for the new design.
Note: The processed design is a one-channel image, so we will have to convert it into a three-channel image by merging that one-channel image three times using the function cv2.merge(), to overlay it over the three-channel candy image.
# Create a copy of the cleared candy image.
output_candy = clear_candy.copy()

# Retrieve the height and width of the resized design image.
design_height, design_width, _ = design_image.shape

# Retrieve the region of interest of the copy of the cleared candy image where the design image will be embedded.
ROI = output_candy[(candy_height//2-design_height//2): (candy_height//2-design_height//2)+design_height,
                   (candy_width//2-design_width//2): (candy_width//2-design_width//2)+design_width].copy()

# Create a copy of the retrieved region of interest.
modified_ROI = ROI.copy()

# Convert the one channel design image mask into a three channel image.
design_mask_3 = cv2.merge((design_mask,design_mask,design_mask))

# Overlay the design by updating the pixel values of the copy of the retrieved region of interest
# at the required indexes i.e., where the design mask image has pixel values 0.
modified_ROI[design_mask==0] = design_mask_3[design_mask==0]

# Perform weighted addition between the modified and the original ROI to get a transparency effect.
resultant_image = cv2.addWeighted(ROI, 0.8, modified_ROI, 0.2, 0)

# Display the original region of interest, modified region of interest, and the resultant image of the weighted addition.
plt.figure(figsize=[10,10])
plt.subplot(131);plt.imshow(ROI[:,:,::-1]);plt.title("ROI");plt.axis('off');
plt.subplot(132);plt.imshow(modified_ROI[:,:,::-1]);plt.title("Modified ROI");plt.axis('off');
plt.subplot(133);plt.imshow(resultant_image[:,:,::-1]);plt.title("Resultant Image");plt.axis('off');

Display and Save the Output Image
Now we will put together all of the resultant ROIs to get the output meme image, and then we will save it into the disk using the cv2.imwrite() function, and display it using the matplotlib library, after converting it into RGB from BGR format.
# Update the copy of the cleared candy image with the resultant ROI which has the design overlayed.
output_candy[(candy_height//2-design_height//2): (candy_height//2-design_height//2)+design_height,
             (candy_width//2-design_width//2): (candy_width//2-design_width//2)+design_width] = resultant_image

# Create a copy of the input image.
output_image = input_image.copy()

# Update the candy region of the copy of the input image from the umbrella design to the bleed AI logo design.
output_image[:,image_width//2:] = output_candy

# Save the output image to a specified path.
cv2.imwrite('media/Output Image.png', output_image)

# Display the output image, also convert BGR to RGB for display.
plt.figure(figsize=[10,10]);plt.title("Output Image");plt.axis('off');plt.imshow(output_image[:,:,::-1]);plt.show()
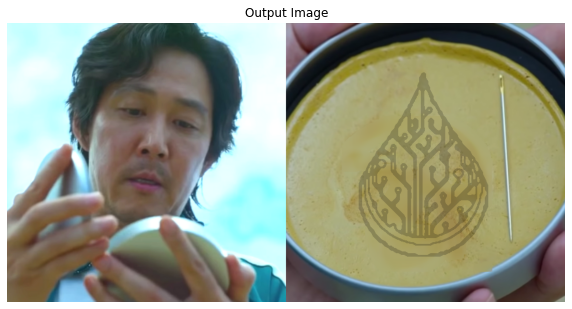
Looks cool, right? With this, we have completed the script to automatically generate squid game dalgona candy memes for any design we want.
Join My Course Computer Vision For Building Cutting Edge Applications Course

The only course out there that goes beyond basic AI Applications and teaches you how to create next-level apps that utilize physics, deep learning, classical image processing, hand and body gestures. Don’t miss your chance to level up and take your career to new heights
You’ll Learn about:
- Creating GUI interfaces for python AI scripts.
- Creating .exe DL applications
- Using a Physics library in Python & integrating it with AI
- Advance Image Processing Skills
- Advance Gesture Recognition with Mediapipe
- Task Automation with AI & CV
- Training an SVM machine Learning Model.
- Creating & Cleaning an ML dataset from scratch.
- Training DL models & how to use CNN’s & LSTMS.
- Creating 10 Advance AI/CV Applications
- & More
Whether you’re a seasoned AI professional or someone just looking to start out in AI, this is the course that will teach you, how to Architect & Build complex, real world and thrilling AI applications
Summary
In this tutorial, we learned to automatically generate the Squid Game memes just by using OpenCV and Python and while doing so we learned a couple of useful image processing techniques like Canny Edge Detection, Dilation, and Median Blurring, etc now you can try to improve the output further by tuning the parameters if you want.
Or you can try to generate a different meme using the concepts you have learned in this tutorial and share the results with me. It is always tempting to see you guys build on top of what you learn here at Bleed AI, so make sure to post the links to your memes in the comments
You can reach out to me personally for a 1 on 1 consultation session in AI/computer vision regarding your project. Our talented team of vision engineers will help you every step of the way. Get on a call with me directly here.
Ready to seriously dive into State of the Art AI & Computer Vision?
Then Sign up for these premium Courses by Bleed AI


0 Comments