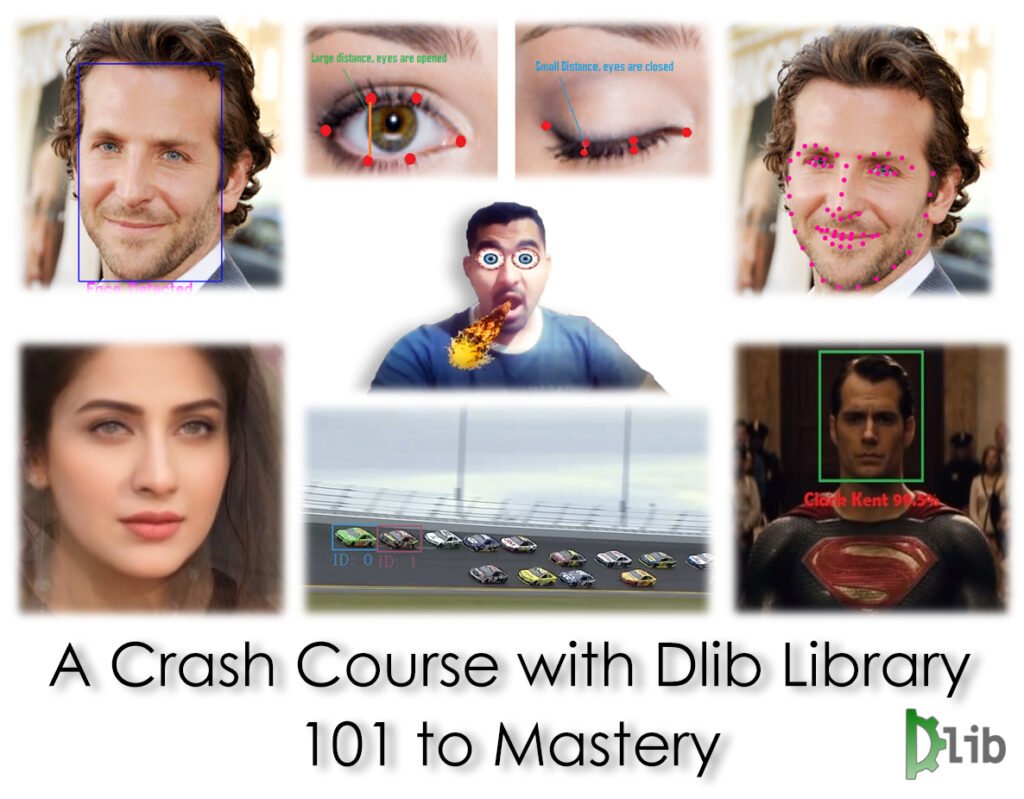
This tutorial will serve as a crash course to dlib library. Dlib library is another powerful computer vision library out there. It is not as extensive as OpenCV but still, there is a lot you can do with it.
This crash course assumes you’re somewhat familiar with OpenCV, if not then I’ve also published a crash course on OpenCV too. Make sure to download Dlib Resource Guide above which includes all important links in this post.
Side Note: I missed publishing a tutorial last week as I tested covid positive and was ill, still not 100% but getting better 🙂
The Dlib Library is created and maintained by Davis King, It’s a C++ toolkit containing machine learning & Computer Vision algorithms for a number of important tasks including, Facial Landmark detection, Deep Metric Learning, Object tracking, and more. It also has a python API.
Note: It’s worth noting that the main power of dlib library is in numerical optimization but today I’m only going to focus on applications, you can look at optimization examples here.
It’s a popular library that is used by people in both industry and academia in a wide range of domains including robotics, embedded devices, and other areas.
I plan to cover most of the prominent features and algorithms present in dlib library so this blog post alone can give you the best overview of dlib library and its functionality. Now, this is a big statement, If I had to explain most of dlib features in a single place then I would probably be writing a book or making a course on it but rather I plan to explain it all in this post.
So how am I going to accomplish that?
So here’s the thing I’m not going to write and explain the code for each algorithm with dlib library, because I don’t want to write several thousand’s of words worth of a blog post and also because almost all of the features of dlib library have been explained pretty well in several posts on the internet.
So if everything is out there then why the heck am I trying to make a crash course out of it ?
So here’s the real added value of this crash course:
In this post, I will connect all the best and the most important tutorials on different aspects of dlib library out there in a nice hierarchical order. This will not only serve as a golden Dlib library 101 to Mastery post for people just starting out with dlib but will also serve as a well-structured reference guide for dlib library users.
The post is split into various sections, in each section, I will briefly explain a useful algorithm or technique present in dlib library. If that explanation intrigues you and you feel that you need to explore that particular algorithm further then in each section I provide links to high-quality tutorials that goes in-depth about that function, the links would mostly be from Pyimagesearch, LearnOpenCV as these are golden sites when it comes to Computer Vision Tutorials.
When learning some topic, ideally we prefer these two things:
- A Collection of all the useful material regarding the topic presented at one place in a nice and neat hierarchical order.
- Each material presented and delivered in a high-quality format preferably by an author who knows how to teach it the right way.
In this post, I’ve made sure both of these points are true, all the information is presented in a nice order and the posts that I link to will be of high quality. Other than that I will also try to include other extra resources where I feel necessary.
[optin-monster slug=”vo6yhgi5h0rivacnipak”]
Here’s the outline for this crash course:
- Dlib Library Installation
- Face Detection
- Facial Landmark Detection
- Facial Landmark Detection Applications (Blink, yawn, smile detection & Snapchat filters)
- Facial Alignment & Filter Orientation Correction
- Head Pose Estimation
- Single & Multi-Object Tracking with Dlib
- Face Swapping, Averaging & Morphing
- Face Recognition
- Face Clustering
- Training a Custom Landmark Predictor
- Training a Custom Object Detector
- Dlib Optimizations For Faster & Better Performance
Installation:
The easiest way to install dlib library is to do:
pip install dlib
This will only work if you have Visual Studio (i.e. you need a C++ compiler) and CMake installed as dlib will build and compile first before installing. If you don’t have these then you can use my OpenCV’s source installation tutorial to install these two things.
If you don’t want to bother installing these then here’s what you can do, if you have a python version greater then 3.6 then create a virtual environment for python 3.6 using Anaconda or virtualenv.
After creating a python 3.6 environment you can do:
pip install dlib==19.8.1
This will let you directly install pre-built binaries of dlib but this currently only works with python 3.6 and below.
Extra Resources on dlib:
Installing dlib in Mac, Raspi & Ubuntu.
Face Detection:
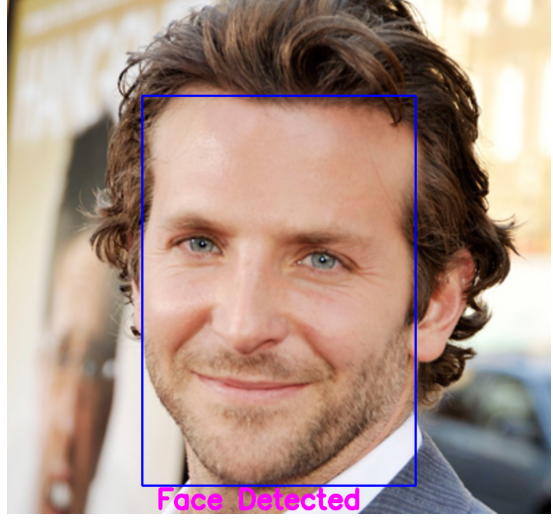
Now that we have installed dlib, let’s start with face detection.
Why face detection ?
Well, most of the interesting use cases in dlib for computer vision is with faces, like facial landmark detection, face recognition, etc so before we can detect facial landmarks, we need to detect faces in the image.
Dlib not only comes with a face detector but it actually comes with 2 of them. If you’re a computer vision practitioner then you would most likely be familiar with the old Haar cascade based face detector. Although this face detector is a lot popular, it’s almost 2 decades old and not very effective when it comes to different orientations of the faces.
Dlib comes with 2 face detection algorithms that are way more effective than the haar cascade based detectors.
These 2 detectors are:
HOG (histogram of oriented gradients) based detection: This detector uses HOG and Support vector machines, its slower than haar cascades but its more accurate and able to handle different orientations
CNN Based Detector: This is a really accurate deep learning based detector but its extremely slow on a CPU, you should only use this if you’ve compiled dlib with GPU.
You can learn more about these detectors here. Other than that I published a library called bleedfacedetector which lets you use these 2 detectors using just a few lines of the same code, and the library also has 2 other face detectors including the haar cascade one. You can look at bleedfacedetector here.
Extra Resources:
Here’s a tutorial on different Face detection methods including the dlib ones.
Facial Landmark Detection:
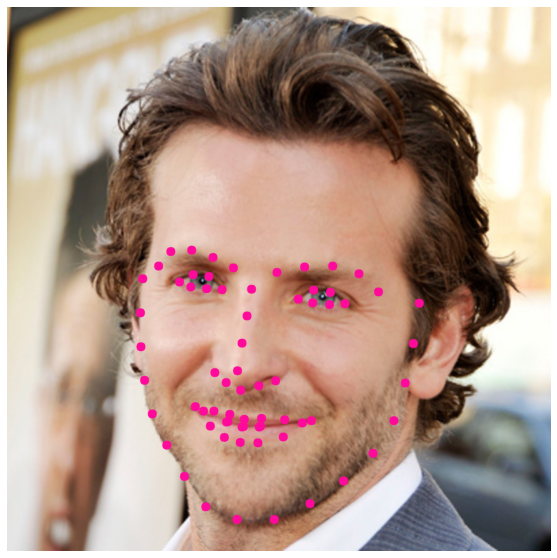
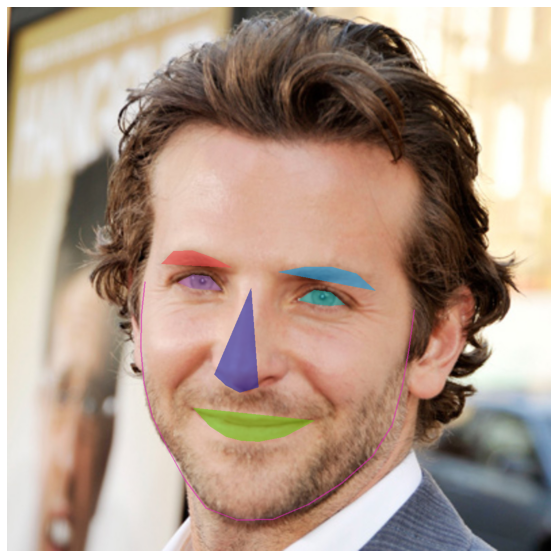
Now that we have learned how to detect faces in images, we will now learn the most common use case of dlib library which is facial landmark detection, with this method you will be able to detect key landmarks/features of the face like eyes, lips, etc.
The detection of these features will allow you to do a lot of things like track the movement of eyes, lips to determine the facial expression of a person, control a virtual Avatar with your facial expressions, understand 3d facial pose of a person, virtual makeover, face swapping, morphing, etc.
Remember those smart Snapchat overlays which trigger based on the facial movement, like that tongue that pops out when you open your mouth, well you can also make that using facial landmarks.
So its suffice to say that Facial landmark detection has a lot of interesting applications.
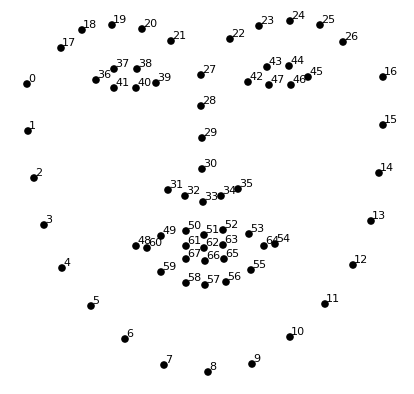
The landmark detector in dlib is based on the paper “One Millisecond Face Alignment with an Ensemble of Regression Trees”, its robust enough to correctly detect landmarks in different facial orientations and expressions. And it easily runs in real-time.
The detector returns 68 important landmarks, these can be seen in below image.
You can read a detailed tutorial on Facial Landmark detection here.
After reading the above tutorial the next step is to learn to manipulate the ROI of these landmarks so, you can modify or extract the individual features like the eyes, nose lips, etc. You can learn that by reading this Tutorial.
After you have gone through both of the above tutorials then you’re ready for running the landmark detector in real time but if you’re still confused about the exact process then take a look at this tutorial.
Extra Resources:
Here’s another great tutorial on Facial Landmark Detection.
Facial Landmark Detection Applications (Blink, yawn, smile detection & Snapchat filters):
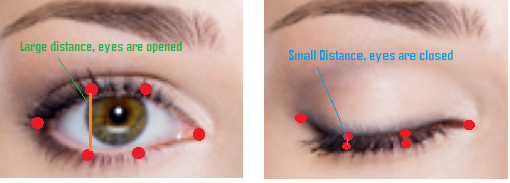
After you’re fully comfortable working with facial landmarks that’s when the fun starts. Now you’re ready to make some exciting applications, you can start by making a blink detection system by going through the tutorial here.
The main idea for a blink detection system is really simple, you just look at 2 vertical landmark points of the eyes and take the distance between these points, if the distance is too small (below some threshold) then that means the eyes are closed.
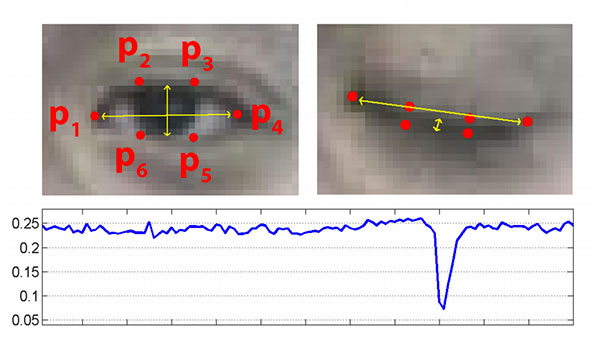
Of course, for a robust estimate, you won’t just settle for the distance between two points but rather you will take a smart average of several distances. One smart approach is to calculate a metric called Eye aspect ratio (EAR) for each eye. This metric was introduced in a paper called “ Real-Time Eye Blink Detection using Facial Landmarks”
This will allow you to utilize all 6 x,y landmark points of the eyes returned by dlib, and this way you can accurately tell if there was a blink or not.
Here’s the equation to calculate the EAR.
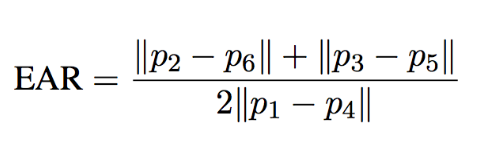
The full implementation details are explained in the tutorial linked above.
You can also easily extend the above method to create a drowsiness detector that alerts drivers if they feel drowsy, this can be done by monitoring how long the eyes are closed for. This is a really simple extension of the above and have real-world applications and could be used to save lives. Here’s a tutorial that explains how to build a step by step drowsiness detection system.
Interestingly you can take the same blink detection approach above and apply it to lips instead of the eyes, and create a smile detector. Yeah, the only thing you would need to change would be the x,y point coordinates (replace eye points with lip points), the EAR equation (use trial and error or intuition to change this), and the threshold.
Few years back I created this smile camera application with only a few lines of code, it takes a picture when you smile. You can easily create that by modifying the above tutorial.
What more can you create with this ?
How about a yawn detector, or a detector that tells if the user’s mouth is opened or not. You can do this by slightly modifying the above approach, you will be using the same lips x,y landmark points, the only difference would be how you’re calculating the distance between points.
Here’s a cool application I built a while back, its the infamous google dino game that’s controlled by me opening and closing the mouth.
The only drawback of the above application is that I can’t munch food while playing this game.
Taking the same concepts above you can create interesting snapchat overlay triggers.
Here’s an eye bulge and fire throw filter I created that triggers when I glare or open my mouth.
Similarly you can create lots of cool things using the facial landmarks.
Facial Alignment & Filter Orientation Correction:
Doing a bit of math with the facial landmarks will allow you to do facial alignment correction. Facial alignment allows you to correctly orient a rotated face.
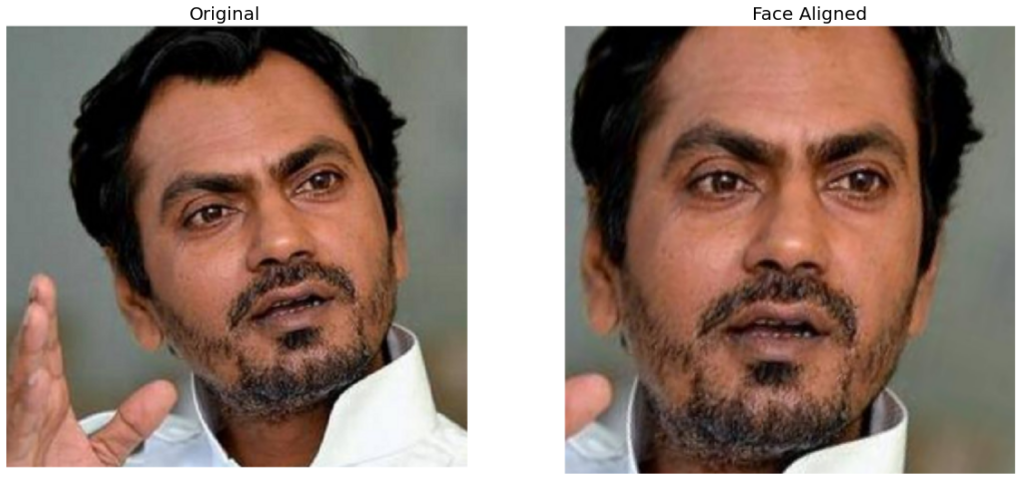
Why is facial alignment important?
One of the most important use case for facial alignment is in face recognition, there are many classical face recognition algorithms that will perform better if the face is oriented correctly before performing inference on them.
Here’s a full tutorial on facial Alignment.
One other useful thing concerning facial alignment is that you can actually extract the angle of the rotated face, this is pretty useful when you’re working with an augmented reality filter application as this will allow you to rotate the filters according to the orientation of the face.
Here’s an application I built that does that.
Head Pose Estimation:
A problem similar to facial alignment correction could be head pose estimation. In this technique instead of determining the 2d head rotation, you will learn to extract the full 3d head pose orientation. This is particularly useful when you’re working with an augmented reality application like overlaying a 3d mask on the face. You will only be able to correctly render the 3d object on the face if you know the face’s 3d orientation.
Here’s a great tutorial that teaches you head pose estimation in great detail.
Single & Multi-Object Tracking with Dlib:
Landmark detection is not all dlib has to offer, there are other useful techniques like a correlation tracking algorithm for Object Tracking that comes packed with dlib.
The tracker is based on Danelljan et al’s 2014 paper, Accurate Scale Estimation for Robust Visual Tracking.
This tracker works well with changes in translation and scale and it works in real time.
Object Detection VS Object Tracking:
If you’re just starting out in your computer vision journey and have some confusion regarding object detection vs tracking then understand that in Object Detection, you try to find an instance of the target object in the whole image. And you perform this detection in each frame of the video. There can be multiple instances of the same object and you’ll detect all of them with no differentiation between those object instances.
What I’m trying to say above is that a single image or frame of a video can contain multiple objects of the same class for e.g. multiple cats can be present on the same image and the object detector will see it as the same thing `CAT` with no difference between the individual cats throughout the video.
Whereas an Object Tracking algorithm will track each cat separately in each frame and will recognize each cat by a unique ID throughout the video.
You can read this tutorial that goes over Dlib correlation tracker.
After reading the above tutorial you can go ahead and read this tutorial for using the correlation tracker to track multiple objects.
Face Swapping, Averaging & Morphing:
Here’s a series of cool facial manipulations you can do by utilizing facial landmarks and some other techniques.
Face Morphing:

What you see in the above video is called facial morphing. I’m sure you have seen such effects in other apps and movies. This effect is a lot more than a simple image pixel blending or transition.
To have a morph effect like the above, you need to do image alignment, establish pixel correspondences using facial landmark detection and more.
Here’s a nice tutorial that teaches you face morphing step by step.
By understanding and utilizing facial morphing techniques you can even do morphing between dissimilar objects like a face to a lion.
Face Swapping:
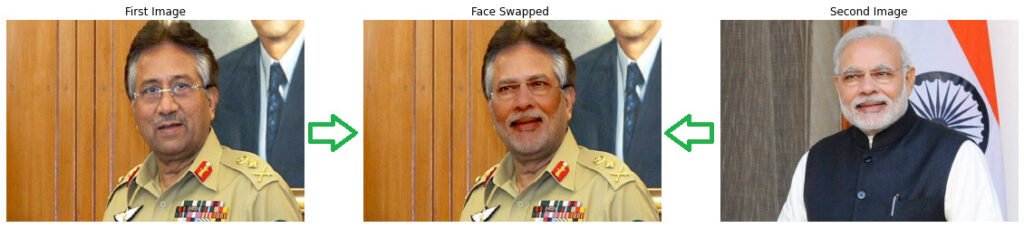
After you’ve understood face morphing then another really interesting you can do is face swapping, where you take a source face and put it over a destination face. Like putting Modi’s face over Musharaf’s above.
The techniques underlying face swapping is pretty similar to the one used in face morphing so there is not much new here.
The way this swapping is done makes the results look real and freakishly weird. See how everything from lightning to skin tone is matched.
Here’s a full tutorial on face swapping.
Tip: If you want to make the above code work in real-time then you would need to replace the seamless cloning function with some other faster cloning method, the results won’t be as good but it’ll work in real-time.
Alternative Tutorial:
Switching eds with python
Note: It should be noted this technique although gives excellent results but the state of the art in face swapping is achieved by deep learning based methods (deepfakes, FaceApp etc).
Face Averaging:
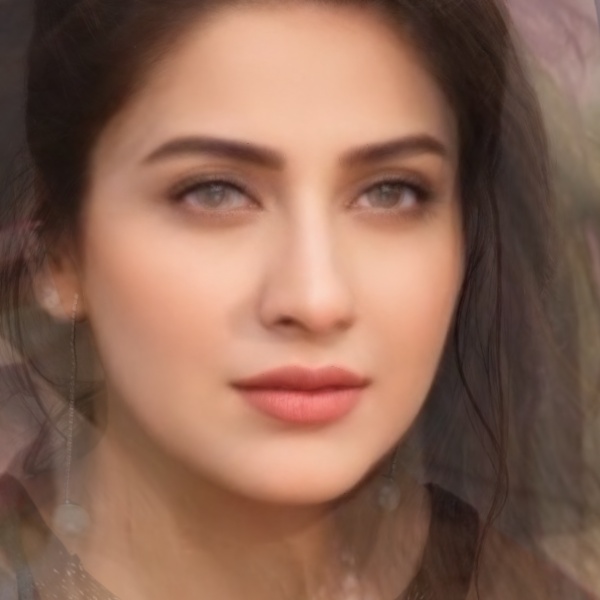
Average face of: Aiman Khan, Ayeza Khan, Mahira Khan, Mehwish Hayat, Saba Qamar & Syra Yousuf
Similar to above methods there’s also Face averaging where you smartly average several faces together utilizing facial landmarks.
The face image you see above is the average face I created using 6 different Pakistani female celebrities.
Personally speaking out of all the applications here I find face averaging the least useful or fun. But Satya has written a really interesting Tutorial on face averaging here that is worth a read.
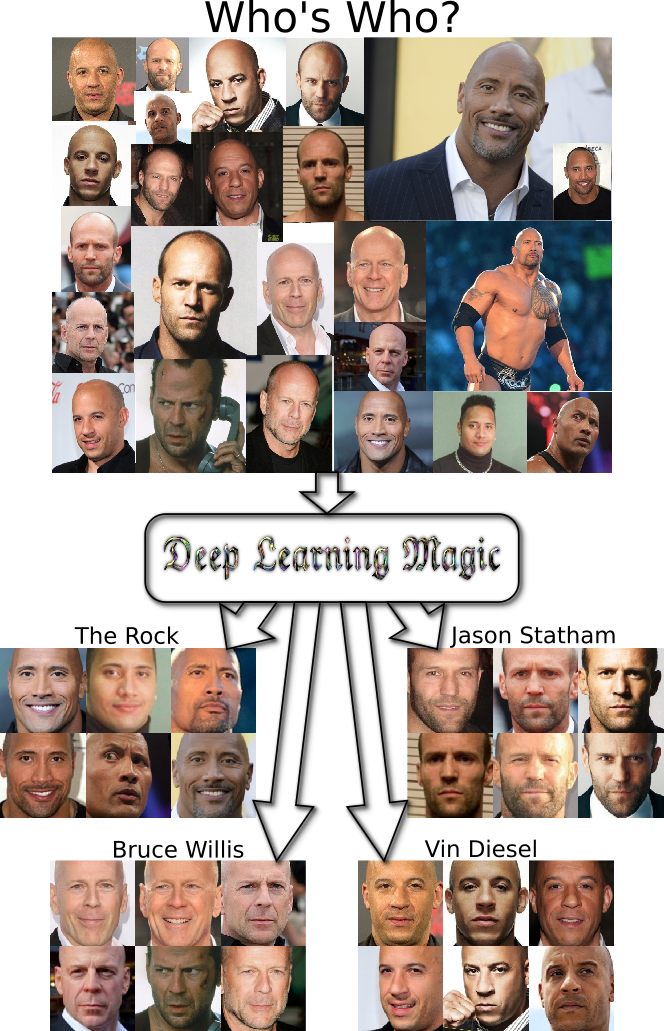
Face Recognition:
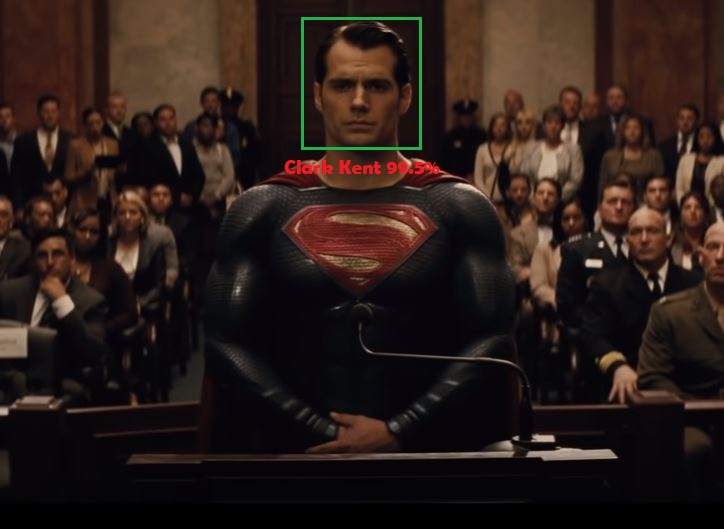
It should not come as a surprise that dlib also has a face recognition pipeline, not only that but the Face recognition implementation is really robust one and is a modified version of ResNet-34, based on the paper “ Deep Residual Learning for Image Recognition paper by He et al.”, it has an accuracy of 99.38% on the Labeled Faces in the Wild (LFW) dataset. This dataset contains ~3 million images.
The model was trained using deep metric learning and for each face, it learned to output a 128-dimensional vector. This vector encodes all the important information about the face. This vector is also called a face embedding.
First, you will store some face embeddings of target faces and then you will test on different new face images. Meaning you will extract embedding from test images and compare it with the saved embeddings of the target faces.
If two vectors are similar (i.e. the euclidean distance between them is small) then it’s said to be a match. This way you can make thousands of matches pretty fast. The approach is really accurate and works in real-time.
Dlib’s Implementation of face recognition can be found here. But I would recommend that you use the face_recognition library to do face recognition.This library uses dlib internally and makes the code a lot simpler.
You can follow this nice tutorial on doing face recognition with face_recognition library.
Extra resources:
An Excellent Guide on face recognition by Adam Geitgey.
Face Clustering:
Consider this, you went to a museum with a number of friends, all of them asked you to take their pictures behind several monuments/statues such that each of your friend had several images of them taken by you.
Now after the trip, all your friends ask for their pictures, now you don’t want to send each of them your whole folder. So what can you do here?
Fortunately, face clustering can help you out here, this method will allow you to make clusters of images of each unique individual.
Consider another use case: You want to quickly build a face recognition dataset for 10 office people that reside in a single room. Instead of taking manual face samples of each person, you instead record a short video of everyone together in the room, you then use a face detector to extract all the faces in each frame, and then you can use a face clustering algorithm to sort all those faces into clusters/folders. Later on, you just need to name these folders and your dataset is ready.
Clustering is a useful unsupervised problem and has many more use cases.
Face clustering is built on top of face recognition so once you’ve understood the recognition part this is easy.
You can follow this tutorial to perform face clustering.
Training a Custom Landmark Predictor:
Just like the Dlib’s Facial Landmark detector, you can train your own custom landmark detector. This detector is also called a shape predictor. Now you aren’t restricted to only facial landmarks but you can go ahead and train a landmark detector for almost anything, body joints of a person, some key points of a particular object, etc.
As long as you can get sufficient annotated data for the key points, you can use dlib to train a landmark detector on it.
Here’s a tutorial that teaches you how to train a custom Landmark detector.
After going through the above tutorial, you may want to learn how to further optimize your trained model in terms of model size, accuracy, and speed.
So there are multiple Hyperparameters that you can tune to get better performance, here’s a tutorial that lets you automate the tuning process, also take a look a this too.
Extra Resources:
Here’s another tutorial on training a shape predictor.
Training a Custom Object Detector:

Just like a custom landmark detector, you can train a custom Object detector with dlib. Dlib uses Histogram of Oriented Gradients (HOG) as features and a Support Vector Machine (SVM) Classifier. This combined with sliding windows and image pyramids, you’ve got yourself an Object detector. The only limitation is that you can train it to detect a single object at a time.
The Object detection approach in dlib is based on the same series of steps used in the sliding window based object detector first published by Dalal and Triggs in 2005 in the Histograms of Oriented Gradients for Human Detection.
HOG + SVM based detector are the strongest non Deep learning based approach for object detection, Here’s a hand detector I built using this approach a few years back.
I didn’t even annotated nor collected training data for my hands but instead made a sliding window application that automatically collected my hand pictures as it moved on the screen and I placed my hands in the bounding box.
Afterward, I took this hand detector created a Video car game controller, so now I was steering the Video game car with my hands literally. To be honest, that wasn’t a pleasant experience, my hand was sore afterwards. Making something cool is not hard but it would take a whole lot effort to make a practical VR or AR-based application.
Here’s Dlib Code for Training an Object Detector and here’s a blog post that teaches you how to do that.
Extra Resources:
Here’s another Tutorial on training the detector.
Dlib Optimizations For Faster & Better Performance:
Here’s a bunch of techniques and tutorials that will help you get the most out of dlib’s landmark detection.
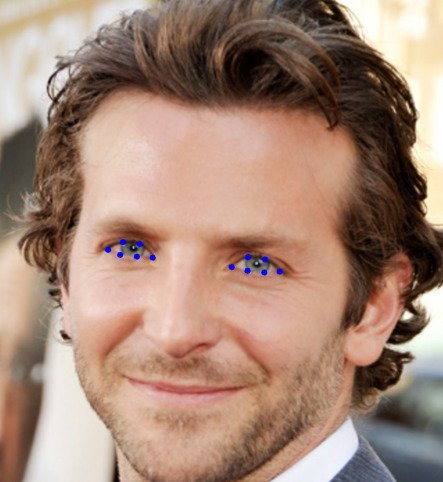
Using A Faster Landmark Detector:

Beside’s the 68 point landmark detector, dlib also has 5 point landmark detector that is 10 times smaller and faster (about 10%) than the 68 point one. If you need more speed and the 5 landmark points as visualized above is all you need then you should opt for this detector. Also from what I’ve seen its also somewhat more efficient than the 68 point detector.
Here’s a tutorial that explains how to use this faster landmark detector.
Speeding Up the Detection Pipeline:
There are a bunch of tips and techniques that you can use to get a faster detection speed, now a landmark detector itself is really fast, the rest of the pipeline takes up a lot of time. Some tricks you can do to increase speed are:
Skip Frames:
If you’re reading from a high fps camera then it won’t hurt to perform detection on every other frame, this will effectively double your speed.
Reduce image Size:
If you’re using Hog + Sliding window based detection or a haar cascade + Sliding window based one then the face detection speed depends upon the size of the image. So one smart thing you can do is reduce the image size before face detection and then rescale the detected coordinates for the original image later.
Both of the above techniques and some others are explained in this tutorial.
Tip: The biggest bottleneck you’ll face in the landmark detection pipeline is the HOG based face detector in dlib which is pretty slow. You can replace this with haar cascades or the SSD based face detector for faster performance.
Summary:
Let’s wrap up, in this tutorial we went over a number of algorithms and techniques in dlib.
We started with installation, moved on to face detection and landmark prediction, and learned to build a number of applications using landmark detection. We also looked at other techniques like correlation tracking and facial recognition.
We also learned that you can train your own landmark detectors and object detectors with dlib.
At the end we learned some nice optimizations that we can do with our landmark predictor.
Extra Resources:
Final Tip: I know most of you won’t be able to go over all the tutorials linked here in a single day so I would recommend that you save and bookmark this page and tackle a single problem at a time. Only when you’ve understood a certain technique move on to the next.
It goes without saying that Dlib is a must learn tool for serious computer vision practitioners out there.
I hope you enjoyed this tutorial and found it useful. If you have any questions feel free to ask them in the comments and I’ll happily address it.
You can reach out to me personally for a 1 on 1 consultation session in AI/computer vision regarding your project. Our talented team of vision engineers will help you every step of the way. Get on a call with me directly here.
Ready to seriously dive into State of the Art AI & Computer Vision?
Then Sign up for these premium Courses by Bleed AI


0 Comments