In this tutorial, we’ll learn how to do real-time 3D pose detection using the mediapipe library in python. After that, we’ll calculate angles between body joints and combine them with some heuristics to create a pose classification system.
All of this will work on real-time camera feed using your CPU as well as on images. See results below.
The code is really simple, for detailed code explanation do also check out the YouTube tutorial, although this blog post will suffice enough to get the code up and running in no time.
This post can be split into 3 parts:
Part 1 (a): Introduction to Pose Detection
Part 1 (b): Mediapipe’s Pose Detection Implementation
Part 2: Using Pose Detection in images and on videos
Part 3: Pose Classification with Angle Heuristics
Part 1 (a): Introduction to Pose Detection:
Pose Detection or Pose Estimation is a very popular problem in computer vision, in fact, it belongs to a broader class of computer vision domain called key point estimation. Today we’ll learn to do Pose Detection where we’ll try to localize 33 key body landmarks on a person e.g. elbows, knees, ankles, etc. see the image below:

Some interesting applications of pose detection are:
- Full body Gesture Control to control anything from video games (e.g. kinect) to physical appliances, robots etc. Check this.
- Full body Sign Language Recognition. Check this.
- Creating Fitness / exercise / dance monitoring applications. Check this.
- Creating Augmented reality applications that overlay virtual clothes or other accessories over someone’s body. Check this.
Now, these are just some interesting things you can make using pose detection, as you can see it’s a really interesting problem.
And that’s not it there are other types of key point detection problems too, e.g. facial landmark detection, hand landmark detection, etc.
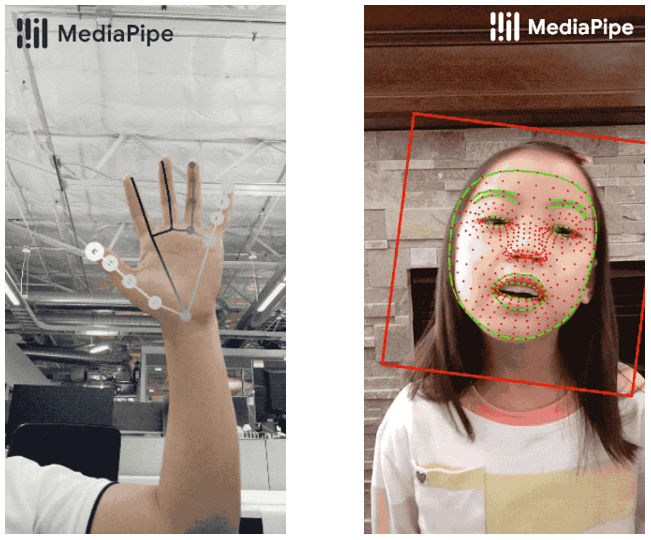
We will actually learn to do both of the above in the upcoming tutorials.
Key point detection in turn belongs to a major computer vision branch called Image recognition, other broad classes of vision that belong in this branch are Classification, Detection, and Segmentation.
Here’s a very generic definition of each class.
- In classification we try to classify whole images or videos as belonging to a certain class.
- In Detection we try to classify and localize objects or classes of interest.
- In Segmentation, we try to extract/segment or find the exact boundary/outline of our target object/class.
- In Keypoint Detection, we try to localize predefined points/landmarks.

It should be noted that each of the major categories above has subcategories or different types, a few weeks ago I wrote a post on Selfie segmentation using mediapipe where I talked about various segmentation types. Be sure to read that post.
If you’re new to Computer vision and just exploring the waters, check this page from paperswithcode, it lists a lot of subcategories from the above major categories. Now don’t be confused by the categorization that paperswtihcode has done, personally speaking, I don’t agree with the way they have sorted subcategories with applications and there are some other issues. The takeaway is that there are a lot of variations in computer vision problems, but the 4 categories I’ve listed above are some major ones.
Part 1 (b): Mediapipe’s Pose Detection Implementation:
Here’s a brief introduction to Mediapipe;
“Mediapipe is a cross-platform/open-source tool that allows you to run a variety of machine learning models in real-time. It’s designed primarily for facilitating the use of ML in streaming media & It was built by Google”
Not only is this tool backed by google but models in Mediapipe are actively used in Google products. So you can expect nothing less than the state of the Art performance from this library.
Now MediaPipe’s Pose detection is a State of the Art solution for high-fidelity (i.e. high quality) and low latency (i.e. Damn fast) for detecting 33 3D landmarks on a person in real-time video feeds on low-end devices i.e. phones, laptops, etc.
Alright, so what makes this pose detection model from Mediapipe so fast?
They are actually using a very successful deep learning recipe that is creating a 2 step detector, where you combine a computationally expensive object detector with a lightweight object tracker.
Here’s how this works:
You run the detector in the first frame of the video to localize the person and provide a bounding box around it, after that the tracker takes over and it predicts the landmark points inside that bounding box ROI, the tracker continues to run on any subsequent frames in the video using the previous frame’s ROI and only calls the detection model again when it fails to track the person with high confidence.

Their model works best if the person is standing 2-4 meters away from the camera and one major limitation of their model is that this approach only works for single-person pose detection, it’s not applicable for multi-person detection.
Mediapipe actually trained 3 models, with different tradeoffs between speed and performance. You’ll be able to use all 3 of them with mediapipe.
| Method | LatencyPixel 3 TFLite GPU | LatencyMacBook Pro (15-inch 2017) |
|---|---|---|
| BlazePose.Heavy | 53 ms | 38 ms |
| BlazePose.Full | 25 ms | 27 ms |
| BlazePose.Lite | 20 ms | 25 ms |
The detector used in pose detection is inspired by Mediapiep’s lightweight BlazeFace model, you can read this paper. For the landmark model used in pose detection, you can read this paper for more details. or read Google’s blog on it.
Here are the 33 landmarks that this model detects:

Alright now that we have covered some basic theory and implementation details, let’s get into the code.
Download Code
[optin-monster slug=”kalfyxphljhqu1zouums”]
Part 2: Using Pose Detection in images and on videos
Import the Libraries
Let’s start by importing the required libraries.
import math
import cv2
import numpy as np
from time import time
import mediapipe as mp
import matplotlib.pyplot as plt
Initialize the Pose Detection Model
The first thing that we need to do is initialize the pose class using the mp.solutions.pose syntax and then we will call the setup function mp.solutions.pose.Pose() with the arguments:
static_image_mode– It is a boolean value that is if set toFalse, the detector is only invoked as needed, that is in the very first frame or when the tracker loses track. If set toTrue, the person detector is invoked on every input image. So you should probably set this value to True when working with a bunch of unrelated images not videos. Its default value isFalse.min_detection_confidence– It is the minimum detection confidence with range(0.0 , 1.0)required to consider the person-detection model’s prediction correct. Its default value is0.5. This means if the detector has a prediction confidence of greater or equal to 50% then it will be considered as a positive detection.min_tracking_confidence– It is the minimum tracking confidence([0.0, 1.0])required to consider the landmark-tracking model’s tracked pose landmarks valid. If the confidence is less than the set value then the detector is invoked again in the next frame/image, so increasing its value increases the robustness, but also increases the latency. Its default value is0.5.model_complexity– It is the complexity of the pose landmark model. As there are three different models to choose from so the possible values are0,1, or2. The higher the value, the more accurate the results are, but at the expense of higher latency. Its default value is1.smooth_landmarks– It is a boolean value that is if set toTrue, pose landmarks across different frames are filtered to reduce noise. But only works whenstatic_image_modeis also set toFalse. Its default value isTrue.
Then we will also initialize mp.solutions.drawing_utils class that will allow us to visualize the landmarks after detection, instead of using this, you can also use OpenCV to visualize the landmarks.
# Initializing mediapipe pose class.
mp_pose = mp.solutions.pose

# Setting up the Pose function.
pose = mp_pose.Pose(static_image_mode=True, min_detection_confidence=0.3, model_complexity=2)

# Initializing mediapipe drawing class, useful for annotation.
mp_drawing = mp.solutions.drawing_utils
Downloading model to C:\ProgramData\Anaconda3\lib\site-packages\mediapipe/modules/pose_landmark/pose_landmark_heavy.tflite
Read an Image
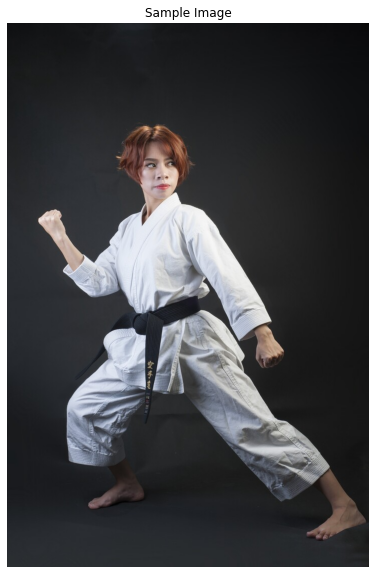
Now we will read a sample image using the function cv2.imread() and then display that image using the matplotlib library.
# Read an image from the specified path.
sample_img = cv2.imread('media/sample.jpg')

# Specify a size of the figure.
plt.figure(figsize = [10, 10])

# Display the sample image, also convert BGR to RGB for display.
plt.title("Sample Image");plt.axis('off');plt.imshow(sample_img[:,:,::-1]);plt.show()
Perform Pose Detection
Now we will pass the image to the pose detection machine learning pipeline by using the function mp.solutions.pose.Pose().process(). But the pipeline expects the input images in RGB color format so first we will have to convert the sample image from BGR to RGB format using the function cv2.cvtColor() as OpenCV reads images in BGR format (instead of RGB).
After performing the pose detection, we will get a list of thirty-three landmarks representing the body joint locations of the prominent person in the image. Each landmark has:
x– It is the landmark x-coordinate normalized to [0.0, 1.0] by the image width.y: It is the landmark y-coordinate normalized to [0.0, 1.0] by the image height.z: It is the landmark z-coordinate normalized to roughly the same scale asx. It represents the landmark depth with midpoint of hips being the origin, so the smaller the value of z, the closer the landmark is to the camera.visibility: It is a value with range [0.0, 1.0] representing the possibility of the landmark being visible (not occluded) in the image. This is a useful variable when deciding if you want to show a particular joint because it might be occluded or partially visible in the image.
After performing the pose detection on the sample image above, we will display the first two landmarks from the list, so that you get a better idea of the output of the model.
# Perform pose detection after converting the image into RGB format.
results = pose.process(cv2.cvtColor(sample_img, cv2.COLOR_BGR2RGB))

# Check if any landmarks are found.
if results.pose_landmarks:

    # Iterate two times as we only want to display first two landmarks.
    for i in range(2):

        # Display the found normalized landmarks.
        print(f'{mp_pose.PoseLandmark(i).name}:\n{results.pose_landmarks.landmark[mp_pose.PoseLandmark(i).value]}')
NOSE:
x: 0.4321258
y: 0.28087094
z: -0.67494285
visibility: 0.99999905
LEFT_EYE_INNER:
x: 0.44070682
y: 0.2621727
z: -0.6380733
visibility: 0.99999845
Now we will convert the two normalized landmarks displayed above into their original scale by using the width and height of the image.
# Retrieve the height and width of the sample image.
image_height, image_width, _ = sample_img.shape

# Check if any landmarks are found.
if results.pose_landmarks:

    # Iterate two times as we only want to display first two landmark.
    for i in range(2):

        # Display the found landmarks after converting them into their original scale.
        print(f'{mp_pose.PoseLandmark(i).name}:')
        print(f'x: {results.pose_landmarks.landmark[mp_pose.PoseLandmark(i).value].x * image_width}')
        print(f'y: {results.pose_landmarks.landmark[mp_pose.PoseLandmark(i).value].y * image_height}')
        print(f'z: {results.pose_landmarks.landmark[mp_pose.PoseLandmark(i).value].z * image_width}')
        print(f'visibility: {results.pose_landmarks.landmark[mp_pose.PoseLandmark(i).value].visibility}\n')
NOSE:
x: 310.69845509529114
y: 303.340619802475
z: -485.28390991687775
visibility: 0.9999990463256836
LEFT_EYE_INNER:
x: 316.86820307374
y: 283.1465148925781
z: -458.774720788002
visibility: 0.9999984502792358
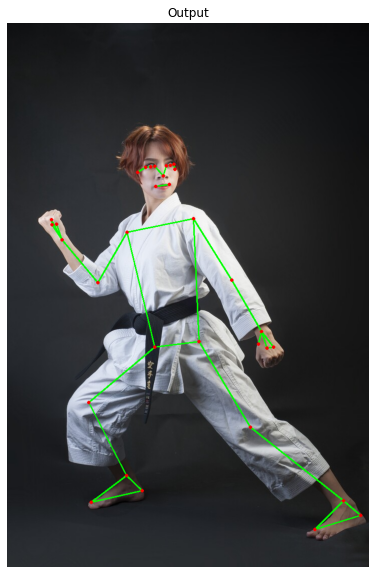
Now we will draw the detected landmarks on the sample image using the function mp.solutions.drawing_utils.draw_landmarks() and display the resultant image using the matplotlib library.
# Create a copy of the sample image to draw landmarks on.
img_copy = sample_img.copy()

# Check if any landmarks are found.
if results.pose_landmarks:

    # Draw Pose landmarks on the sample image.
    mp_drawing.draw_landmarks(image=img_copy, landmark_list=results.pose_landmarks, connections=mp_pose.POSE_CONNECTIONS)

    # Specify a size of the figure.
    fig = plt.figure(figsize = [10, 10])

    # Display the output image with the landmarks drawn, also convert BGR to RGB for display.
    plt.title("Output");plt.axis('off');plt.imshow(img_copy[:,:,::-1]);plt.show()
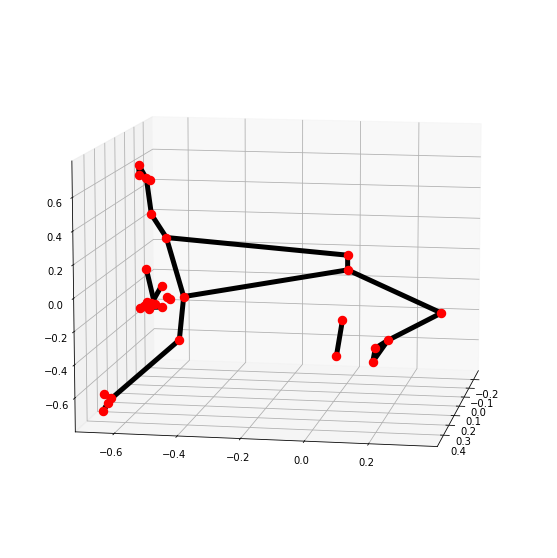
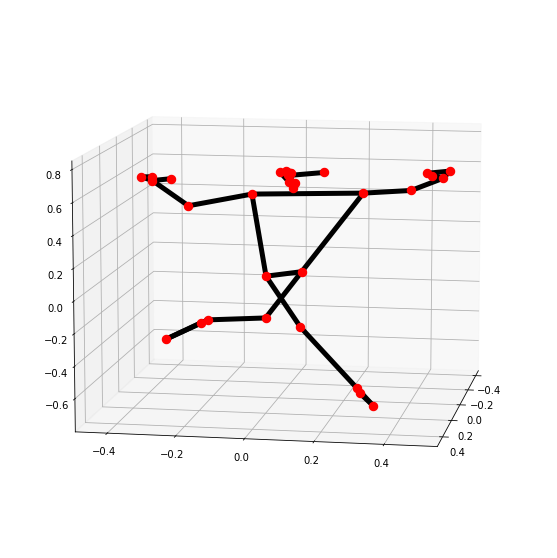
Now we will go a step further and visualize the landmarks in three-dimensions (3D) using the function mp.solutions.drawing_utils.plot_landmarks(). We will need the POSE_WORLD_LANDMARKS that is another list of pose landmarks in world coordinates that has the 3D coordinates in meters with the origin at the center between the hips of the person.
# Plot Pose landmarks in 3D.
mp_drawing.plot_landmarks(results.pose_world_landmarks, mp_pose.POSE_CONNECTIONS)
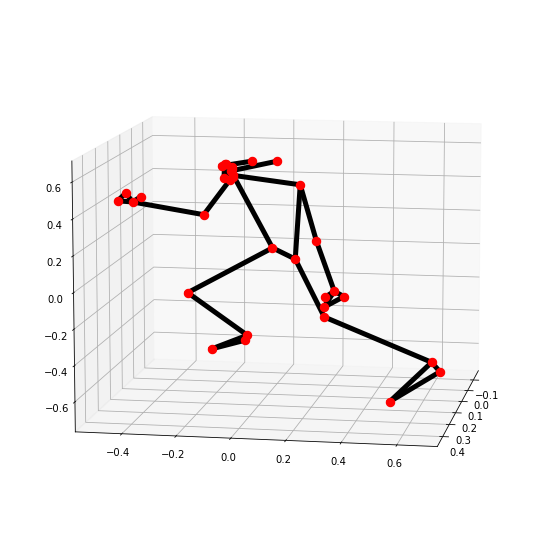
Note: This is actually a neat hack by mediapipe, the coordinates returned are not actually in 3D but by setting hip landmark as the origin allows us to measure the relative distance of the other points from the hip, and since this distance increases or decreases depending upon if you’re close or further from the camera it gives us a sense of the depth of each landmark point.
Create a Pose Detection Function
Now we will put all this together to create a function that will perform pose detection on an image and visualize the results or return the results depending upon the passed arguments.
def detectPose(image, pose, display=True):
'''
This function performs pose detection on an image.
Args:
image: The input image with a prominent person whose pose landmarks needs to be detected.
pose: The pose setup function required to perform the pose detection.
display: A boolean value that is if set to true the function displays the original input image, the resultant image,
and the pose landmarks in 3D plot and returns nothing.
Returns:
output_image: The input image with the detected pose landmarks drawn.
landmarks: A list of detected landmarks converted into their original scale.
'''
# Create a copy of the input image.
output_image = image.copy()
# Convert the image from BGR into RGB format.
imageRGB = cv2.cvtColor(image, cv2.COLOR_BGR2RGB)
# Perform the Pose Detection.
results = pose.process(imageRGB)
# Retrieve the height and width of the input image.
height, width, _ = image.shape
# Initialize a list to store the detected landmarks.
landmarks = []
# Check if any landmarks are detected.
if results.pose_landmarks:
# Draw Pose landmarks on the output image.
mp_drawing.draw_landmarks(image=output_image, landmark_list=results.pose_landmarks,
connections=mp_pose.POSE_CONNECTIONS)
# Iterate over the detected landmarks.
for landmark in results.pose_landmarks.landmark:
# Append the landmark into the list.
landmarks.append((int(landmark.x * width), int(landmark.y * height),
(landmark.z * width)))
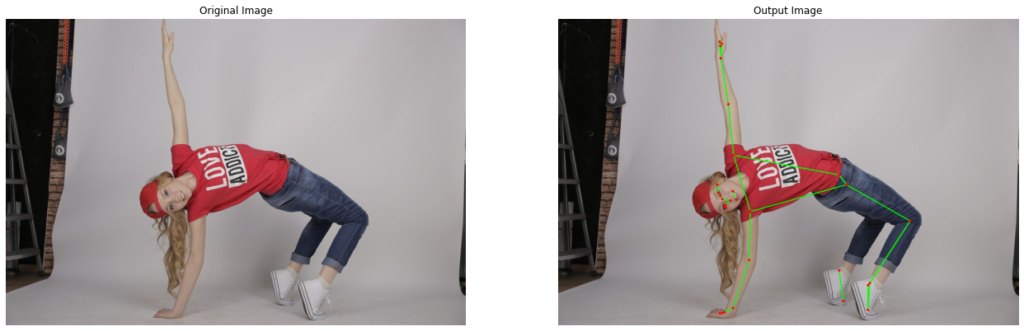
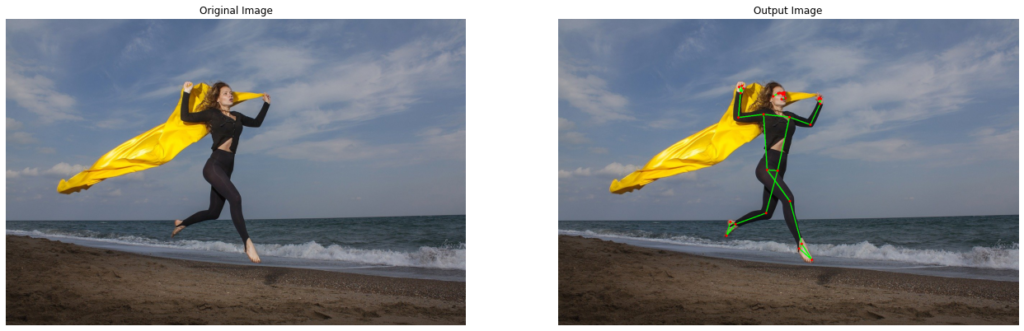
# Check if the original input image and the resultant image are specified to be displayed.
if display:
# Display the original input image and the resultant image.
plt.figure(figsize=[22,22])
plt.subplot(121);plt.imshow(image[:,:,::-1]);plt.title("Original Image");plt.axis('off');
plt.subplot(122);plt.imshow(output_image[:,:,::-1]);plt.title("Output Image");plt.axis('off');
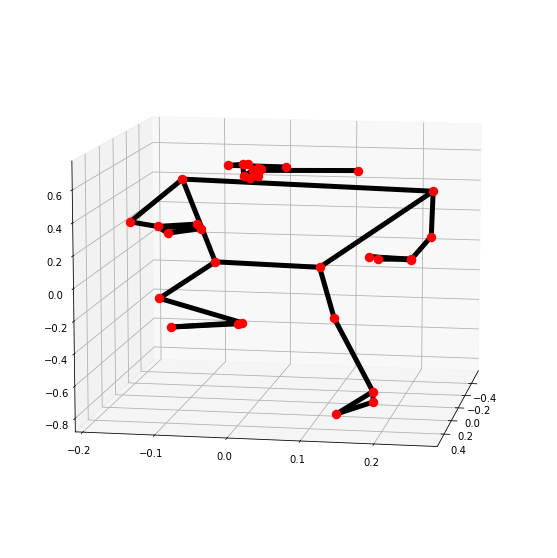
# Also Plot the Pose landmarks in 3D.
mp_drawing.plot_landmarks(results.pose_world_landmarks, mp_pose.POSE_CONNECTIONS)
# Otherwise
else:
# Return the output image and the found landmarks.
return output_image, landmarks
Now we will utilize the function created above to perform pose detection on a few sample images and display the results.
# Read another sample image and perform pose detection on it.
image = cv2.imread('media/sample1.jpg')
detectPose(image, pose, display=True)
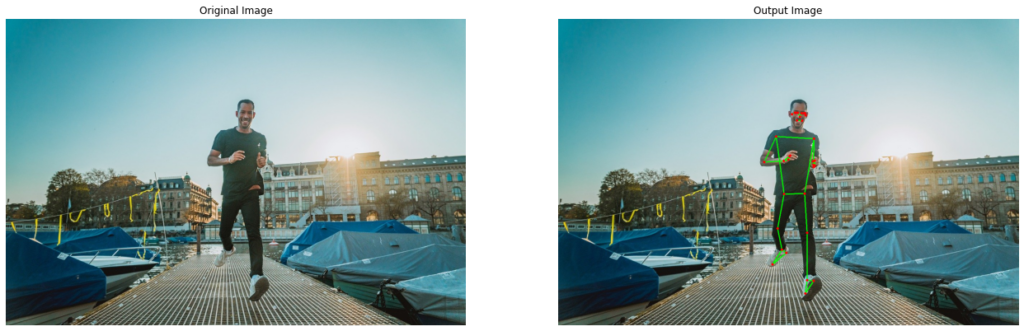
# Read another sample image and perform pose detection on it.
image = cv2.imread('media/sample2.jpg')
detectPose(image, pose, display=True)
# Read another sample image and perform pose detection on it.
image = cv2.imread('media/sample3.jpg')
detectPose(image, pose, display=True)
Pose Detection On Real-Time Webcam Feed/Video
The results on the images were pretty good, now we will try the function on a real-time webcam feed and a video. Depending upon whether you want to run pose detection on a video stored in the disk or on the webcam feed, you can comment and uncomment the initialization code of the VideoCapture object accordingly.
# Setup Pose function for video.
pose_video = mp_pose.Pose(static_image_mode=False, min_detection_confidence=0.5, model_complexity=1)

# Initialize the VideoCapture object to read from the webcam.
#video = cv2.VideoCapture(0)

# Initialize the VideoCapture object to read from a video stored in the disk.
video = cv2.VideoCapture('media/running.mp4')


# Initialize a variable to store the time of the previous frame.
time1 = 0

# Iterate until the video is accessed successfully.
while video.isOpened():

    # Read a frame.
    ok, frame = video.read()

    # Check if frame is not read properly.
    if not ok:

        # Break the loop.
        break

    # Flip the frame horizontally for natural (selfie-view) visualization.
    frame = cv2.flip(frame, 1)

    # Get the width and height of the frame
    frame_height, frame_width, _ =  frame.shape

    # Resize the frame while keeping the aspect ratio.
    frame = cv2.resize(frame, (int(frame_width * (640 / frame_height)), 640))

    # Perform Pose landmark detection.
    frame, _ = detectPose(frame, pose_video, display=False)

    # Set the time for this frame to the current time.
    time2 = time()

    # Check if the difference between the previous and this frame time > 0 to avoid division by zero.
    if (time2 - time1) > 0:

        # Calculate the number of frames per second.
        frames_per_second = 1.0 / (time2 - time1)

        # Write the calculated number of frames per second on the frame.
        cv2.putText(frame, 'FPS: {}'.format(int(frames_per_second)), (10, 30),cv2.FONT_HERSHEY_PLAIN, 2, (0, 255, 0), 3)

    # Update the previous frame time to this frame time.
    # As this frame will become previous frame in next iteration.
    time1 = time2

    # Display the frame.
    cv2.imshow('Pose Detection', frame)

    # Wait until a key is pressed.
    # Retreive the ASCII code of the key pressed
    k = cv2.waitKey(1) & 0xFF

    # Check if 'ESC' is pressed.
    if(k == 27):

        # Break the loop.
        break

# Release the VideoCapture object.
video.release()

# Close the windows.
cv2.destroyAllWindows()
Output:
Cool! so it works great on the videos too. The model is pretty fast and accurate.
Part 3: Pose Classification with Angle Heuristics
We have learned to perform pose detection, now we will level up our game by also classifying different yoga poses using the calculated angles of various joints. We will first detect the pose landmarks and then use them to compute angles between joints and depending upon those angles we will recognize the yoga pose of the prominent person in an image.
But this approach does have a drawback that limits its use to a controlled environment, the calculated angles vary with the angle between the person and the camera. So the person needs to be facing the camera straight to get the best results.
Create a Function to Calculate Angle between Landmarks
Now we will create a function that will be capable of calculating angles between three landmarks. The angle between landmarks? Do not get confused, as this is the same as calculating the angle between two lines.
The first point (landmark) is considered as the starting point of the first line, the second point (landmark) is considered as the ending point of the first line and the starting point of the second line as well, and the third point (landmark) is considered as the ending point of the second line.
def calculateAngle(landmark1, landmark2, landmark3):
    '''
    This function calculates angle between three different landmarks.
    Args:
        landmark1: The first landmark containing the x,y and z coordinates.
        landmark2: The second landmark containing the x,y and z coordinates.
        landmark3: The third landmark containing the x,y and z coordinates.
    Returns:
        angle: The calculated angle between the three landmarks.

    '''

    # Get the required landmarks coordinates.
    x1, y1, _ = landmark1
    x2, y2, _ = landmark2
    x3, y3, _ = landmark3

    # Calculate the angle between the three points
    angle = math.degrees(math.atan2(y3 - y2, x3 - x2) - math.atan2(y1 - y2, x1 - x2))

    # Check if the angle is less than zero.
    if angle < 0:

        # Add 360 to the found angle.
        angle += 360

    # Return the calculated angle.
    return angle
Now we will test the function created above to calculate angle three landmarks with dummy values.
# Calculate the angle between the three landmarks.
angle = calculateAngle((558, 326, 0), (642, 333, 0), (718, 321, 0))

# Display the calculated angle.
print(f'The calculated angle is {angle}')
The calculated angle is 166.26373169437744
Create a Function to Perform Pose Classification
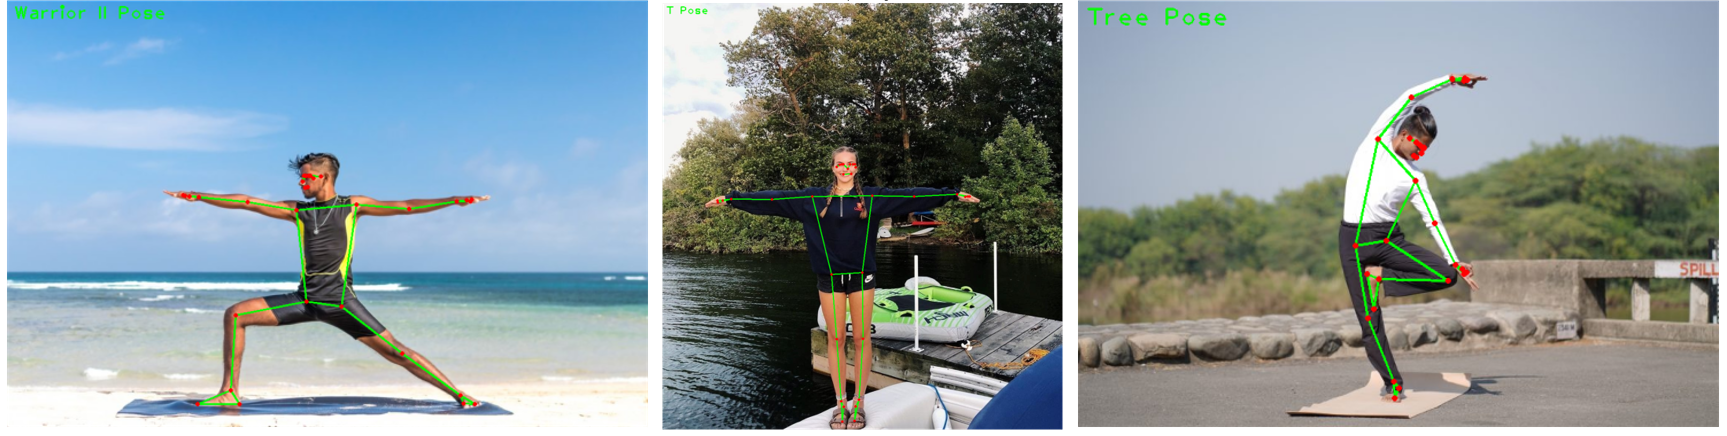
Now we will create a function that will be capable of classifying different yoga poses using the calculated angles of various joints. The function will be capable of identifying the following yoga poses:
- Warrior II Pose
- T Pose
- Tree Pose
def classifyPose(landmarks, output_image, display=False):
    '''
    This function classifies yoga poses depending upon the angles of various body joints.
    Args:
        landmarks: A list of detected landmarks of the person whose pose needs to be classified.
        output_image: A image of the person with the detected pose landmarks drawn.
        display: A boolean value that is if set to true the function displays the resultant image with the pose label
        written on it and returns nothing.
    Returns:
        output_image: The image with the detected pose landmarks drawn and pose label written.
        label: The classified pose label of the person in the output_image.

    '''

    # Initialize the label of the pose. It is not known at this stage.
    label = 'Unknown Pose'

    # Specify the color (Red) with which the label will be written on the image.
    color = (0, 0, 255)

    # Calculate the required angles.
    #----------------------------------------------------------------------------------------------------------------

    # Get the angle between the left shoulder, elbow and wrist points.
    left_elbow_angle = calculateAngle(landmarks[mp_pose.PoseLandmark.LEFT_SHOULDER.value],
                                      landmarks[mp_pose.PoseLandmark.LEFT_ELBOW.value],
                                      landmarks[mp_pose.PoseLandmark.LEFT_WRIST.value])

    # Get the angle between the right shoulder, elbow and wrist points.
    right_elbow_angle = calculateAngle(landmarks[mp_pose.PoseLandmark.RIGHT_SHOULDER.value],
                                       landmarks[mp_pose.PoseLandmark.RIGHT_ELBOW.value],
                                       landmarks[mp_pose.PoseLandmark.RIGHT_WRIST.value])

    # Get the angle between the left elbow, shoulder and hip points.
    left_shoulder_angle = calculateAngle(landmarks[mp_pose.PoseLandmark.LEFT_ELBOW.value],
                                         landmarks[mp_pose.PoseLandmark.LEFT_SHOULDER.value],
                                         landmarks[mp_pose.PoseLandmark.LEFT_HIP.value])

    # Get the angle between the right hip, shoulder and elbow points.
    right_shoulder_angle = calculateAngle(landmarks[mp_pose.PoseLandmark.RIGHT_HIP.value],
                                          landmarks[mp_pose.PoseLandmark.RIGHT_SHOULDER.value],
                                          landmarks[mp_pose.PoseLandmark.RIGHT_ELBOW.value])

    # Get the angle between the left hip, knee and ankle points.
    left_knee_angle = calculateAngle(landmarks[mp_pose.PoseLandmark.LEFT_HIP.value],
                                     landmarks[mp_pose.PoseLandmark.LEFT_KNEE.value],
                                     landmarks[mp_pose.PoseLandmark.LEFT_ANKLE.value])

    # Get the angle between the right hip, knee and ankle points
    right_knee_angle = calculateAngle(landmarks[mp_pose.PoseLandmark.RIGHT_HIP.value],
                                      landmarks[mp_pose.PoseLandmark.RIGHT_KNEE.value],
                                      landmarks[mp_pose.PoseLandmark.RIGHT_ANKLE.value])

    #----------------------------------------------------------------------------------------------------------------

    # Check if it is the warrior II pose or the T pose.
    # As for both of them, both arms should be straight and shoulders should be at the specific angle.
    #----------------------------------------------------------------------------------------------------------------

    # Check if the both arms are straight.
    if left_elbow_angle > 165 and left_elbow_angle < 195 and right_elbow_angle > 165 and right_elbow_angle < 195:

        # Check if shoulders are at the required angle.
        if left_shoulder_angle > 80 and left_shoulder_angle < 110 and right_shoulder_angle > 80 and right_shoulder_angle < 110:

    # Check if it is the warrior II pose.
    #----------------------------------------------------------------------------------------------------------------

            # Check if one leg is straight.
            if left_knee_angle > 165 and left_knee_angle < 195 or right_knee_angle > 165 and right_knee_angle < 195:

                # Check if the other leg is bended at the required angle.
                if left_knee_angle > 90 and left_knee_angle < 120 or right_knee_angle > 90 and right_knee_angle < 120:

                    # Specify the label of the pose that is Warrior II pose.
                    label = 'Warrior II Pose'

    #----------------------------------------------------------------------------------------------------------------

    # Check if it is the T pose.
    #----------------------------------------------------------------------------------------------------------------

            # Check if both legs are straight
            if left_knee_angle > 160 and left_knee_angle < 195 and right_knee_angle > 160 and right_knee_angle < 195:

                # Specify the label of the pose that is tree pose.
                label = 'T Pose'

    #----------------------------------------------------------------------------------------------------------------

    # Check if it is the tree pose.
    #----------------------------------------------------------------------------------------------------------------

    # Check if one leg is straight
    if left_knee_angle > 165 and left_knee_angle < 195 or right_knee_angle > 165 and right_knee_angle < 195:

        # Check if the other leg is bended at the required angle.
        if left_knee_angle > 315 and left_knee_angle < 335 or right_knee_angle > 25 and right_knee_angle < 45:

            # Specify the label of the pose that is tree pose.
            label = 'Tree Pose'

    #----------------------------------------------------------------------------------------------------------------

    # Check if the pose is classified successfully
    if label != 'Unknown Pose':

        # Update the color (to green) with which the label will be written on the image.
        color = (0, 255, 0)

    # Write the label on the output image.
    cv2.putText(output_image, label, (10, 30),cv2.FONT_HERSHEY_PLAIN, 2, color, 2)

    # Check if the resultant image is specified to be displayed.
    if display:

        # Display the resultant image.
        plt.figure(figsize=[10,10])
        plt.imshow(output_image[:,:,::-1]);plt.title("Output Image");plt.axis('off');

    else:

        # Return the output image and the classified label.
        return output_image, label
Now we will utilize the function created above to perform pose classification on a few images of people and display the results.
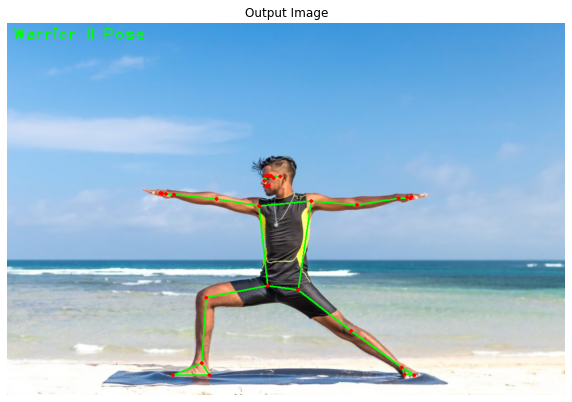
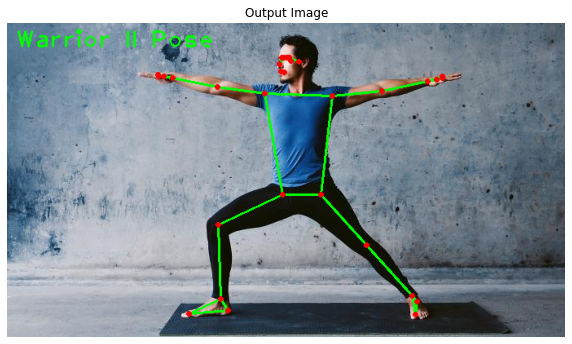
Warrior II Pose
The Warrior II Pose (also known as Virabhadrasana II) is the same pose that the person is making in the image above. It can be classified using the following combination of body part angles:
- Around 180° at both elbows
- Around 90° angle at both shoulders
- Around 180° angle at one knee
- Around 90° angle at the other knee
# Read a sample image and perform pose classification on it.
image = cv2.imread('media/warriorIIpose.jpg')
output_image, landmarks = detectPose(image, pose, display=False)
if landmarks:
    classifyPose(landmarks, output_image, display=True)
# Read another sample image and perform pose classification on it.
image = cv2.imread('media/warriorIIpose1.jpg')
output_image, landmarks = detectPose(image, pose, display=False)
if landmarks:
    classifyPose(landmarks, output_image, display=True)
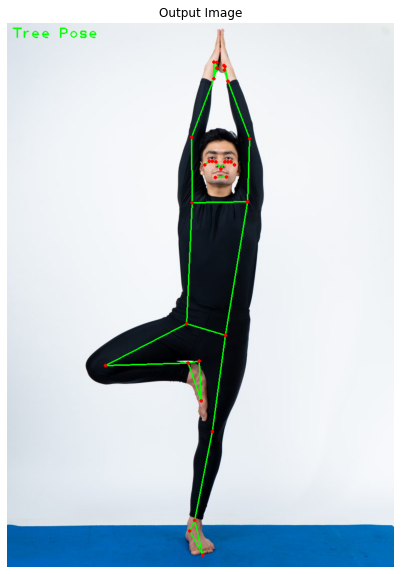
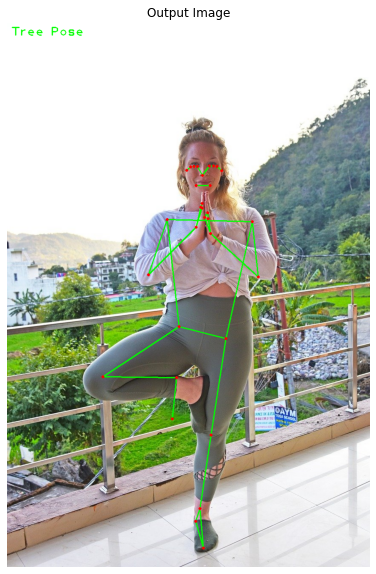
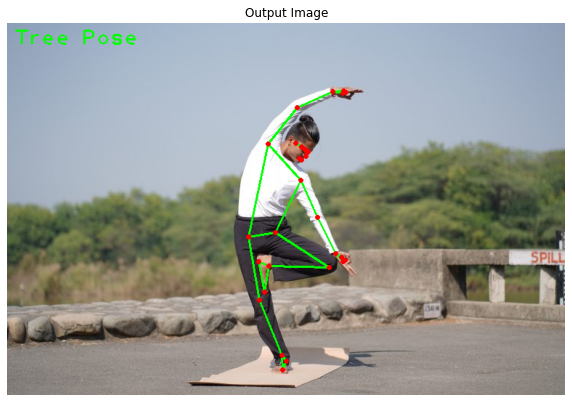
Tree Pose
Tree Pose (also known as Vrikshasana) is another yoga pose for which the person has to keep one leg straight and bend the other leg at a required angle. The pose can be classified easily using the following combination of body part angles:
- Around 180° angle at one knee
- Around 35° (if right knee) or 335° (if left knee) angle at the other knee
Now to understand it better, you should go back to the pose classification function above to overview the classification code of this yoga pose.
We will perform pose classification on a few images of people in the tree yoga pose and display the results using the same function we had created above.
# Read a sample image and perform pose classification on it.
image = cv2.imread('media/treepose.jpg')
output_image, landmarks = detectPose(image, mp_pose.Pose(static_image_mode=True,
                                         min_detection_confidence=0.5, model_complexity=0), display=False)
if landmarks:
    classifyPose(landmarks, output_image, display=True)
# Read another sample image and perform pose classification on it.
image = cv2.imread('media/treepose1.jpg')
output_image, landmarks = detectPose(image, mp_pose.Pose(static_image_mode=True,
                                         min_detection_confidence=0.5, model_complexity=0), display=False)
if landmarks:
    classifyPose(landmarks, output_image, display=True)
# Read another sample image and perform pose classification on it.
image = cv2.imread('media/treepose2.jpg')
output_image, landmarks = detectPose(image, pose, display=False)
if landmarks:
    classifyPose(landmarks, output_image, display=True)
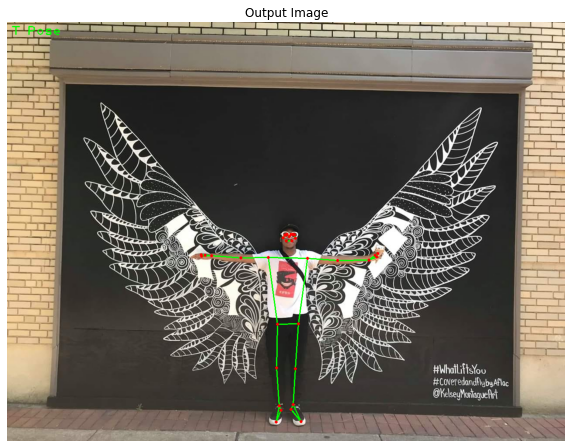
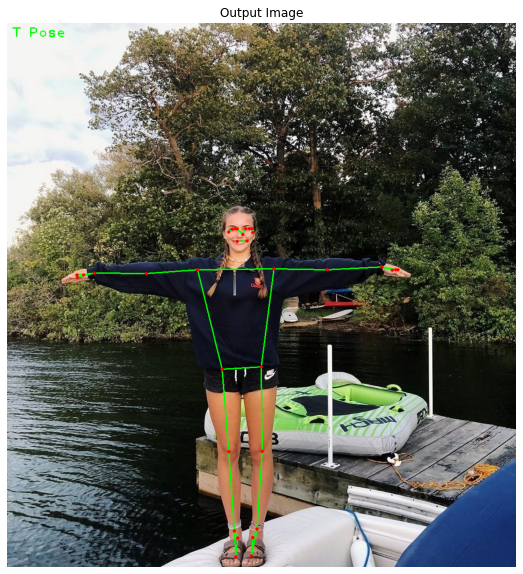
T Pose
T Pose (also known as a bind pose or reference pose) is the last pose we are dealing with in this lesson. To make this pose, one has to stand up like a tree with both hands wide open as branches. The following body part angles are required to make this one:
- Around 180° at both elbows
- Around 90° angle at both shoulders
- Around 180° angle at both knees
You can now go back to go through the classification code of this T pose in the pose classification function created above.
Now, let’s test the pose classification function on a few images of the T pose.
# Read another sample image and perform pose classification on it.
image = cv2.imread('media/Tpose.jpg')
output_image, landmarks = detectPose(image, pose, display=False)
if landmarks:
    classifyPose(landmarks, output_image, display=True)
# Read another sample image and perform pose classification on it.
image = cv2.imread('media/Tpose1.jpg')
output_image, landmarks = detectPose(image, pose, display=False)
if landmarks:
    classifyPose(landmarks, output_image, display=True)
So the function is working pretty well on all the known poses on images lets try it on an unknown pose called cobra pose (also known as Bhujangasana).
# Read another sample image and perform pose classification on it.
image = cv2.imread('media/cobrapose1.jpg')
output_image, landmarks = detectPose(image, pose, display=False)
if landmarks:
    classifyPose(landmarks, output_image, display=True)
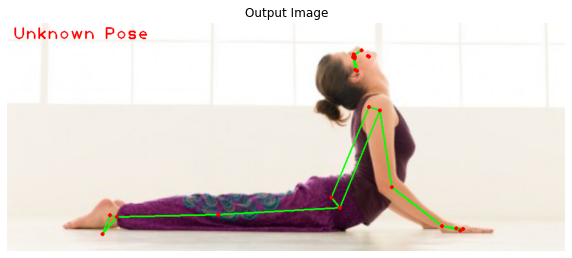
Now if you want you can extend the pose classification function to make it capable of identifying more yoga poses like the one in the image above. The following combination of body part angles can help classify this one:
- Around 180° angle at both knees
- Around 105° (if the person is facing right side) or 240° (if the person is facing left side) angle at both hips
Pose Classification On Real-Time Webcam Feed
Now we will test the function created above to perform the pose classification on a real-time webcam feed.
# Initialize the VideoCapture object to read from the webcam.
camera_video = cv2.VideoCapture('sample.mp4')

# Initialize a resizable window.
cv2.namedWindow('Pose Classification', cv2.WINDOW_NORMAL)

# Iterate until the webcam is accessed successfully.
while camera_video.isOpened():

    # Read a frame.
    ok, frame = camera_video.read()

    # Check if frame is not read properly.
    if not ok:

        # Continue to the next iteration to read the next frame and ignore the empty camera frame.
        continue

    # Flip the frame horizontally for natural (selfie-view) visualization.
    frame = cv2.flip(frame, 1)

    # Get the width and height of the frame
    frame_height, frame_width, _ =  frame.shape

    # Resize the frame while keeping the aspect ratio.
    frame = cv2.resize(frame, (int(frame_width * (640 / frame_height)), 640))

    # Perform Pose landmark detection.
    frame, landmarks = detectPose(frame, pose_video, display=False)

    # Check if the landmarks are detected.
    if landmarks:

        # Perform the Pose Classification.
        frame, _ = classifyPose(landmarks, frame, display=False)

    # Display the frame.
    cv2.imshow('Pose Classification', frame)

    # Wait until a key is pressed.
    # Retreive the ASCII code of the key pressed
    k = cv2.waitKey(1) & 0xFF

    # Check if 'ESC' is pressed.
    if(k == 27):

        # Break the loop.
        break

# Release the VideoCapture object and close the windows.
camera_video.release()
cv2.destroyAllWindows()
Output:
Summary:
Today, we learned about a very popular vision problem called pose detection. We briefly discussed popular computer vision problems then we saw how mediapipe has implemented its pose detection solution and how it used a 2 step detection + tracking pipeline to speed up the process.
After that, we saw step by step how to do real-time 3d pose detection with mediapipe on images and on webcam.
Then we learned to calculate angles between different landmarks and then used some heuristics to build a classification system that could determine 3 poses, T-Pose, Tree Pose, and a Warrior II Pose.
Alright here are some limitations to our pose classification system, it has too many conditions and checks, now for our case it’s not that complicated, but if you throw in a few more poses this system can easily get too confusing and complicated, a much better method is to train an MLP ( a simple multi-layer perceptron) using Keras on landmark points from a few target pose pictures and then classify them. I’m not sure but I might create a separate tutorial for that in the future.
Another issue that I briefly went over was that the pose detection model in mediapipe is only able to detect a single person at a time, now this is fine for most pose-based applications but can prove to be an issue where you’re required to detect more than one person. If you do want to detect more people then you could try other popular models like PoseNet or OpenPose.
You can reach out to me personally for a 1 on 1 consultation session in AI/computer vision regarding your project. Our talented team of vision engineers will help you every step of the way. Get on a call with me directly here.
Ready to seriously dive into State of the Art AI & Computer Vision?
Then Sign up for these premium Courses by Bleed AI


A really cool project, thanks for sharing.
You’re welcome Juanfedo, 🙂
Thanks for the good lecture.
I want to take the project using keras as well.
You’re Welcome hwagn, if you need to use Keras use TF.keras, keras standalone is no longer updated.
Great tutorial, I want to ask how to detect a series of consecutive actions; Another question is how to calculate the angle in the three-dimension(x,y,z) so that we can detect more three-dimensional motion
Thanks, Zixuan, you’ll have to figure out an equation that takes into account another axis. Look into 3D space vectors: https://www.intmath.com/vectors/img/cosines.gif
I tried use cosX to calcualted the angle,(cos=m.n/|m||n|, cos=(x1x2+y1y2+z1z2)/[√(x1^2+y1^2+z1^2)*√(x2^2+y2^2+z2^2)]), but the results are not good. Is it because the detection mechanism of mediapipe is inaccurate?
Thank you for sharing. A really cool project. I’m gonna use it for my college project for pose classification
Sounds great Lvee, do share the project on Linkedin and tag Bleed AI or me, would love to see what you end up making.