A few weeks ago we learned how to do Super-Resolution using OpenCV’s DNN module, in today’s post we will perform Facial Expression Recognition AKA Emotion Recognition using the DNN module. Although the term emotion recognition is technically incorrect (I will explain why) for this problem but for the remainder of this post I’ll be using both of these terms, since emotion recognition is short and also good for SEO since people still search for emotion recognition while looking for facial expression recognition xD.
The post is structured in the following way:
- First I will define Emotion Recognition & its importance.
- Then I will discuss different approaches to tackle this problem.
- Finally, we will Implement an Emotion Recognition pipeline using OpenCV’s DNN module.
Emotion Recognition Or Facial Expression Recognition
Now let me start by clarifying what I meant when I said this problem is incorrectly quoted as Emotion recognition. So you see by saying that you’re doing emotion recognition you’re implying that you’re actually finding the emotion of a person whereas in a typical AI-based emotion recognition system you’ll find around and the one that we’re gonna built looks only at a single image of a person’s face to determine the emotion of that person. Now, in reality, our expression may at times exhibit what we feel but not always. People may smile for a picture or someone may have a face that inherently looks gloomy & sad but that doesn’t represent the person’s emotion.
So If we were to build a system that actually recognizes the emotions of a person then we need to do more than look at a simple face image. We would also consider the body language of a person through a series of frames, so the network would be a combination of an LSTM & a CNN network. Also for a more robust system, we may also incorporate a voice tone recognition AI as the tone of a voice, and speech patterns tell a lot about the person’s feelings.
Watch this part of the interview of Lisa Feldman Barret who debunks these so-called Emotion recognition systems.
Since today we’ll only be looking at a single face image so it’s better to call our task Facial Expression Recognition rather than Emotion recognition.
Facial Expression Recognition Applications:
Monitoring facial expressions of several people over a period of time provides great insights if used carefully, so for this reason we can use this technology in the following applications.
1: Smart Music players that play music according to your mood:
Think about it, you come home after having a really bad day, you lie down on the bed looking really sad & gloomy and then suddenly just the right music plays to lift up your mood.
2: Student Mood Monitoring System:
Now a system that cleverly averages the expressions of multiple students over a period of time can get an estimate of how a particular topic or teacher is impacting students, does the topic being taught stresses out the students, is a particular session from a teacher a joyful experience for students.
3: Smart Advertisement Banners:
Think about smart advertisement banners that have a camera attached to it, when a commercial airs, it checks real-time facial expressions of people consuming that ad and informing the advertiser if the ad had the desired effect or not. Similarly, companies can get feedback if customers liked their products or not without even asking them.
Also, check out this video in which the performance of a new Ice Cream flavor is tested on people using their expressions.
These are just some of the applications from top of my head, if you start thinking about it you can come up with more use cases. One thing to remember is that you have to be really careful as how you use this technology. Use it as an assistive tool and do not completely rely on it. For e.g don’t deploy on Airport and start interrogating every other black guy who triggers Angry expressions on the system for a couple of frames.
Facial Expression Recognition Approaches:
So let’s talk about the ways we could go about recognizing someone’s facial expressions. We will look at some classical approaches first then move on to deep learning.
Haar Cascades based Recognition:
Perhaps the oldest method that could work are Haar Cascades. So essentially these Haar Cascades also called viola jones Classifier is an outdated Object detection technique by Paul Viola and Michael Jones in 2001. It is a machine learning-based approach where a cascade is trained from a lot of positive and negative images. It is then used to detect objects in images.
The most popular use of these cascades is as a face detector which is still used today, although there are better methods available.
Now instead of using face detection, we could train a cascade to detect expressions. Since you can only train a single class with a cascade so you’ll need multiple cascades. A better way to go about is to first perform face detection then look for different features inside the face ROI, like detecting a smile with this smile detection cascade. You can also train a frown detector and so on.
Truth be told, this method is so weak that I wouldn’t even try experimenting with this in this time and era but since people have used this in the past so I’m just putting it there.
Fisher, Eigen & LBPH based Recognition:
OpenCV’s built-in face_recognition module has 3 different face recognition algorithms, Eigenfaces face recognizer, Fisherfaces face recognizer and Local binary patterns histograms (LBPH) Face Recognizer.
If you’re wondering why am I mentioning face recognition algorithms on a facial expression recognition post, So understand this, these algorithms can extract some really interesting features like principal components and local histograms which you can then feed into an ML classifier like SVM, so in theory, you can repurpose them for emotion recognition, only this time the target classes are not the identities of people but some facial expressions. This will work best if you have a few classes, ideally 2-3. I haven’t seen many people work on emotion like this but take a look at this post in which a guy uses Fisher faces for facial expression recognition.
Again I would mention this is not a robust approach, but would work better than the previous one.
Histogram Oriented Gradients based Recognition (HOG):
Now similar to the above approach instead of using the face_recognizer module to extract features you can extract HOG features of faces, HOG based features are really effective. After extracting HOG features you can train an SVM or any other Machine learning classifier on top of it.
Custom Features with Landmark Detection:
One of the easiest and effective ways to create an emotion recognition system is to use a landmark detector like the one in dlib which allows you to detect 68 important landmarks on the face.

By using this detector you can extract facial features like eyes, eyebrows, mouth, etc. Now you can take custom measurements of these features like measuring the distance between the lip ends to detect if the person is smiling or not. Similarly, you can measure if the eyes are wide open or not, indicating surprise or shock.

Now there are two ways to go about it, either you can send these custom measurements to an ML classifier and let it learn to predict emotions based on these measurements or you use your own heuristics to determine when to call it happy, sad etc based on the measurements.
I do think the former approach is more effective than the latter. But if you’re just determining a singular emotion like if a person is smiling or not then it’s easier to use heuristics.
Deep Learning based Recognizer:
It should not come as a surprise that the State of the Art approach to detect emotions would be a deep learning-based approach. Let me explain how you would create a simple yet effective emotion recognizer system. So what you would simply do is train a Convolutional Neural Network (CNN) on different facial expression images (Ideally thousands of images for each class/emotion) and after the training showed it new samples and if done right it would perform better than all the above approaches I’ve mentioned.
Now that we have discussed different approaches, let’s move on to the coding part of the blog.
Facial Expression Recognition in OpenCV
We will be using a deep learning classifier that will be loaded to the OpenCV DNN module. The authors trained this model using MS Cognitive Toolkit (formerly CNTK) and then converted this model to ONNX (Open neural network exchange ) format.
ONNX format allows developers to move models between different frameworks such as CNTK, Caffe2, Tensorflow, PyTorch etc.

There is also a javascript version of this model (version 1.2) with a live demo which you can check out here. In this post we will be using version 1.3 which has a better performance.
You can also look at the original source code used to train this model here, the authors explained the architectural details of their model in their research paper titled Training Deep Networks for Facial Expression Recognition with Crowd-Sourced Label Distribution.
In the paper, the authors demonstrate training a deep CNN using 4 different approaches: majority voting, multi-label learning, probabilistic label drawing, and cross-entropy loss. The model that we are going to use today was trained using cross-entropy loss, which according to the author’s conclusion was one of the best performing models.
The model was trained on FER+ dataset, FER dataset was the standard dataset for emotion recognition task but in FER+ each image has been labeled by 10 crowd-sourced taggers, which provides a better quality of ground truth label for still image emotion than the original FER labels.
More information about the ONNX version of the model can be found here.
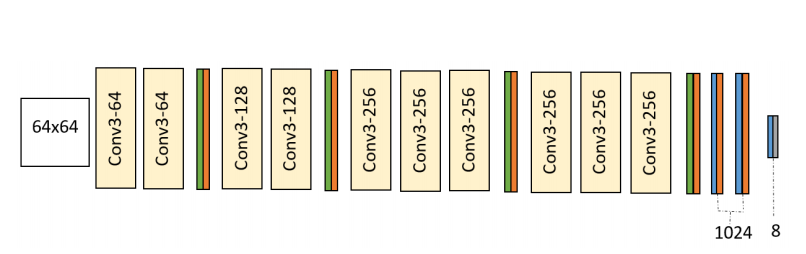
The input to our emotion recognition model is a grayscale image of 64×64 resolution. The output is the probabilities of 8 emotion classes: neutral, happiness, surprise, sadness, anger, disgust, fear, and contempt.
Here’s the architecture of the model.
Here are the steps we would need to perform:
- Initialize the Dnn module.
- Read the image.
- Detect faces in the image.
- Pre-process all the faces.
- Run a forward pass on all the faces.
- Get the predicted emotion scores and convert them to probabilities.
- Finally get the emotion corresponding to the highest probability
Make sure you have the following Libraries Installed.
- OpenCV ( possibly Version 4.0 or above)
- Numpy
- Matplotlib
- bleedfacedetector
Bleedfacedetector is my face detection library which can detect faces using 4 different algorithms. You can read more about the library here.
You can install it by doing:
pip install bleedfacedetector
Before installing bleedfacedetector make sure you have OpenCV & Dlib installed.
pip install opencv-contrib-python
To install dlib you can do:
pip install dlib
OR
pip install dlib==19.8.1
[optin-monster slug=”yif9nbr5u0xxerzz2wfu”]
Directory Hierarchy
You can go ahead and download the source code from the download code section. After downloading the zip folder, unzip it and you will have the following directory structure.
Emotion Recognition
    │   Facial Expression Recognition.ipynb
    │
    ├───Media
    │       emotion1.jpeg
    │       emotion2.jpg
    │       emotion3.jpg
    │       emotion4.jpg
    │       emotion5.jpeg
    │
    └───Model
            emotion-ferplus-8.onnx
You can now run the Jupyter notebook Facial Expression Recognition.ipynb and start executing each cell as follows.
Import Libraries
# Import required libraries
import cv2
import numpy as np
import matplotlib.pyplot as plt
import os
import bleedfacedetector as fd
Import time

# This is the magic command to show matplotlib graphs.
%matplotlib inline
Initialize DNN Module
To use Models in ONNX format, you just have to use cv2.dnn.readNetFromONNX(model) and pass the model inside this function.
# Set model path
model = 'Model/emotion-ferplus-8.onnx'
# Now read the model
net = cv2.dnn.readNetFromONNX(model)
Read Image
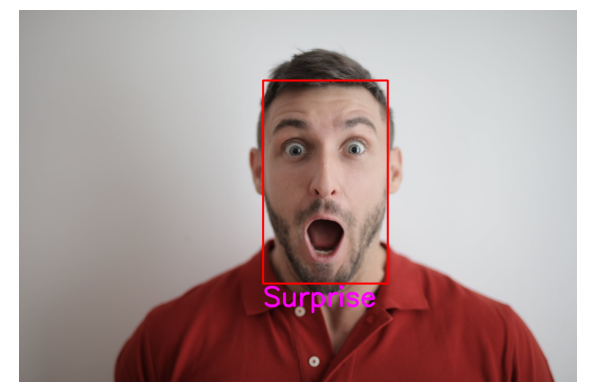
This is our image on which we are going to perform emotion recognition.
# Read image
image = cv2.imread("Media/surprise.jpeg")

# Display image
plt.figure(figsize=[10,10]);
plt.imshow(image[:,:,::-1]);plt.axis('off');

- Line 2: We’re reading the image form disk.
- Line 5-6 : We’re setting the figure size and showing the image with matplotlib, [:,:,::-1] means to reverse image channels so we can show OpenCV BGR images properly in matplotlib. OpenCV BGR images.
Define the available classes / labels
Now we will create a list of all 8 available emotions that we need to detect.
# Define the emotions
emotions = ['Neutral', 'Happy', 'Surprise', 'Sad', 'Anger', 'Disgust', 'Fear', 'Contempt']
Detect faces in the image
The next step is to detect all the faces in the image, since our target image only contains a single face so we will extract the first face we find.
img_copy = image.copy()

# Use SSD detector with 20% confidence threshold.
faces = fd.ssd_detect(img_copy, conf=0.2)

# Lets take the coordinates of the first face in the image.
x,y,w,h = faces[0]

# Define padding for face roi
padding = 3

# Extract the Face from image with padding.
face = img_copy[y-padding:y+h+padding,x-padding:x+w+padding]
Line 4: We’re using an SSD based face detector with 20% filter confidence to detect faces, you can easily swap this detector with any other detector inside bleedfacedetector by just changing this line.
Line 7: We’re extracting the x,y,w,h coordinates from the first face we found in the list of faces.
Line 10-13: We’re padding the face by a value of 3, now this expands the face ROI boundaries, this way the model takes a look at a larger face image when predicting. I’ve seen this improves results in a lot of cases, Although this is not required.
Padded Vs Non Padded Face
Here you can see what the final face ROI looks like when it’s padded and when it’s not padded.
# Non Padded face
face = img_copy[y:y+h, x:x+w]

# Just increasing the padding for demo purpose
padding = 20

# Get the Padded face
padded_face_demo = img_copy[y-padding:y+h+padding,x-padding:x+w+padding]

plt.figure(figsize=[10, 10])
plt.subplot(121);plt.imshow(padded_face_demo[...,::-1]);plt.title("Padded face");plt.axis('off')
plt.subplot(122);plt.imshow(face[...,::-1]);plt.title("Non Padded face");plt.axis('off');

Pre-Processing Image
Before you pass the image to a neural network you perform some image processing to get the image in the right format. So the first thing we need to do is convert the face from BGR to Grayscale then we’ll resize the image to be of size 64x64. This is the size that our network requires. After that we’ll reshape the face image into (1, 1, 64, 64), this is the final format which the network will accept.
# Convert Image into Grayscale
gray = cv2.cvtColor(padded_face,cv2.COLOR_BGR2GRAY)

# Resize into 64x64
resized_face = cv2.resize(gray, (64, 64))

# Reshape the image into required format for the model
processed_face = resized_face.reshape(1,1,64,64)
Line 2: Convert the padded face into GrayScale image
Line 5: Resize the GrayScale image into 64 x 64
Line 8: Finally we are reshaping the image into the required format for our model
Input the preprocessed Image to the Network
net.setInput(processed_face)
Forward Pass
Most of the Computations will take place in this step, This is the step where the image goes through the whole neural network.
Output = net.forward()
Check the output
As you can see, the model outputs scores for each emotion class.
# The output are the scores for each emotion class
print('Shape of Output: {} n'.format(Output.shape))
print(Output)
Shape of Output: (1, 8)
[[ 0.59999390 -0.05662632 7.5.22 -3.5109.508 -0.33268.593 -3.967.581.5 9.2001578 -3.1812003 ]]
Apply Softmax function to get probabilities:
We will convert the model scores to class probabilities between 0-1 by applying a Softmax function on it.
# Compute softmax values for each sets of scores
expanded = np.exp(scores - np.max(Output))
probablities =  expanded / expanded.sum()

# Get the final probablities
prob = np.squeeze(probablities)
print(prob)
[9.1010029e-04 4.7197891e-04 9.6490067e-01 1.491846e-05
3.5819356e-04 9.4487186e-06 3.3313509e-02 2.1165248e-05]
Get Predicted emotion
# Get the index of the max probability, use that index to get the predicted emotion in the
# emotions list you created above.
predicted_emotion = emotions[prob.argmax()]

# Print the target Emotion
print('Predicted Emotion is: {}'.format(predicted_emotion ))
Predicted Emotion is: Surprise
Display Final Result
We already have the correct prediction from the last step but to make it more cleaner we will display the final image with the predicted emotion, we will also draw a bounding box over the detected face.
# Write predicted emotion on image
cv2.putText(img_copy,'{}'.format(predicted_emotion),(x,y+h+75), cv2.FONT_HERSHEY_SIMPLEX, 3, (255,0,255), 7, cv2.LINE_AA)

# Draw rectangular box on detected face
cv2.rectangle(img_copy,(x,y),(x+w,y+h),(0,0,255),5)

# Display image
plt.figure(figsize=(10,10))
plt.imshow(img_copy[:,:,::-1]);plt.axis("off");
Creating Functions
Now that we have seen a step by step implementation of the network, we’ll create the 2 following python functions.
Initialization Function: This function will contain parts of the network that will be set once, like loading the model.
Main Function: This function will contain all the rest of the code from preprocessing to postprocessing, it will also have the option to either return the image or display it with matplotlib.
Furthermore, the Main Function will be able to predict the emotions of multiple people in a single image, as we will be doing all the operations in a loop.
Initialization Function
def init_emotion(model="Model/emotion-ferplus-8.onnx"):

    # Set global variables
    global net,emotions

    # Define the emotions
    emotions = ['Neutral', 'Happy', 'Surprise', 'Sad', 'Anger', 'Disgust', 'Fear', 'Contempt']

    # Initialize the DNN module
    net = cv2.dnn.readNetFromONNX(model)
Main Function
Set returndata = True when you just want the image. I usually do this when working with videos.
def emotion(image,returndata=False):

    # Make copy of  image
    img_copy = image.copy()

    # Detect faces in image
    faces = fd.ssd_detect(img_copy,conf=0.2)

    # Define padding for face ROI
    padding = 3

    # Iterate process for all detected faces
    for x,y,w,h in faces:

        # Get the Face from image
        face = img_copy[y-padding:y+h+padding,x-padding:x+w+padding]

        # Convert the detected face from BGR to Gray scale
        gray = cv2.cvtColor(face,cv2.COLOR_BGR2GRAY)

        # Resize the gray scale image into 64x64
        resized_face = cv2.resize(gray, (64, 64))

        # Reshape the final image in required format of model
        processed_face = resized_face.reshape(1,1,64,64)

        # Input the processed image
        net.setInput(processed_face)

        # Forward pass
        Output = net.forward()

        # Compute softmax values for each sets of scores
        expanded = np.exp(Output - np.max(Output))
        probablities =  expanded / expanded.sum()

        # Get the final probablities by getting rid of any extra dimensions
        prob = np.squeeze(probablities)

        # Get the predicted emotion
        predicted_emotion = emotions[prob.argmax()]

        # Write predicted emotion on image
        cv2.putText(img_copy,'{}'.format(predicted_emotion),(x,y+h+(1*20)), cv2.FONT_HERSHEY_SIMPLEX, 1, (255,0,255),
                        2, cv2.LINE_AA)
        # Draw a rectangular box on the detected face
        cv2.rectangle(img_copy,(x,y),(x+w,y+h),(0,0,255),2)

    if  returndata:
        # Return the the final image if return data is True
        return img_copy

    else:
        # Displpay the image
        plt.figure(figsize=(10,10))
        plt.imshow(img_copy[:,:,::-1]);plt.axis("off");
Initialize the Emotion Recognition
Call the initialization function once.
init_emotion()
Calling the main function
Now pass in any image to the main function
image = cv2.imread("Media/emotion1.jpeg")
emotion(image)
image = cv2.imread("Media/emotion4.jpg")
emotion(image)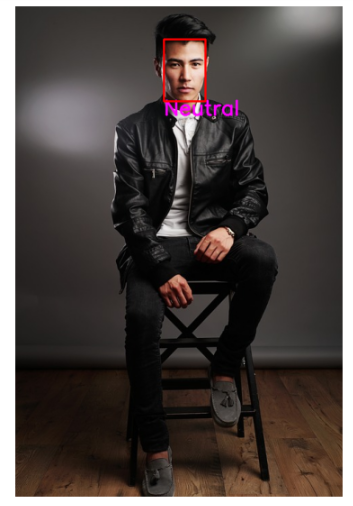
image = cv2.imread("Media/emotion3.jpg")
emotion(image)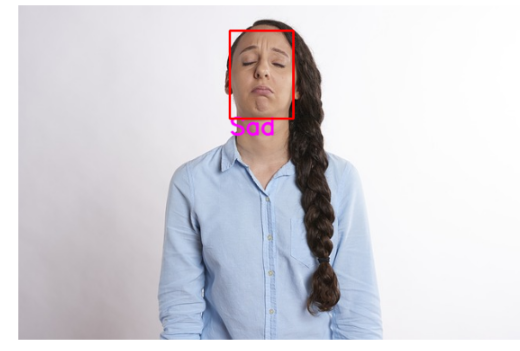
image = cv2.imread("Media/emotion2.jpg")
emotion(image)
Real time emotion recognition on Video:
You can also take the above main function that we created and put it inside a loop and it will start detecting facial expressions on a video, below code detects emotions using your webcam in real time. Make sure to set returndata = True
fps=0
init_emotion()
cap = cv2.VideoCapture('media/bean_input.mp4')

# If you want to use the webcam the pass 0
# cap = cv2.VideoCapture(0)


while(True):

    start_time = time.time()
    ret,frame=cap.read()

    if not ret:
        break

    image = cv2.flip(frame,1)

    image = emotion(image, returndata=True, confidence = 0.8)

    cv2.putText(image, 'FPS: {:.2f}'.format(fps), (10, 20), cv2.FONT_HERSHEY_SIMPLEX,0.8, (255, 20, 55), 1)
    cv2.imshow("Emotion Recognition",image)

    k = cv2.waitKey(1)
    fps= (1.0 / (time.time() - start_time))

    if k == ord('q'):
        break
cap.release()
cv2.destroyAllWindows()
Conclusion:
Here’s the confusion matrix of the model from the author’s paper. As you can see this model is not good at predicting Disgust, Fear & Contempt classes.
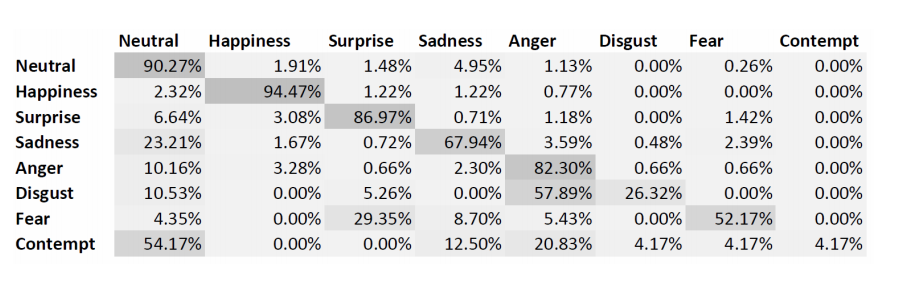
You can try running the model on different images and you’ll also agree with the above matrix, that the last three classes are pretty difficult to predict, particularly because It’s also hard for us to differentiate between these many emotions based on just facial expression, a lot of micro expressions overlap between these classes and so it’s understandable why the algorithm would have a hard time differentiating between 8 different emotional expressions.
Improvement Suggestions:
Still, if you really want to detect some expressions that the model seems to fail on then the best way to go about is to train the model yourself on your own data. Ethnicity & color can make a lot of difference. Also, try removing some emotion classes so the model can focus only on those that you care about.
You can also try changing the padding value, this seems to help in some cases.
If you’re working on a live video feed then try to average the results of several frames instead of giving a new result on every new frame.
You’ll come across many Computer Vision courses out there, but nothing beats a 1 on 1 video call support from an expert in the field. Plus there is a plethora of subfields and tons of courses on AI and computer vision out there, you need someone to lay out a step-by-step learning path customized to your needs. This is where I come in, whether you need monthly support or just want to have a one-time chat with me, I’ve got you covered. Check all the coaching details and packages here
Ready? Get Started on 1×1 Coaching here.
Summary:
In this tutorial we first learned about the Emotion Recognition problem, why it’s important, and what are the different approaches we could take to develop such systems.
Then we learned to perform emotion recognition using OpenCV’s DNN module. After that, we went over some ways on how to improve our results.
I hope you enjoyed this tutorial. If you have any questions regarding this post then please feel free to comment below and I’ll gladly answer them.
You can reach out to me personally for a 1 on 1 consultation session in AI/computer vision regarding your project. Our talented team of vision engineers will help you every step of the way. Get on a call with me directly here.


Hi,
Just wondering, what are the color-codings of the layers in the diagram of the model, between the convolution layers? I am guessing the blue strips are fully connected layers, and the orange and gray strips activation layers. Are the green pooling layers? And what are the other parameters of the conv. layers (kernel size, stride, padding, etc)?
Thank you in advance 🙂
Hi Karen, thanks for reading the post, so that image is from a research paper, and according to the author: yellow, green, orange, blue and gray are convolution, max pooling,
dropout, fully connected and soft-max layer, respectively
For further information, you can read the full paper here.