Watch Video Here
In this post, you’ll learn in-depth about the five of the most easiest and effective face detection options available in python, along with the pros and cons of each one of them. You will become capable of obtaining the required balance in accuracy, speed, and efficiency in any given scenario.
The face detection methods we will be covering are:
- OpenCV Haar Cascade Face Detection
- Dlib HoG Face Detection
- OpenCV Deep Learning-based Face Detection
- Dlib Deep Learning-based Face Detection
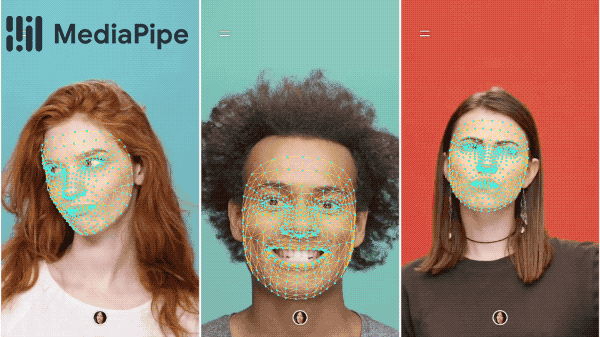
- Mediapipe Deep Learning-based Face Detection
Face Detection is one of the most common and simplest vision techniques out there, as the name implies, it detects (i.e., locates) the faces in the images and is the first and essential step for almost every face application like Face Recognition, Facial Landmarks Detection, Face Gesture Recognition, and Augmented Reality (AR) Filters, etc.
Other than these, one of its most common applications, that you must have used, is your mobile camera which detects your face and adjusts the camera focus automatically in real-time.

Also, for what it’s worth Tony Stark’s EDITH (Even Dead I’m The Hero) glasses, inherited by Peter Parker in the Spider-Man Far From Home movie, also uses Face Detection as an initial step to perform its functionalities. Cool 😊 … right?
Yeah I know .. I know, I needed to add a marvel reference into it, the whole post get’s cooler.
Face detection also serves as a ground for a lot of exciting face applications for e.g. You can even appoint Mr. Beans as the President 😂 using Deepfake.

But for now, let’s just go back to Face Detection.
The idea behind face detection is to make the computer capable of identifying what human face exactly is and detecting the features that are associated with the faces in images/videos which might not always be easy because of changing facial expression, orientation, lighting conditions, and occlusions due to face masks, glasses, etc.
But with enough training data covering all the possible scenarios, you can create a very robust face detector.
And people throughout the years have done just that, they have designed various algorithms for facial detection and in this post, we’ll explore 5 such algorithms.
As this is the most common and widely used technique, there are a lot of face detectors out there.
But which Algorithm is the best?
If you’re looking for a single solution then it’s a hard answer as each of the algorithms that we’re going to cover has its own pros and cons, take a look at the demos at the end for some comparison, and make sure to read the summary for the final verdict.
Alright, so without further ado, let’s dive in.
[optin-monster slug=”rhkojx1lcwd45akbz8u8″]
Import the Libraries
We will first import the required libraries.
import os
import cv2
import dlib
from time import time
import mediapipe as mp
import matplotlib.pyplot as plt
Algorithm 1: OpenCV Haar Cascade Face Detection
This face detector was introduced in 2001 and remained the state-of-the-art face detection algorithm for many years. Other than just this face detector, OpenCV provides some other detectors (like eye, and smile, etc) too, which use the same haar cascade technique.
Load the OpenCV Haar Cascade Face Detector
To perform the face detection using this algorithm, first, we will have to load the pre-trained Haar cascade face detection model around 900 KBs from the disk, stored in a .xml file format, using the function CascadeClassifier().
# Load the pre-trained Haar cascade face detection model.
cascade_face_detector = cv2.CascadeClassifier("models/haarcascade_frontalface_default.xml")
cascade_face_detector
Create a Haar Cascade Face Detection Function
Now we will create a function haarCascadeDetectFaces() that will perform haar cascade face detection using the function cv2.CascadeClassifier.detectMultiScale() on an image/frame and will visualize the resultant image along with the original image (when working with images) or return the resultant image along with the output of the model (when working with videos) depending upon the passed arguments.
Function Syntax:
results = cv2.CascadeClassifier.detectMultiScale(image, scaleFactor, minNeighbors, minSize, maxSize)
Parameters:
image– It is the input grayscale image containing the faces.scaleFactor(optional) – It is the image size that is reduced at each image scale. Its default value is1.1which means a decrease of 10%.minNeighbors(optional) – It is the number of minimum neighbors each predicted face should have, to retain. Otherwise, the prediction is ignored. Its default value is3.minSize(optional) – It is the minimum possible face size, the faces smaller than that size are ignored.maxSize(optional) – It is the maximum possible face size, the faces larger than that are ignored. IfmaxSize==minSizethen only the faces of a particular size are detected.
Returns:
results– It is an array of bounding boxes coordinates(i.e., x1, y1, bbox_width, bbox_height)where each bounding box encloses the detected face, the boxes may be partially outside the original image.
Note: When the value of the minNeighbors parameter is decreased, false positives are increased, and when the value of scaleFactor is decreased the large faces in the image become smaller and detectable by the algorithm at the cost of speed.
So the algorithm can detection very large and very small faces too by appropriately utilizing the scaleFactor argument.
def haarCascadeDetectFaces(image, cascade_face_detector, display = True):
    '''
    This function performs face(s) detection on an image using opencv haar cascade face detector.
    Args:
        image:                 The input image of the person(s) whose face needs to be detected.
        cascade_face_detector: The pre-trained Haar cascade face detection model loaded from the disk required to
                               perform the detection.
        display:               A boolean value that is if set to true the function displays the original input image,
                               and the output image with the bounding boxes drawn and time taken written and returns
                               nothing.
    Returns:
        output_image: A copy of input image with the bounding boxes drawn.
        results:      The output of the face detection process on the input image.
    '''

    # Get the height and width of the input image.
    image_height, image_width, _ = image.shape

    # Create a copy of the input image to draw bounding boxes on.
    output_image = image.copy()

    # Convert the input image to grayscale.
    gray = cv2.cvtColor(image, cv2.COLOR_BGR2GRAY)

    # Get the current time before performing face detection.
    start = time()

    # Perform the face detection on the image.
    results = cascade_face_detector.detectMultiScale(image=gray, scaleFactor=1.2, minNeighbors=3)

    # Get the current time after performing face detection.
    end = time()

    # Loop through each face detected in the image and retireve the bounding box cordinates.
    for (x1, y1, bbox_width, bbox_height) in results:

        # Draw bounding box around the face on the copy of the input image using the retrieved coordinates.
        cv2.rectangle(output_image, pt1=(x1, y1), pt2=(x1 + bbox_width, y1 + bbox_height), color=(0, 255, 0),
                      thickness=image_width//200)

    # Check if the original input image and the output image are specified to be displayed.
    if display:

        # Write the time take by face detection process on the output image.
        cv2.putText(output_image, text='Time taken: '+str(round(end - start, 2))+' Seconds.', org=(10, 65),
                    fontFace=cv2.FONT_HERSHEY_COMPLEX, fontScale=image_width//700, color=(0,0,255),
                    thickness=image_width//500)

        # Display the original input image and the output image.
        plt.figure(figsize=[15,15])
        plt.subplot(121);plt.imshow(image[:,:,::-1]);plt.title("Original Image");plt.axis('off');
        plt.subplot(122);plt.imshow(output_image[:,:,::-1]);plt.title("Output");plt.axis('off');

    # Otherwise
    else:

        # Return the output image and results of face detection.
        return output_image, results
Now we will utilize the function haarCascadeDetectFaces() created above to perform face detection on a few sample images and display the results.
# Read a sample image and perform haar cascade face detection on it.
image = cv2.imread('media/sample4.jpg')
haarCascadeDetectFaces(image, cascade_face_detector, display=True)
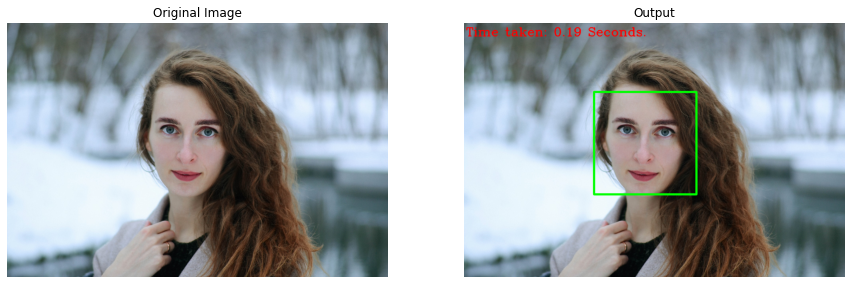
The time taken by the algorithm to perform detection is pretty impressive, so yeah, it can work in real-time on a CPU.
# Read another sample image and perform haar cascade face detection on it.
image = cv2.imread('media/sample5.jpg')
haarCascadeDetectFaces(image, cascade_face_detector, display=True)
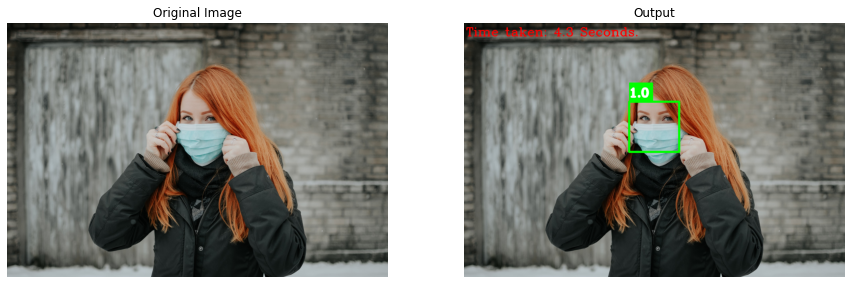
A major drawback of this algorithm is that it does not work on non-frontal and occluded faces.
# Read another sample image and perform haar cascade face detection on it.
image = cv2.imread('media/sample1.jpg')
haarCascadeDetectFaces(image, cascade_face_detector, display=True)
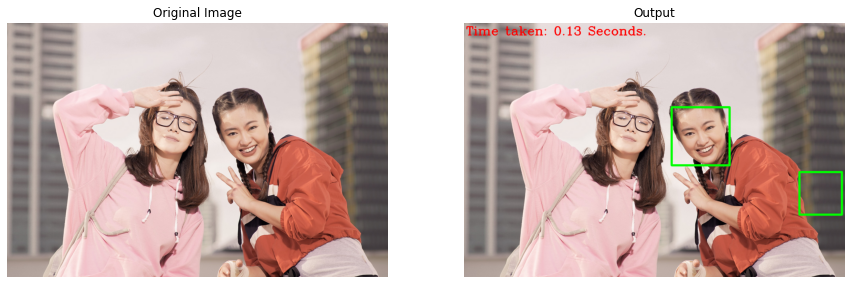
minNeighbors argument in the function cv2.CascadeClassifier.detectMultiScale().Algorithm 2: Dlib HoG Face Detection
This face detector is based on HoG (Histogram of Oriented Gradients), and SVM (Support Vector Machine) and is significantly more accurate than the previous one. The technique used in this one is not invariant to changes in face angle, so it uses five different HOG filters that are for:
- Frontal face
- Right side turned face
- Left side turned face
- Frontal face but rotated right
- Frontal face but rotated left
So it can work on slightly non-frontal and rotated faces as well.
Load the Dlib HoG Face Detector
Now we will use the dlib.get_frontal_face_detector() function to load the pre-trained HoG face detector and we will not need to pass the path of the model file for this one as the model is included in the dlib library.
# Get the HoG face detection model.
hog_face_detector = dlib.get_frontal_face_detector()
hog_face_detector
Create a HoG Face Detection Function
Now we will create a function hogDetectFaces() that will perform HoG face detection by inputting the image/frame into the loaded hog_face_detector and will visualize the resultant image along with the original image or return the resultant image along with the output of HoG face detector depending upon the passed arguments.
Function Syntax:
results = hog_face_detector(image, upsample)
Parameters:
image– It is the input image containing the faces in RGB format.upsample(optional) – It is the number of times to upsample an image before performing face detection.
Returns:
results– It is an array of rectangle objects containing the (x, y) coordinates of the corners of the bounding boxes enclosing the faces in the input image.
Note: The model is trained to detect a minimum face size of 80×80, so to detect small faces in the images, you will have to upsample the images that increase the resolution of the input images, thus increases the face size at the cost of computation speed of the detection process.
def hogDetectFaces(image, hog_face_detector, display = True):
    '''
    This function performs face(s) detection on an image using dlib hog face detector.
    Args:
        image:             The input image of the person(s) whose face needs to be detected.
        hog_face_detector: The hog face detection model required to perform the detection on the input image.
        display:           A boolean value that is if set to true the function displays the original input image,
                           and the output image with the bounding boxes drawn and time taken written and returns nothing.
    Returns:
        output_image: A copy of input image with the bounding boxes drawn.
        results:      The output of the face detection process on the input image.
    '''

    # Get the height and width of the input image.
    height, width, _ = image.shape

    # Create a copy of the input image to draw bounding boxes on.
    output_image = image.copy()

    # Convert the image from BGR into RGB format.
    imgRGB = cv2.cvtColor(image, cv2.COLOR_BGR2RGB)

    # Get the current time before performing face detection.
    start = time()

    # Perform the face detection on the image.
    results = hog_face_detector(imgRGB, 0)

    # Get the current time after performing face detection.
    end = time()

    # Loop through the bounding boxes of each face detected in the image.
    for bbox in results:

        # Retrieve the left most x-coordinate of the bounding box.
        x1 = bbox.left()

        # Retrieve the top most y-coordinate of the bounding box.
        y1 = bbox.top()

        # Retrieve the right most x-coordinate of the bounding box.
        x2 = bbox.right()

        # Retrieve the bottom most y-coordinate of the bounding box.
        y2 = bbox.bottom()

        # Draw a rectangle around a face on the copy of the image using the retrieved coordinates.
        cv2.rectangle(output_image, pt1=(x1, y1), pt2=(x2, y2), color=(0, 255, 0), thickness=width//200)


    # Check if the original input image and the output image are specified to be displayed.
    if display:

        # Write the time take by face detection process on the output image.
        cv2.putText(output_image, text='Time taken: '+str(round(end - start, 2))+' Seconds.', org=(10, 65),
                    fontFace=cv2.FONT_HERSHEY_COMPLEX, fontScale=width//700, color=(0,0,255), thickness=width//500)

        # Display the original input image and the output image.
        plt.figure(figsize=[15,15])
        plt.subplot(121);plt.imshow(image[:,:,::-1]);plt.title("Original Image");plt.axis('off');
        plt.subplot(122);plt.imshow(output_image[:,:,::-1]);plt.title("Output");plt.axis('off');

    # Otherwise
    else:

        # Return the output image and results of face detection.
        return output_image, results
Now we will utilize the function hogDetectFaces() created above to perform HoG face detection on a few sample images and display the results.
# Read a sample image and perform hog face detection on it.
image = cv2.imread('media/sample4.jpg')
hogDetectFaces(image, hog_face_detector, display=True)
So this too can work in real-time on a CPU. You can also resize the images before passing them to the model, as the smaller the images are, the faster the detection process will be. But this also increases the probability of faces smaller than 80×80 in the images.
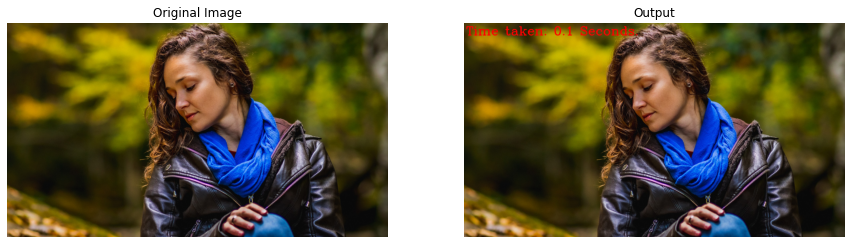
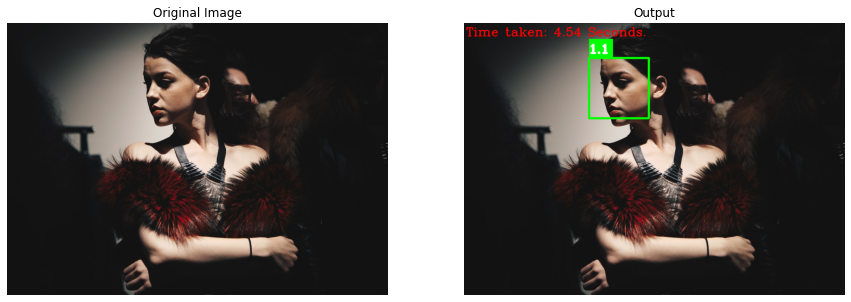
# Read another sample image and perform hog face detection on it.
image = cv2.imread('media/sample3.jpg')
hogDetectFaces(image, hog_face_detector, display=True)
As you can see, it works on slightly rotated faces but will fail on extremely rotated and non-frontal ones and the bounding box often excludes some parts of the face like the chin and forehead.
# Read another sample image and perform hog face detection on it.
image = cv2.imread('media/sample7.jpg')
hogDetectFaces(image, hog_face_detector, display=True)
And also works on small occlusions but will fail on massive ones.
# Read another sample image and perform hog face detection on it.
image = cv2.imread('media/sample6.jpg')
hogDetectFaces(image, hog_face_detector, display=True)
As mentioned above, it cannot detect faces smaller than 80x80. Now, if you want, you can increase the upsample argument value of the loaded hog_face_detector in the function hogDetectFaces() created above, to detect the face in the image above, but that will also tremendously increase the time taken by the face detection process.
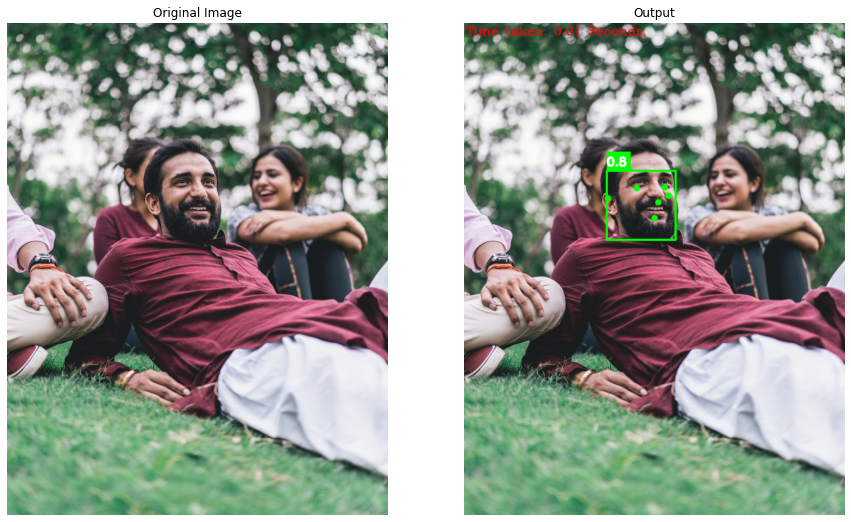
Algorithm 3: OpenCV Deep Learning based Face Detection
This one is based on a deep learning approach and uses ResNet-10 Architecture to detect multiple faces in a single pass (Single Shot Detector SSD) of the image through the network (model). It has been included in OpenCV since August 2017, with the official release of version 3.3, still, it is not as popular as the OpenCV Haar Cascade Face Detector but surely is highly more accurate.
Load the OpenCV Deep Learning based Face Detector
Now to load the face detector, OpenCV provides us with two options, one of them is in the Caffe framework’s format and takes around 5.10 MBs in memory and the other one is in the TensorFlow framework’s format and acquires only 2.7 MBs in memory.
To load the first one from the disk, we can use the cv2.dnn.readNetFromCaffe() function and to load the other one we will have to use the cv2.dnn.readNetFromTensorflow() function with appropriate arguments.
# Select the framework you want to use.
########################################################################################################################

# Load a model stored in Caffe framework's format using the architecture and the layers weights file stored in the disk.
opencv_dnn_model = cv2.dnn.readNetFromCaffe(prototxt="models/deploy.prototxt",
                                            caffeModel="models/res10_300x300_ssd_iter_140000_fp16.caffemodel")

########################################################## OR ##########################################################

# Load a model stored in TensorFlow framework's format using the architecture and the layers weights file stored in the disk
# opencv_dnn_model = cv2.dnn.readNetFromTensorflow(model="models/opencv_face_detector_uint8.pb",
#                                                  config="models/opencv_face_detector.pbtxt")

########################################################################################################################
opencv_dnn_model
Create an OpenCV Deep Learning based Face Detection Function
Now we will create a function cvDnnDetectFaces() that will perform Deep Learning-based face detection using OpenCV. First, we will pre-process the image/frame using the cv2.dnn.blobFromImage() function and then we will set the pre-processed image as an input to the network by using the function opencv_dnn_model.setInput().
And after that, pass the input image into the network by using the opencv_dnn_model.forward() function to get an array containing the bounding boxes coordinates normalized to ([0.0, 1.0]) and the detection confidence of each faces in the image.
After performing the detection, the function will also visualize the resultant image along with the original image or return the resultant image along with the output of the dnn face detector depending upon the passed arguments.
Note: Higher the face detection confidence score is, the more certain the model is about the detection.
def cvDnnDetectFaces(image, opencv_dnn_model, min_confidence=0.5, display = True):
    '''
    This function performs face(s) detection on an image using opencv deep learning based face detector.
    Args:
        image:               The input image of the person(s) whose face needs to be detected.
        opencv_dnn_model:    The pre-trained opencv deep learning based face detection model loaded from the disk
                             required to perform the detection.
        min_confidence:      The minimum detection confidence required to consider the face detection model's
                             prediction correct.
        display:             A boolean value that is if set to true the function displays the original input image,
                             and the output image with the bounding boxes drawn, confidence scores, and time taken
                             written and returns nothing.
    Returns:
        output_image: A copy of input image with the bounding boxes drawn and confidence scores written.
        results:      The output of the face detection process on the input image.
    '''

    # Get the height and width of the input image.
    image_height, image_width, _ = image.shape

    # Create a copy of the input image to draw bounding boxes and write confidence scores.
    output_image = image.copy()

    # Perform the required pre-processings on the image and create a 4D blob from image.
    # Resize the image and apply mean subtraction to its channels
    # Also convert from BGR to RGB format by swapping Blue and Red channels.
    preprocessed_image = cv2.dnn.blobFromImage(image, scalefactor=1.0, size=(300, 300),
                                               mean=(104.0, 117.0, 123.0), swapRB=False, crop=False)

    # Set the input value for the model.
    opencv_dnn_model.setInput(preprocessed_image)

    # Get the current time before performing face detection.
    start = time()

    # Perform the face detection on the image.
    results = opencv_dnn_model.forward()

    # Get the current time after performing face detection.
    end = time()

    # Loop through each face detected in the image.
    for face in results[0][0]:

        # Retrieve the face detection confidence score.
        face_confidence = face[2]

        # Check if the face detection confidence score is greater than the thresold.
        if face_confidence > min_confidence:

            # Retrieve the bounding box of the face.
            bbox = face[3:]

            # Retrieve the bounding box coordinates of the face and scale them according to the original size of the image.
            x1 = int(bbox[0] * image_width)
            y1 = int(bbox[1] * image_height)
            x2 = int(bbox[2] * image_width)
            y2 = int(bbox[3] * image_height)

            # Draw a bounding box around a face on the copy of the image using the retrieved coordinates.
            cv2.rectangle(output_image, pt1=(x1, y1), pt2=(x2, y2), color=(0, 255, 0), thickness=image_width//200)

            # Draw a filled rectangle near the bounding box of the face.
            # We are doing it to change the background of the confidence score to make it easily visible.
            cv2.rectangle(output_image, pt1=(x1, y1-image_width//20), pt2=(x1+image_width//16, y1),
                          color=(0, 255, 0), thickness=-1)

            # Write the confidence score of the face near the bounding box and on the filled rectangle.
            cv2.putText(output_image, text=str(round(face_confidence, 1)), org=(x1, y1-25),
                        fontFace=cv2.FONT_HERSHEY_COMPLEX, fontScale=image_width//700,
                        color=(255,255,255), thickness=image_width//200)

    # Check if the original input image and the output image are specified to be displayed.
    if display:

        # Write the time take by face detection process on the output image.
        cv2.putText(output_image, text='Time taken: '+str(round(end - start, 2))+' Seconds.', org=(10, 65),
                    fontFace=cv2.FONT_HERSHEY_COMPLEX, fontScale=image_width//700,
                    color=(0,0,255), thickness=image_width//500)

        # Display the original input image and the output image.
        plt.figure(figsize=[15,15])
        plt.subplot(121);plt.imshow(image[:,:,::-1]);plt.title("Original Image");plt.axis('off');
        plt.subplot(122);plt.imshow(output_image[:,:,::-1]);plt.title("Output");plt.axis('off');

    # Otherwise
    else:

        # Return the output image and results of face detection.
        return output_image, results
Now we will utilize the function cvDnnDetectFaces() created above to perform OpenCV deep learning-based face detection on a few sample images and display the results.
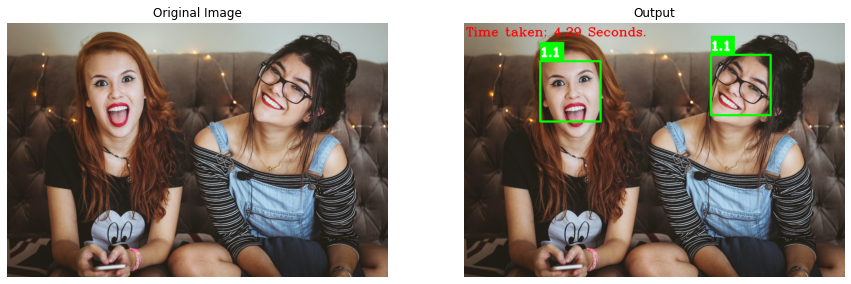
# Read a sample image and perform OpenCV dnn face detection on it.
image = cv2.imread('media/sample5.jpg')
cvDnnDetectFaces(image, opencv_dnn_model, display=True)
So it is highly more accurate than both of the above and works great even under massive occlusions and on non-frontal faces. And the reason for its significantly higher speed is that it can detect faces across various scales, allowing us to resize the images to a smaller size which decreases computations.
# Read another sample image and perform OpenCV dnn face detection on it.
image = cv2.imread('media/sample3.jpg')
cvDnnDetectFaces(image, opencv_dnn_model, display=True)
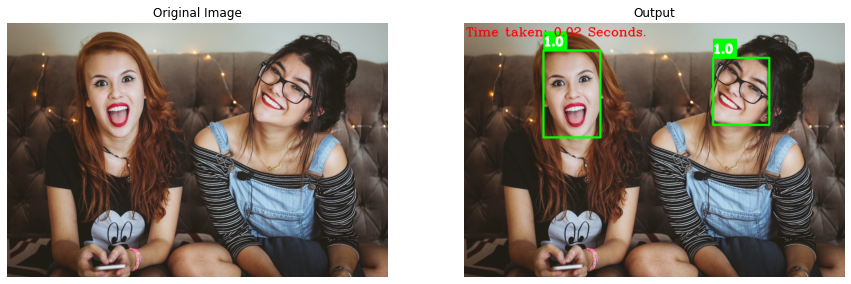
Also, the bounding box encloses the whole face, unlike the HoG Face Detector, making it easier to crop regions of interest (i.e., faces) from the images.CodeText
Also, the bounding box encloses the whole face, unlike the HoG Face Detector, making it easier to crop regions of interest (i.e., faces) from the images.CodeText
# Read another sample image and perform OpenCV dnn face detection on it.
image = cv2.imread('media/sample8.jpg')
cvDnnDetectFaces(image, opencv_dnn_model, display=True)
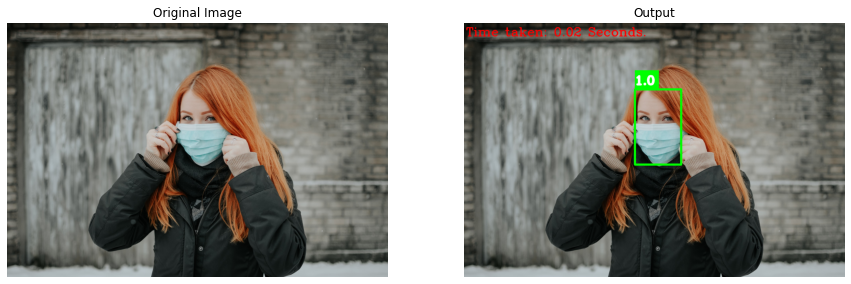
So even the faces with masks are detectable with this one.
Algorithm 4: Dlib Deep Learning based Face Detection
This detector is also based on a Deep learning (Convolution Neural Network) approach and uses Maximum-Margin Object Detection (MMOD) method to detect faces in images. This one is also trained for a minimum face size of 80×80 and provides the option of upsampling the images. This one is very slow on a CPU but can be used on an NVIDIA GPU and outperforms the other detectors in speed on the GPU.
Load the Dlib Deep Learning based Face Detector
Now first, we will use the dlib.cnn_face_detection_model_v1() function to load the pre-trained maximum-margin cnn face detector around 700 KBs from the disk, stored in a .dat file format.
# Load the dlib dnn face detection model from the file stored in the disk.
cnn_face_detector = dlib.cnn_face_detection_model_v1("models/mmod_human_face_detector.dat")
cnn_face_detector
Create a Dlib Deep Learning based Face Detection Function
Now we will create a function dlibDnnDetectFaces() in which we will perform deep Learning-based face detection using dlib by inputting the image/frame and the number of times to upsample the image to the loaded cnn_face_detector as we had done for the HoG face detection.
The only difference is that we are loading a different model, and it will return a list of objects, where each object will be a wrapper around a rectangle object (containing the bounding box coordinates) and a detection confidence score. As our every other function, this one will also visualize the results or return them depending upon the passed arguments.
def dlibDnnDetectFaces(image, cnn_face_detector, new_width = 600, display = True):
    '''
    This function performs face(s) detection on an image using dlib deep learning based face detector.
    Args:
        image:              The input image of the person(s) whose face needs to be detected.
        cnn_face_detector:  The pre-trained dlib deep learning based (CNN) face detection model loaded from
                            the disk required to perform the detection.
        new_width:          The new width of the input image to which it will be resized before passing it to the model.
        display:            A boolean value that is if set to true the function displays the original input image,
                            and the output image with the bounding boxes drawn, confidence scores, and time taken
                            written and returns nothing.
    Returns:
        output_image: A copy of input image with the bounding boxes drawn and confidence scores written.
        results:      The output of the face detection process on the input image.
    '''

    # Get the height and width of the input image.
    height, width, _ = image.shape

    # Calculate the new height of the input image while keeping the aspect ratio constant.
    new_height = int((new_width / width) * height)

    # Resize a copy of input image while keeping the aspect ratio constant.
    resized_image = cv2.resize(image.copy(), (new_width, new_height))

    # Convert the resized image from BGR into RGB format.
    imgRGB = cv2.cvtColor(resized_image, cv2.COLOR_BGR2RGB)

    # Create a copy of the input image to draw bounding boxes and write confidence scores.
    output_image = image.copy()

    # Get the current time before performing face detection.
    start = time()

    # Perform the face detection on the image.
    results = cnn_face_detector(imgRGB, 0)

    # Get the current time after performing face detection.
    end = time()

    # Loop through each face detected in the image.
    for face in results:

        # Retriece the bounding box of the face.
        bbox = face.rect

        # Retrieve the bounding box coordinates and scale them according to the size of original input image.
        x1 = int(bbox.left() * (width/new_width))
        y1 = int(bbox.top() * (height/new_height))
        x2 = int(bbox.right() * (width/new_width))
        y2 = int(bbox.bottom() * (height/new_height))

        # Draw bounding box around the face on the copy of the image using the retrieved coordinates.
        cv2.rectangle(output_image, pt1=(x1, y1), pt2=(x2, y2), color=(0, 255, 0), thickness=width//200)

        # Draw a filled rectangle near the bounding box of the face.
        # We are doing it to change the background of the confidence score to make it easily visible.
        cv2.rectangle(output_image, pt1=(x1, y1-width//20), pt2=(x1+width//16, y1), color=(0, 255, 0), thickness=-1)

        # Write the confidence score of the face near the bounding box and on the filled rectangle.
        cv2.putText(output_image, text=str(round(face.confidence, 1)), org=(x1, y1-25), fontFace=cv2.FONT_HERSHEY_COMPLEX,
                    fontScale=width//700, color=(255,255,255), thickness=width//200)

    # Check if the original input image and the output image are specified to be displayed.
    if display:

        # Write the time take by face detection process on the output image.
        cv2.putText(output_image, text='Time taken: '+str(round(end - start, 2))+' Seconds.', org=(10, 65),
                    fontFace=cv2.FONT_HERSHEY_COMPLEX, fontScale=width//700, color=(0,0,255), thickness=width//500)

        # Display the original input image and the output image.
        plt.figure(figsize=[15,15])
        plt.subplot(121);plt.imshow(image[:,:,::-1]);plt.title("Original Image");plt.axis('off');
        plt.subplot(122);plt.imshow(output_image[:,:,::-1]);plt.title("Output");plt.axis('off');

    # Otherwise
    else:

        # Return the output image and results of face detection.
        return output_image, results
Now we will utilize the function dlibDnnDetectFaces() created above to perform dlib deep learning-based face detection on a few sample images and display the results.
# Read a sample image and perform dlib dnn face detection on it.
image = cv2.imread('media/sample8.jpg')
dlibDnnDetectFaces(image, cnn_face_detector, display=True)
Interesting! this one is also far more accurate and robust than the first two and is also capable of detecting faces under occlusion. But as you can see, the time taken by the detection process is very high, so this detector cannot work in real-time on a CPU.
# Read another sample image and perform dlib dnn face detection on it.
image = cv2.imread('media/sample9.jpg')
dlibDnnDetectFaces(image, cnn_face_detector, display=True)
Also, the varying face orientations and lighting do not stop it from detecting faces accurately.
# Read another sample image and perform dlib dnn face detection on it.
image = cv2.imread('media/sample3.jpg')
dlibDnnDetectFaces(image, cnn_face_detector, display=True)
Similar to the HoG face detector, the bounding box for this one is also small and does not enclose the whole face.
Algorithm 5: Mediapipe Deep Learning based Face Detection
The last one is also based on Deep learning approach and uses BlazeFace that is a very lightweight and highly accurate face detector inspired and modified from Single Shot MultiBox Detector (SSD) & MobileNetv2. The detector provided by Mediapipe is capable of running at a speed of 200-1000+ FPS on flagship devices.
Load the Mediapipe Face Detector
To load the model, we first have to initialize the face detection class using the mp.solutions.face_detection syntax and then we will have to call the function mp.solutions.face_detection.FaceDetection() with the arguments explained below:
model_selection– It is an integer index( i.e., 0 or 1 ). When set to0, a short-range model is selected that works best for faces within 2 meters from the camera, and when set to1, a full-range model is selected that works best for faces within 5 meters. Its default value is0.min_detection_confidence– It is the minimum detection confidence between([0.0, 1.0])required to consider the face-detection model’s prediction successful. Its default value is0.5( i.e., 50% ) which means that all the detections with prediction confidence less than0.5are ignored by default.
We will also have to initialize the mp.solutions.drawing_utils class which is used to visualize the detection results on the images/frames.
# Initialize the mediapipe drawing class.
mp_drawing = mp.solutions.drawing_utils

# Initialize the mediapipe face detection class.
mp_face_detection = mp.solutions.face_detection

# Set up the face detection function by selecting the full-range model.
mp_face_detector = mp_face_detection.FaceDetection(min_detection_confidence=0.4)
mp_face_detector
Create a Mediapipe Deep Learning based Face Detection Function
Now we will create a function mpDnnDetectFaces() in which we will use the mediapipe face detector to perform the detection on an image/frame by passing it into the loaded model by using the function mp_face_detector.process() and get a list of a bounding box and six key points for each face in the image. The six key points are on the:
- Right Eye
- Left Eye
- Nose Tip
- Mouth Center
- Right Ear Tragion
- Left Ear Tragion
The bounding boxes are composed of xmin and width (both normalized to [0.0, 1.0] by the image width) and ymin and height (both normalized to [0.0, 1.0] by the image height). Each key point is composed of x and y, which are normalized to [0.0, 1.0] by the image width and height respectively. The function will work on images and videos as well as this one will also display or return the results depending upon passed arguments.
def mpDnnDetectFaces(image, mp_face_detector, display = True):
    '''
    This function performs face(s) detection on an image using mediapipe deep learning based face detector.
    Args:
        image:            The input image with person(s) whose face needs to be detected.
        mp_face_detector: The mediapipe's face detection function required to perform the detection.
        display:          A boolean value that is if set to true the function displays the original input image,
                          and the output image with the bounding boxes, and key points drawn, and also confidence
                          scores, and time taken written and returns nothing.
    Returns:
        output_image: A copy of input image with the bounding box and key points drawn and also confidence scores written.
        results:      The output of the face detection process on the input image.
    '''

    # Get the height and width of the input image.
    image_height, image_width, _ = image.shape

    # Create a copy of the input image to draw bounding box and key points.
    output_image = image.copy()

    # Convert the image from BGR into RGB format.
    imgRGB = cv2.cvtColor(image, cv2.COLOR_BGR2RGB)

    # Get the current time before performing face detection.
    start = time()

    # Perform the face detection on the image.
    results = mp_face_detector.process(imgRGB)

    # Get the current time after performing face detection.
    end = time()

    # Check if the face(s) in the image are found.
    if results.detections:

        # Iterate over the found faces.
        for face_no, face in enumerate(results.detections):

            # Draw the face bounding box and key points on the copy of the input image.
            mp_drawing.draw_detection(image=output_image, detection=face,
                                      keypoint_drawing_spec=mp_drawing.DrawingSpec(color=(0,255,0),
                                                                                   thickness=-1,
                                                                                   circle_radius=image_width//115),
                                      bbox_drawing_spec=mp_drawing.DrawingSpec(color=(0,255,0),thickness=image_width//180))

            # Retrieve the bounding box of the face.
            face_bbox = face.location_data.relative_bounding_box

            # Retrieve the required bounding box coordinates and scale them according to the size of original input image.
            x1 = int(face_bbox.xmin*image_width)
            y1 = int(face_bbox.ymin*image_height)


            # Draw a filled rectangle near the bounding box of the face.
            # We are doing it to change the background of the confidence score to make it easily visible
            cv2.rectangle(output_image, pt1=(x1, y1-image_width//20), pt2=(x1+image_width//16, y1) ,
                          color=(0, 255, 0), thickness=-1)

            # Write the confidence score of the face near the bounding box and on the filled rectangle.
            cv2.putText(output_image, text=str(round(face.score[0], 1)), org=(x1, y1-25),
                        fontFace=cv2.FONT_HERSHEY_COMPLEX, fontScale=image_width//700, color=(255,255,255),
                        thickness=image_width//200)

    # Check if the original input image and the output image are specified to be displayed.
    if display:

        # Write the time take by face detection process on the output image.
        cv2.putText(output_image, text='Time taken: '+str(round(end - start, 2))+' Seconds.', org=(10, 65),
                    fontFace=cv2.FONT_HERSHEY_COMPLEX, fontScale=image_width//700, color=(0,0,255),
                    thickness=image_width//500)

        # Display the original input image and the output image.
        plt.figure(figsize=[15,15])
        plt.subplot(121);plt.imshow(image[:,:,::-1]);plt.title("Original Image");plt.axis('off');
        plt.subplot(122);plt.imshow(output_image[:,:,::-1]);plt.title("Output");plt.axis('off');

    # Otherwise
    else:

        # Return the output image and results of face detection.
        return output_image, results
Now we will utilize the function mpDnnDetectFaces() created above to perform face detection using Mediapipe’s detector on a few sample images and display the results.
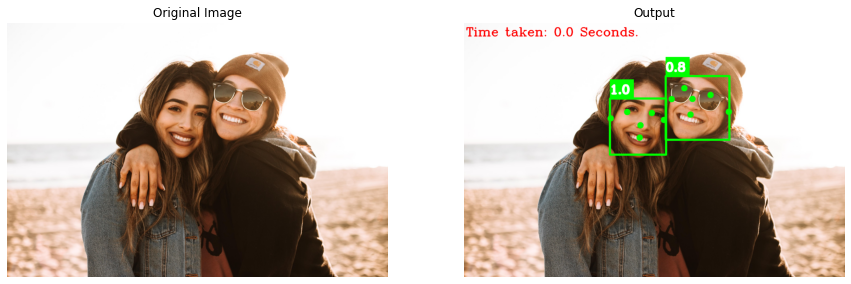
# Read a sample image and perform Mediapipe's face detection on it.
image = cv2.imread('media/sample11.jpg')
mpDnnDetectFaces(image, mp_face_detector, display=True)
You can get an idea of its super-realtime performance from the time taken by the detection process. After all, this is what differentiates this detector from all the others.
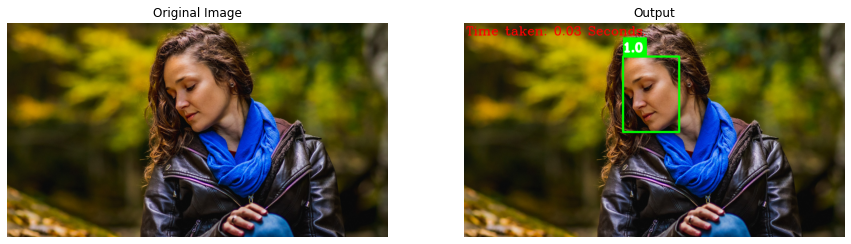
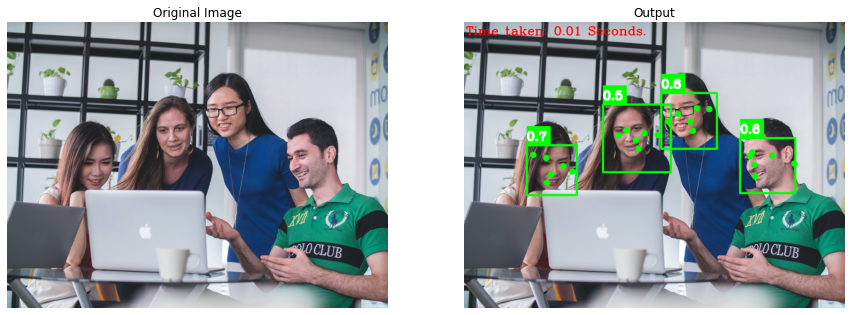
# Read another sample image and perform Mediapipe's face detection on it.
image = cv2.imread('media/sample7.jpg')
mpDnnDetectFaces(image, mp_face_detector, display=True)
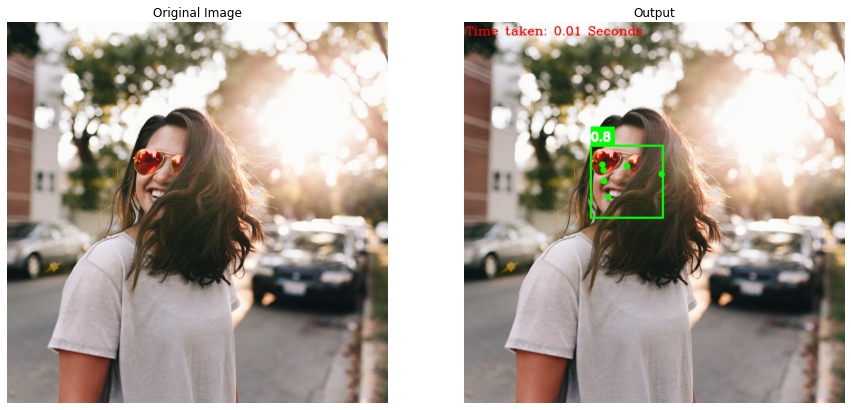
It can detect the non-frontal and occluded faces but fails to accurately detect the key points in such scenerios.
# Read another sample image and perform Mediapipe's face detection on it.
image = cv2.imread('media/sample2.jpg')
mpDnnDetectFaces(image, mp_face_detector, display=True)
The size of the bounding box returned by this detector is also quite appropriate.
# Set up the face detection function by selecting the short-range model.
mp_face_detector = mp_face_detection.FaceDetection( min_detection_confidence=0.5)

# Read another sample image and perform Mediapipe's face detection on it.
image = cv2.imread('media/sample10.jpg')
mpDnnDetectFaces(image, mp_face_detector, display=True)
By using the short-range model, one can easily ignore the faces in the background, which is normally required in most of the applications out there, like face gesture recognition.
Face Detection on Real-Time Webcam Feed
We have compared the face detection algorithms on the images and discussed the pros and cons of each of them, but now the real test begins, as we will test the algorithms on a real-time webcam feed. First, we will select the algorithm we want to use as one of them will be used at a time. We have designed the code below to switch between different face detection algorithms in real-time, by pressing the key s.
We will utilize the functions created above to perform face detection on the real-time webcam feed using the selected algorithm and will also calculate and display the number of frames being updated in one second to get an idea of whether the algorithms can work in real-time on a CPU or not.
# Initialize the VideoCapture object to read from the webcam.
camera_video = cv2.VideoCapture(1)
camera_video.set(3,1280)
camera_video.set(4,960)

# Create named window for resizing purposes.
cv2.namedWindow('Face Detection', cv2.WINDOW_NORMAL)

# Initialize a list to store the face detection algorithms.
algoirthms = ['Mediapipe', 'OpenCV DNN', 'HOG', 'Haar Cascade', 'Dlib DNN']

# Initialize a variable to store the index of the selected face detection algorithm
algo_index = 0

# Initialize a variable to store the time of the previous frame.
time1 = 0

# Iterate until the webcam is accessed successfully.
while camera_video.isOpened():

    # Read a frame.
    ok, frame = camera_video.read()

    # Check if frame is not read properly then continue to the next iteration to read the next frame.
    if not ok:
        continue

    # Flip the frame horizontally for natural (selfie-view) visualization.
    frame = cv2.flip(frame, 1)

    # Get the height and width of the frame.
    frame_height, frame_width, _ = frame.shape

    # Retrive the currently selected face detection algorithm.
    algoirthm = algoirthms[algo_index % len(algoirthms)]

    # Check if the Haar Cascade algorithm is selected.
    if algoirthm == 'Haar Cascade':

        # Perform face detection using the Haar Cascade algorithm.
        frame, _ = haarCascadeDetectFaces(frame, cascade_face_detector, display=False)

    # Check if the HOG algorithm is selected.
    elif algoirthm == 'HOG':

        # Perform face detection using the HOG algorithm.
        frame, _ = hogDetectFaces(frame, hog_face_detector, display=False)

    # Check if the OpenCV DNN algorithm is selected.
    elif algoirthm == 'OpenCV DNN':

        # Perform face detection using the OpenCV DNN algorithm.
        frame, _ = cvDnnDetectFaces(frame, opencv_dnn_model, display=False)

    # Check if the 'Dlib DNN algorithm is selected.
    elif algoirthm == 'Dlib DNN':

        # Perform face detection using the Dlib DNN algorithm.
        frame, _ = dlibDnnDetectFaces(frame, cnn_face_detector, display=False)

    # Check if the Mediapipe algorithm is selected.
    elif algoirthm == 'Mediapipe':

        # Perform face detection using the Mediapipe algorithm.
        frame, _ = mpDnnDetectFaces(frame, mp_face_detector, display=False)

    # Write the currently selected method on the frame.
    cv2.putText(frame, algoirthm, (frame_width//3, frame_height//8),cv2.FONT_HERSHEY_PLAIN, 4, (255, 155, 0), 3)

    # Set the time for this frame to the current time.
    time2 = time()

    # Check if the difference between the previous and this frame time > 0 to avoid division by zero.
    if (time2 - time1) > 0:

        # Calculate the number of frames per second.
        frames_per_second = 1.0 / (time2 - time1)

        # Write the calculated number of frames per second on the frame.
        cv2.putText(frame, 'FPS: {}'.format(int(frames_per_second)), (10, 30),cv2.FONT_HERSHEY_PLAIN, 2, (0, 255, 0), 3)

    # Update the previous frame time to this frame time.
    # As this frame will become previous frame in next iteration.
    time1 = time2

    # Display the frame.
    cv2.imshow('Face Detection', frame)

    # Wait for 1ms. If a a key is pressed, retreive the ASCII code of the key.
    k = cv2.waitKey(1) & 0xFF

    # Check if 'ESC' is pressed and break the loop.
    if(k == 27):
        break

    # Check if 's' is pressed then increment the algorithm index.
    elif (k == ord('s')):
        algo_index += 1


# Release the VideoCapture Object and close the windows.
camera_video.release()
cv2.destroyAllWindows()
Output
As expected! all of them can work in real-time on a CPU except for the Dlib Deep Learning-based Face Detector.
Join My Course Computer Vision For Building Cutting Edge Applications Course

The only course out there that goes beyond basic AI Applications and teaches you how to create next-level apps that utilize physics, deep learning, classical image processing, hand and body gestures. Don’t miss your chance to level up and take your career to new heights
You’ll Learn about:
- Creating GUI interfaces for python AI scripts.
- Creating .exe DL applications
- Using a Physics library in Python & integrating it with AI
- Advance Image Processing Skills
- Advance Gesture Recognition with Mediapipe
- Task Automation with AI & CV
- Training an SVM machine Learning Model.
- Creating & Cleaning an ML dataset from scratch.
- Training DL models & how to use CNN’s & LSTMS.
- Creating 10 Advance AI/CV Applications
- & More
Whether you’re a seasoned AI professional or someone just looking to start out in AI, this is the course that will teach you, how to Architect & Build complex, real world and thrilling AI applications
Further Resources
Face Detection – OpenCV, Dlib and Deep Learning ( C++ / Python )
Dlib 18.6 released: Make your own object detector!
Easily Create High-Quality Object Detectors with Deep Learning
Bleed Face Detector – It is a python package that allows using 4 different face detectors (OpenCV Haar Cascade, Dlib HoG, OpenCV Deep Learning-based, and Dlib Deep Learning-based) by just changing a single line of code.
Summary:
In this tutorial, you have learned about the five most popular and effective face detectors along with the best tips, and suggestions. You have become capable of acquiring the required balance in accuracy, speed, and efficiency in any given scenario. Now to summarize;
If you have a low-end device or an embedded device like the Raspberry Pi and are expecting faces under substantial occlusion and with various sizes, orientations, and angles then I will recommend you to go for the Mediapipe Face Detector, as it is the fastest one and also pretty accurate. In fact, this one has the best trade-off between speed and accuracy and also gives a few facial landmarks (key points).
Otherwise, if you have some environmental restrictions and cannot use the Mediapipe face detector, then the next best option will be OpenCV DNN Face Detector as this one is also pretty accurate but has higher latency.
For applications in which the face size can be controlled (> 80×80), and you want to skip the people (small faces) that are far away from the camera, the Dlib HoG Face Detector can be used but surely is not the best option and for flag-ship devices with NVIDIA GPU in the same scenario, Dlib DNN Face Detector can be a good alternative to the HoG Face Detector, but try to use it on a CPU.
And If you are only working with frontal faces and want to skip all the non-frontal and rotated faces, then the Haar Cascade detector can be an option but remember you will have to manually tune the parameters to get rid of false positives.
So generally, you should just go with the Mediapipe Face Detector for super real-time speed and high accuracy.
You can reach out to me personally for a 1 on 1 consultation session in AI/computer vision regarding your project. Our talented team of vision engineers will help you every step of the way. Get on a call with me directly here.
Ready to seriously dive into State of the Art AI & Computer Vision?
Then Sign up for these premium Courses by Bleed AI


0 Comments