Watch Video Here
In this tutorial, we’ll learn how to do real-time 3D hands landmarks detection using the Mediapipe library in python. After that, we’ll learn to perform hands type classification (i.e. is it a left or right hand) and then draw the bounding boxes around the hands by retrieving the required coordinates from the detected landmarks.
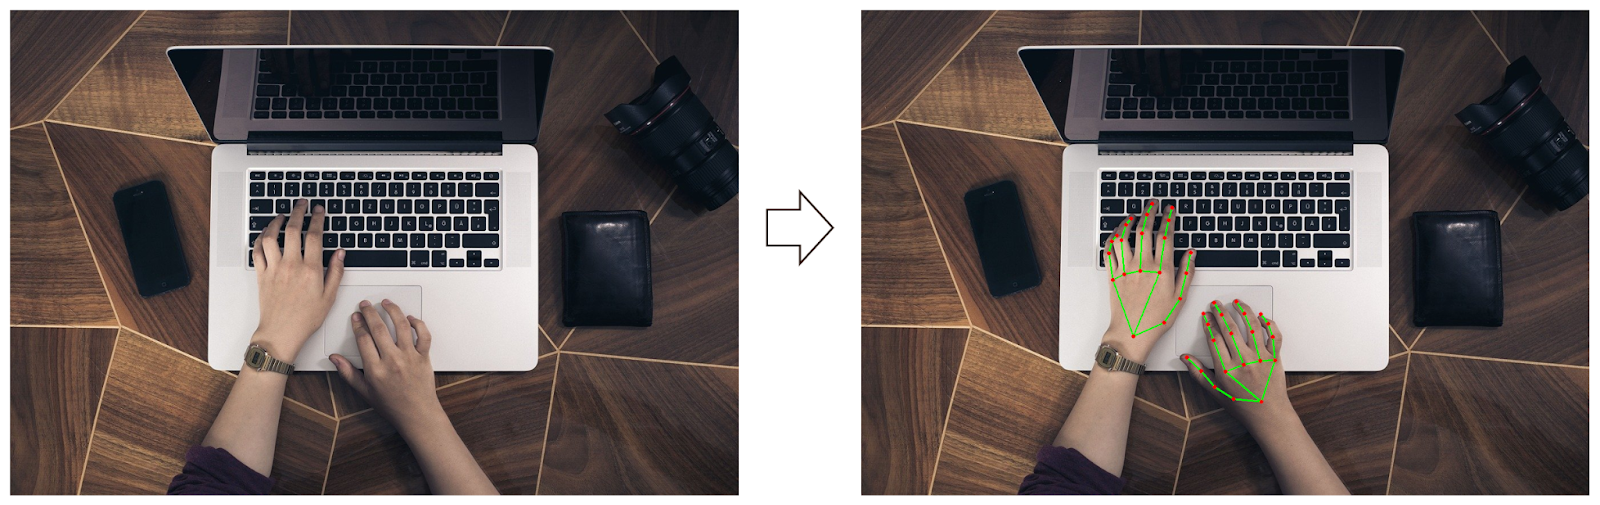
Below are the results on a few sample images, and this will work on real-time camera feed or recorded videos as well.

And last but not the least, we will also create a customized landmarks annotation of the hands utilizing the depth (distance from the camera) of the hands, as Mediapipe’s solution provides three-dimensional landmarks.
The annotation provided by Mediapipe allows users to annotate the images and videos with a single line of code but it does not utilize the depth and draws fixed-sized lines and circles on the hands.
But in our customized annotation, the thickness of the lines (connections) and circles (landmarks) for each hand will vary in real-time by using the depth of each hand, with the decrease in the distance from the camera (depth), the size of the annotation increases.
The motivation behind this was that the size of the hand in the image/frame increases when the hand is moved closer to the camera, so using a fixed size annotation for a hand that varies in size was hard to digest for me. You can see the comparison of Mediapipe’s annotation and our customized annotation below.

The code for all this is very easy and is explained in the simplest manner possible.
Now before diving further, you can go and watch the youtube tutorial for the detailed explanation, although this blog post alone can also serve the purpose.
This post can be split into 4 parts:
Part 1 (a): Introduction to Hands Recognition & Landmarks Detection
Part 1 (b): Mediapipe’s Hands Landmarks Detection Implementation
Part 2: Using Hands Landmarks Detection on images and videos
Part 3: Hands Classification (i.e., Left or Right)
Part 4 (a): Draw Bounding Boxes around the Hands
Part 4 (b): Draw Customized Landmarks Annotation
Part 1 (a): Introduction to Hands Recognition & Landmarks Detection
Hands Recognition & Landmarks Detection also belongs to the keypoint estimation category of computer vision that I had talked about in detail in a post I wrote a few weeks ago Real-Time 3D Pose Detection & Pose Classification with Mediapipe and Python, make sure to read that.
In this one, we will learn to localize twenty-one key landmarks on hand(s) e.g. wrist, thumb and fingertips, etc. See the image below:
It is an important and popular pre-processing task in many vision applications as it allows to localize and recognize the shape and motion of hands that opens up the door to the future by making a ton of applications feasible like:
- Augmented Reality Applications that overlay Digital Content and Information over Reality like a Virtual Painter.
- Sign Language Recognition.
- Hand Gesture Controlled Drones and Robots or any other Physical Appliances.


Using landmark detection is also a great way to interact with any Human-Computer Interaction (HCI) based system as the human hand is capable of making multiple gestures without much effort.
Some other types of keypoint detection problems are facial landmark detection, pose detection, etc.
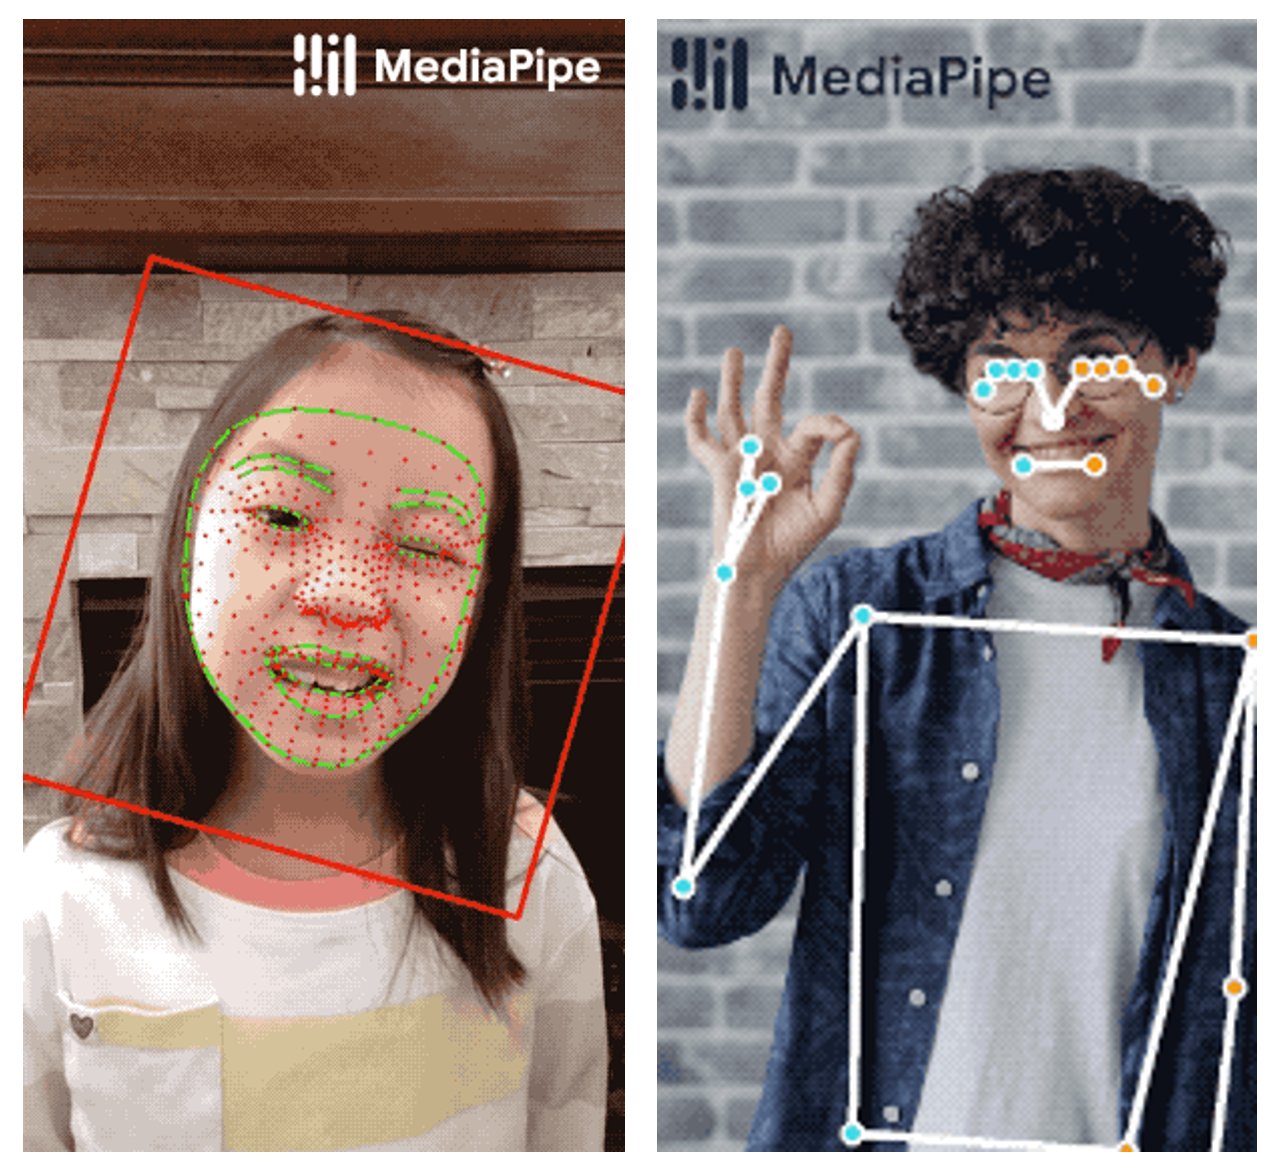
I have already made a tutorial on pose detection and will explain facial landmark detection in an upcoming tutorial.
Part 1 (b): Mediapipe’s Hands Landmarks Detection Implementation
Here’s a brief introduction to Mediapipe;
“Mediapipe is a cross-platform/open-source tool that allows you to run a variety of machine learning models in real-time. It’s designed primarily for facilitating the use of ML in streaming media & It was built by Google”

All the models in Mediapipe have state-of-the-art performance and are highly optimized as well and are used in a lot of well-known products out there.
It provides a robust solution capable of predicting twenty-one 3D landmarks on a hand in real-time with high accuracy and speed as well, even on low-end devices i.e. phones, laptops, etc., which makes it stand out from the other solutions out there.
Now you may be thinking what makes it so fast?
Actually, they have combined a computationally costly object detector with an object tracker that requires a lot less processing. So for the videos, a tracker is used instead of invoking the object detector at every frame which makes this solution so fast and brilliant.
The detector is only invoked as needed, that is in the very first frame or when the tracker loses track of any of the hands. The detector localizes the hand in the image/frame and outputs the bounding box coordinates around the hand.
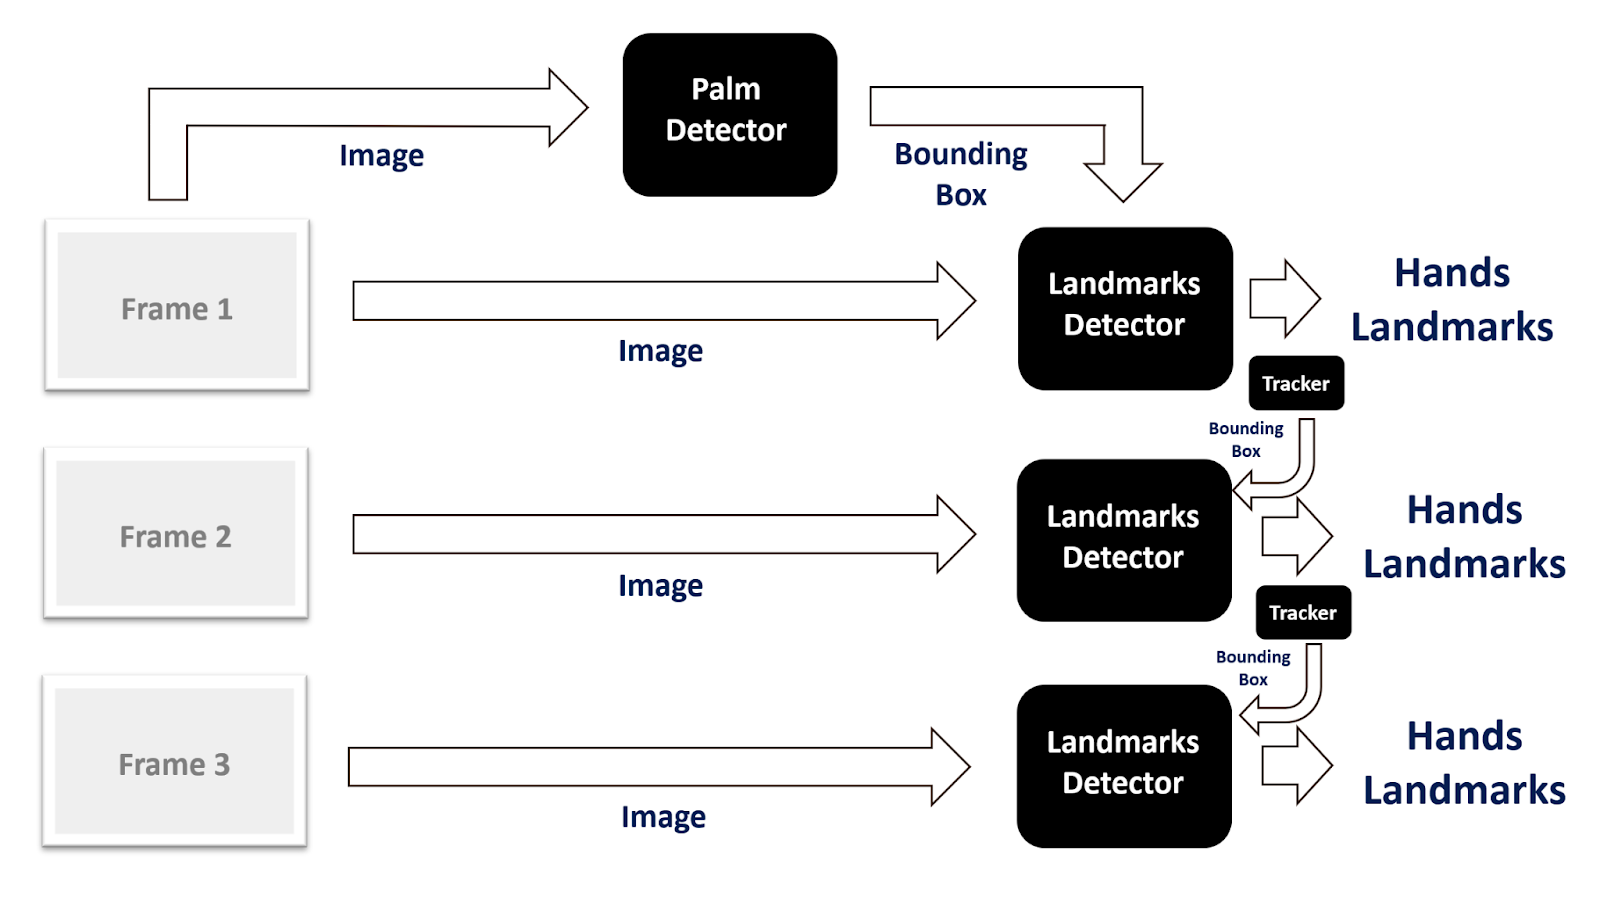
Then the region of interest (ROI) is cropped from the image/frame using the bounding box coordinates and after that, the cropped image/frame is used by the hand landmark model to predict the landmarks within the ROI.
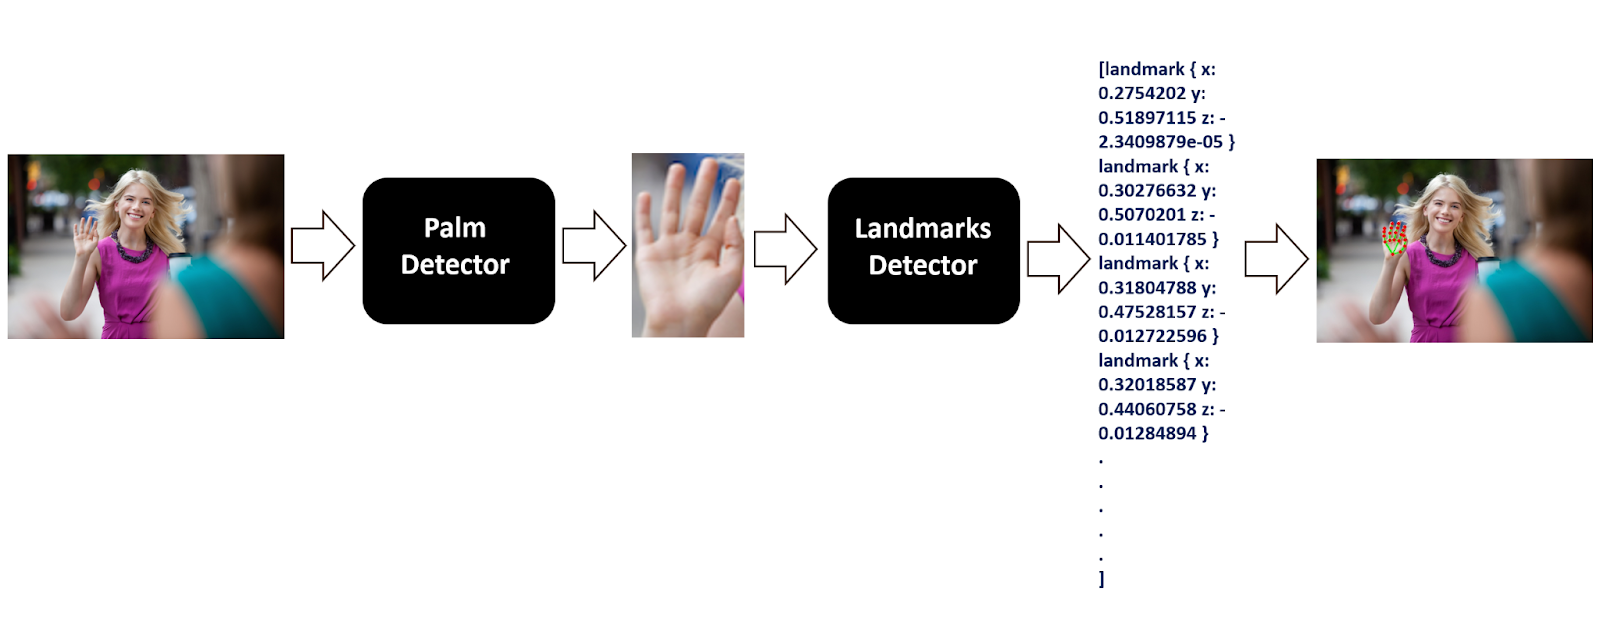
The palm detector is used, as detecting hands is a comparatively more complex task than the palm or fist (i.e., rigid objects). Palms require square bounding boxes which reduces the number of anchors (predefined bounding boxes of a certain height and width). Also as palms are smaller objects, which reduces the possibility of self-occlusion (hidden by themselves), like handshakes. Comparatively, hands lack easily distinguishable patterns and are often occluded.
The image below shows the twenty-one hand landmarks, that this solution detects, along with their indexes.

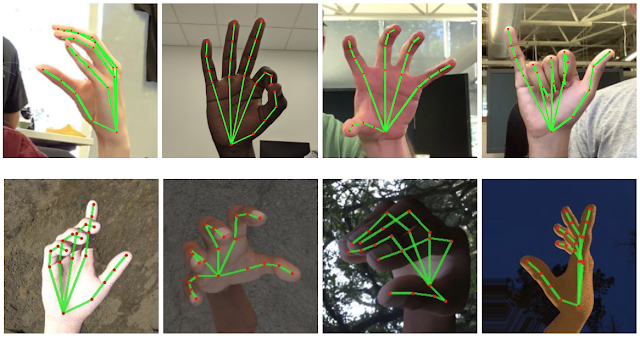
They manually annotated around 30K real-world images with 3D coordinates by using images depth maps and also rendered a high-quality synthetic hand model over various backgrounds and then mapped the model with different backgrounds to the corresponding 3D coordinates.
So they kind of automated the whole annotation process. The image below contains the aligned hands cropped images and the rendered synthetic hand images with ground truth annotation.
Alright now we have learned the required basic theory and implementation details, let’s dive into the code.
Download Code:
[optin-monster slug=”ko5ox1sveedosrhdesgq”]
Import the Libraries
We will start by importing the required libraries.
import cv2
import numpy as np
from time import time
import mediapipe as mp
import matplotlib.pyplot as plt
Part 2: Using Hands Landmarks Detection on images and videos
Initialize the Hands Landmarks Detection Model
To use the Mediapipe’s hands solution, we first have to initialize the hands class using the mp.solutions.hands syntax and then we will have to call the function mp.solutions.hands.Hands() with the arguments explained below:
static_image_mode– It is a boolean value that is if set toFalse, the solution treats the input images as a video stream. It will try to detect hands in the first input images, and upon a successful detection further localizes the hand landmarks. In subsequent images, once allmax_num_handshands are detected and the corresponding hand landmarks are localized, it simply tracks those landmarks without invoking another detection until it loses track of any of the hands. This reduces latency and is ideal for processing video frames. If set toTrue, hand detection runs on every input image, ideal for processing a batch of static, possibly unrelated, images. Its default value isFalse.max_num_hands– It is the maximum number of hands to detect. Its default value is2.min_detection_confidence– It is the minimum detection confidence([0.0, 1.0])required to consider the palm-detection model’s prediction correct. Its default value is0.5which means that all the detections with prediction confidence less than 50% are ignored by default.min_tracking_confidence– It is the minimum tracking confidence([0.0, 1.0])required to consider the landmark-tracking model’s tracked hands landmarks valid. If the confidence is less than this argument value then the detector is invoked again in the next frame/image, so increasing its value increases the robustness, but also increases the latency. Its default value is0.5.
Then we will also need to initialize the mp.solutions.drawing_utils class that is very useful to visualize the landmarks on the images/frames.
# Initialize the mediapipe hands class.
mp_hands = mp.solutions.hands

# Set up the Hands function.
hands = mp_hands.Hands(static_image_mode=True, max_num_hands=2, min_detection_confidence=0.3)

# Initialize the mediapipe drawing class.
mp_drawing = mp.solutions.drawing_utils
Read an Image
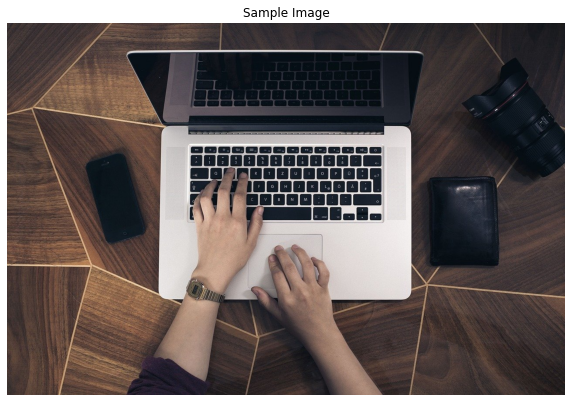
Now we will use the function cv2.imread() to read a sample image and then display it using the matplotlib library.
# Read an image from the specified path.
sample_img = cv2.imread('media/sample.jpg')

# Specify a size of the figure.
plt.figure(figsize = [10, 10])

# Display the sample image, also convert BGR to RGB for display.
plt.title("Sample Image");plt.axis('off');plt.imshow(sample_img[:,:,::-1]);plt.show()
Perform Hands Landmarks Detection
Now we will pass the image to the hand’s landmarks detection machine learning pipeline by using the function mp.solutions.hands.Hands().process(). But first, we will have to convert the image from BGR to RGB format using the function cv2.cvtColor() as OpenCV reads images in BGR format and the ml pipeline expects the input images to be in RGB color format.
The machine learning pipeline outputs a list of twenty-one landmarks of the prominent hands in the image. Each landmark has:
x– It is the landmark x-coordinate normalized to [0.0, 1.0] by the image width.y: It is the landmark y-coordinate normalized to [0.0, 1.0] by the image height.z: It is the landmark z-coordinate normalized to roughly the same scale asx. It represents the landmark depth with the wrist being the origin, so the smaller the value the closer the landmark is to the camera.
To get more intuition, we will display the first two landmarks of each hand, the ml pipeline outputs an object that has an attribute multi_hand_landmarks that contains the found landmarks coordinates of each hand as an element of a list.
Note: The z-coordinate is just the relative distance of the landmark from the wrist, and this distance increases and decreases depending upon the distance from the camera so that is why it represents the depth of each landmark point.
# Perform hands landmarks detection after converting the image into RGB format.
results = hands.process(cv2.cvtColor(sample_img, cv2.COLOR_BGR2RGB))

# Check if landmarks are found.
if results.multi_hand_landmarks:

    # Iterate over the found hands.
    for hand_no, hand_landmarks in enumerate(results.multi_hand_landmarks):

        print(f'HAND NUMBER: {hand_no+1}')
        print('-----------------------')

        # Iterate two times as we only want to display first two landmarks of each hand.
        for i in range(2):

            # Display the found normalized landmarks.
            print(f'{mp_hands.HandLandmark(i).name}:')
            print(f'{hand_landmarks.landmark[mp_hands.HandLandmark(i).value]}')
Output
HAND NUMBER: 1
WRIST:
x: 0.37476441264152527
y: 0.6743423938751221
z: -6.916032725712284e-05
THUMB_CMC:
x: 0.4167462885379791
y: 0.6456755995750427
z: 0.009653960354626179
HAND NUMBER: 2
WRIST:
x: 0.5507286787033081
y: 0.8074262142181396
z: -2.4604334612376988e-05
THUMB_CMC:
x: 0.510724663734436
y: 0.8015302419662476
z: 0.002759072231128812
As you can see that the landmarks are normalized to specific scales, so now we will convert them back to their original scale by using the width and height of the sample image and display them.
# Retrieve the height and width of the sample image.
image_height, image_width, _ = sample_img.shape

# Check if landmarks are found.
if results.multi_hand_landmarks:

    # Iterate over the found hands.
    for hand_no, hand_landmarks in enumerate(results.multi_hand_landmarks):

        print(f'HAND NUMBER: {hand_no+1}')
        print('-----------------------')

        # Iterate two times as we only want to display first two landmark of each hand.
        for i in range(2):

            # Display the found landmarks after converting them into their original scale.
            print(f'{mp_hands.HandLandmark(i).name}:')
            print(f'x: {hand_landmarks.landmark[mp_hands.HandLandmark(i).value].x * image_width}')
            print(f'y: {hand_landmarks.landmark[mp_hands.HandLandmark(i).value].y * image_height}')
            print(f'z: {hand_landmarks.landmark[mp_hands.HandLandmark(i).value].z * image_width}\n')
Output
HAND NUMBER: 1
WRIST:
x: 479.69844818115234
y: 575.2140619754791
z: -0.08852521888911724
THUMB_CMC:
x: 533.4352493286133
y: 550.7612864375114
z: 12.357069253921509
HAND NUMBER: 2
WRIST:
x: 704.9327087402344
y: 688.7345607280731
z: -0.031493548303842545
THUMB_CMC:
x: 653.7275695800781
y: 683.7052963972092
z: 3.531612455844879
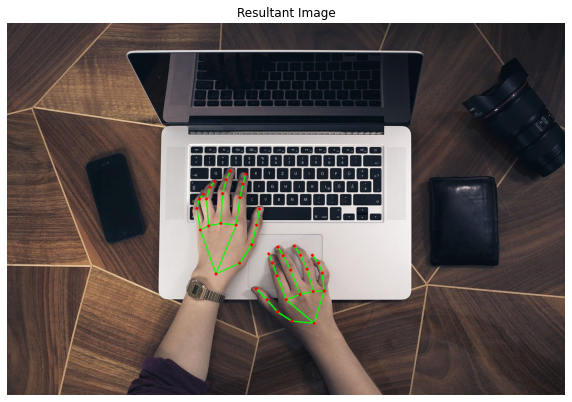
Now we will draw the detected landmarks on a copy of the sample image using the function mp.solutions.drawing_utils.draw_landmarks() from the class mp.solutions.drawing_utils, we had initialized earlier and will display the resultant image.
# Create a copy of the sample image to draw landmarks on.
img_copy = sample_img.copy()

# Check if landmarks are found.
if results.multi_hand_landmarks:

    # Iterate over the found hands.
    for hand_no, hand_landmarks in enumerate(results.multi_hand_landmarks):

        # Draw the hand landmarks on the copy of the sample image.
        mp_drawing.draw_landmarks(image = img_copy, landmark_list = hand_landmarks,
                                  connections = mp_hands.HAND_CONNECTIONS)

    # Specify a size of the figure.
    fig = plt.figure(figsize = [10, 10])

    # Display the resultant image with the landmarks drawn, also convert BGR to RGB for display.
    plt.title("Resultant Image");plt.axis('off');plt.imshow(img_copy[:,:,::-1]);plt.show()
Part 3: Hands Classification (i.e., Left or Right)
Create a Hands Landmarks Detection Function
Now we will put all this together to create a function that will perform hands landmarks detection on an image and will visualize the resultant image along with the original image or return the resultant image along with the output of the model depending upon the passed arguments.
def detectHandsLandmarks(image, hands, display = True):
    '''
    This function performs hands landmarks detection on an image.
    Args:
        image:   The input image with prominent hand(s) whose landmarks needs to be detected.
        hands:   The hands function required to perform the hands landmarks detection.
        display: A boolean value that is if set to true the function displays the original input image, and the output
                 image with hands landmarks drawn and returns nothing.
    Returns:
        output_image: The input image with the detected hands landmarks drawn.
        results: The output of the hands landmarks detection on the input image.
    '''

    # Create a copy of the input image to draw landmarks on.
    output_image = image.copy()

    # Convert the image from BGR into RGB format.
    imgRGB = cv2.cvtColor(image, cv2.COLOR_BGR2RGB)

    # Perform the Hands Landmarks Detection.
    results = hands.process(imgRGB)

    # Check if landmarks are found.
    if results.multi_hand_landmarks:

        # Iterate over the found hands.
        for hand_landmarks in results.multi_hand_landmarks:

            # Draw the hand landmarks on the copy of the input image.
            mp_drawing.draw_landmarks(image = output_image, landmark_list = hand_landmarks,
                                  connections = mp_hands.HAND_CONNECTIONS)

    # Check if the original input image and the output image are specified to be displayed.
    if display:

        # Display the original input image and the output image.
        plt.figure(figsize=[15,15])
        plt.subplot(121);plt.imshow(image[:,:,::-1]);plt.title("Original Image");plt.axis('off');
        plt.subplot(122);plt.imshow(output_image[:,:,::-1]);plt.title("Output");plt.axis('off');

    # Otherwise
    else:

        # Return the output image and results of hands landmarks detection.
        return output_image, results
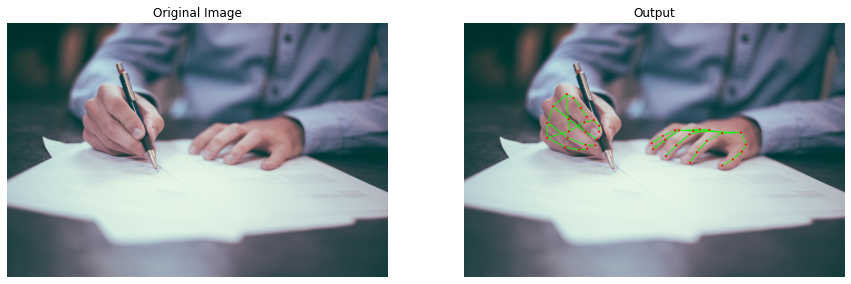
Now we will utilize the function created above to perform hands landmarks detection on a few sample images and display the results.
# Read another sample image and perform hands landmarks detection on it.
image = cv2.imread('media/sample1.jpg')
detectHandsLandmarks(image, hands, display=True)
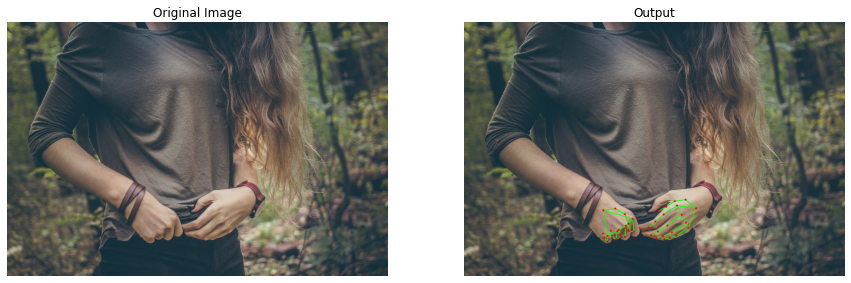
# Read another sample image and perform hands landmarks detection on it.
image = cv2.imread('media/sample2.jpg')
detectHandsLandmarks(image, hands, display=True)

# Read another sample image and perform hands landmarks detection on it.
image = cv2.imread('media/sample3.jpg')
detectHandsLandmarks(image, hands, display=True)
Hands Landmarks Detection on Real-Time Webcam Feed
The results on the images were excellent, but now the real test begins, we will try the function on a real-time webcam feed. We will also calculate and display the number of frames being updated in one second to get an idea of whether this solution can work in real-time on a CPU or not. As that is the only thing that differentiates it from the other solutions out there.
# Setup Hands function for video.
hands_video = mp_hands.Hands(static_image_mode=False, max_num_hands=2,
                             min_detection_confidence=0.7, min_tracking_confidence=0.4)

# Initialize the VideoCapture object to read from the webcam.
camera_video = cv2.VideoCapture(1)
camera_video.set(3,1280)
camera_video.set(4,960)

# Create named window for resizing purposes.
cv2.namedWindow('Hands Landmarks Detection', cv2.WINDOW_NORMAL)

# Initialize a variable to store the time of the previous frame.
time1 = 0

# Iterate until the webcam is accessed successfully.
while camera_video.isOpened():

    # Read a frame.
    ok, frame = camera_video.read()

    # Check if frame is not read properly then continue to the next iteration to read the next frame.
    if not ok:
        continue

    # Flip the frame horizontally for natural (selfie-view) visualization.
    frame = cv2.flip(frame, 1)

    # Perform Hands landmarks detection.
    frame, _ = detectHandsLandmarks(frame, hands_video, display=False)

    # Set the time for this frame to the current time.
    time2 = time()

    # Check if the difference between the previous and this frame time > 0 to avoid division by zero.
    if (time2 - time1) > 0:

        # Calculate the number of frames per second.
        frames_per_second = 1.0 / (time2 - time1)

        # Write the calculated number of frames per second on the frame.
        cv2.putText(frame, 'FPS: {}'.format(int(frames_per_second)), (10, 30),cv2.FONT_HERSHEY_PLAIN, 2, (0, 255, 0), 3)

    # Update the previous frame time to this frame time.
    # As this frame will become previous frame in next iteration.
    time1 = time2

    # Display the frame.
    cv2.imshow('Hands Landmarks Detection', frame)

    # Wait for 1ms. If a a key is pressed, retreive the ASCII code of the key.
    k = cv2.waitKey(1) & 0xFF

    # Check if 'ESC' is pressed and break the loop.
    if(k == 27):
        break

# Release the VideoCapture Object and close the windows.
camera_video.release()
cv2.destroyAllWindows()
Output
Woah! that was impressive not only it was fast but the results were quite accurate too.
Create a Hand Type Classification Function
Now we will create a function that will perform hands type classification (i.e. is it a left or right hand). The output (object) by the hand’s landmarks detector model contains another attribute multi_handedness that contains a score (probability of the predicted label being correct) and label (either "Left" or "Right") for each detected hand.
While determining the label, it is assumed that the input image is mirrored (i.e., flipped horizontally). So we had already performed classification during the hand’s landmarks detection, and now we only need to access the information stored in the attribute multi_handedness.
def getHandType(image, results, draw=True, display = True):
    '''
    This function performs hands type (left or right) classification on hands.
    Args:
        image:   The image of the hands that needs to be classified, with the hands landmarks detection already performed.
        results: The output of the hands landmarks detection performed on the image in which hands types needs
                 to be classified.
        draw:    A boolean value that is if set to true the function writes the hand type label on the output image.
        display: A boolean value that is if set to true the function displays the output image and returns nothing.
    Returns:
        output_image: The image of the hands with the classified hand type label written if it was specified.
        hands_status: A dictionary containing classification info of both hands.
    '''

    # Create a copy of the input image to write hand type label on.
    output_image = image.copy()

    # Initialize a dictionary to store the classification info of both hands.
    hands_status = {'Right': False, 'Left': False, 'Right_index' : None, 'Left_index': None}

    # Iterate over the found hands in the image.
    for hand_index, hand_info in enumerate(results.multi_handedness):

        # Retrieve the label of the found hand.
        hand_type = hand_info.classification[0].label

        # Update the status of the found hand.
        hands_status[hand_type] = True

        # Update the index of the found hand.
        hands_status[hand_type + '_index'] = hand_index

        # Check if the hand type label is specified to be written.
        if draw:

            # Write the hand type on the output image.
            cv2.putText(output_image, hand_type + ' Hand Detected', (10, (hand_index+1) * 30),cv2.FONT_HERSHEY_PLAIN,
                        2, (0,255,0), 2)

    # Check if the output image is specified to be displayed.
    if display:

        # Display the output image.
        plt.figure(figsize=[10,10])
        plt.imshow(output_image[:,:,::-1]);plt.title("Output Image");plt.axis('off');

    # Otherwise
    else:

        # Return the output image and the hands status dictionary that contains classification info.
        return output_image, hands_status
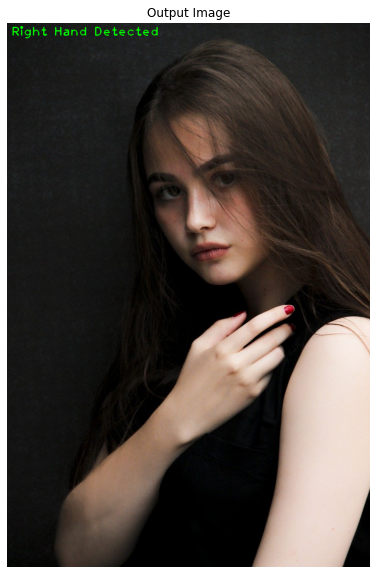
Now we will utilize the function created above to perform hand type classification on a few sample images and display the results.
# Read a sample image with one hand and perform hand type classification on it after flipping it horizontally.
image = cv2.imread('media/sample5.jpg')
flipped_image = cv2.flip(image, 1)
_, results = detectHandsLandmarks(flipped_image, hands, display=False)
if results.multi_hand_landmarks:
    getHandType(image, results)
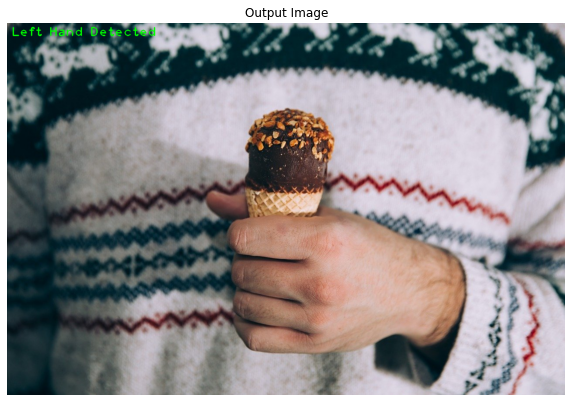
# Read a sample image with one hand and perform hand type classification on it after flipping it horizontally.
image = cv2.imread('media/sample6.jpg')
flipped_image = cv2.flip(image, 1)
_, results = detectHandsLandmarks(flipped_image, hands, display=False)
if results.multi_hand_landmarks:
    getHandType(image, results)
# Read a sample image with one hand and perform hand type classification on it after flipping it horizontally.
image = cv2.imread('media/sample7.jpg')
flipped_image = cv2.flip(image, 1)
_, results = detectHandsLandmarks(flipped_image, hands, display=False)
if results.multi_hand_landmarks:
    getHandType(image, results)
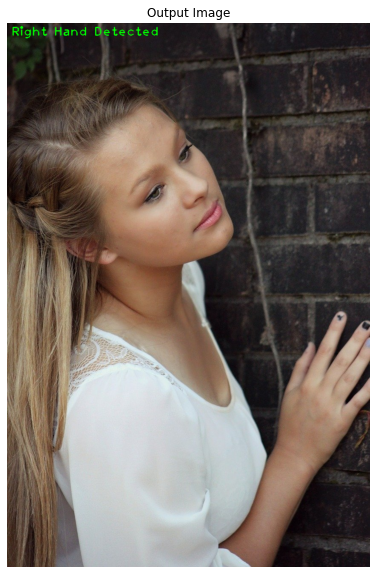
Cool! it worked perfectly on each of the sample images.
Part 4 (a): Draw Bounding Boxes around the Hands
Create a Function to Draw Bounding Boxes
Now we will create a function that will draw bounding boxes around the hands and write their classified types near them. We will first convert the normalized landmarks back to their original scale by using the width and height of the image. We will then get the bounding box coordinates ((x1,y1), (x2, y2)) for each hand.
Top Left Coordinate:x1– the smallest x-coordinate in the list of the found landmarks of the hand.y1– the smallest y-coordinate in the list of the found landmarks of the hand.
Bottom Right Coordinate:x2– the largest x-coordinate in the list of the found landmarks of the hand.y2– the largest y-coordinate in the list of the found landmarks of the hand.
Then we will draw the bounding boxes around the hands using the found coordinates and the specified padding and write the classified types of each hand near them using the bounding box coordinates. And after that, we will either display the resultant image or return it depending upon the passed arguments.
def drawBoundingBoxes(image, results, hand_status, padd_amount = 10, draw=True, display=True):
    '''
    This function draws bounding boxes around the hands and write their classified types near them.
    Args:
        image:       The image of the hands on which the bounding boxes around the hands needs to be drawn and the
                     classified hands types labels needs to be written.
        results:     The output of the hands landmarks detection performed on the image on which the bounding boxes needs
                     to be drawn.
        hand_status: The dictionary containing the classification info of both hands.
        padd_amount: The value that specifies the space inside the bounding box between the hand and the box's borders.
        draw:        A boolean value that is if set to true the function draws bounding boxes and write their classified
                     types on the output image.
        display:     A boolean value that is if set to true the function displays the output image and returns nothing.
    Returns:
        output_image:     The image of the hands with the bounding boxes drawn and hands classified types written if it
                          was specified.
        output_landmarks: The dictionary that stores both (left and right) hands landmarks as different elements.
    '''

    # Create a copy of the input image to draw bounding boxes on and write hands types labels.
    output_image = image.copy()

    # Initialize a dictionary to store both (left and right) hands landmarks as different elements.
    output_landmarks = {}

    # Get the height and width of the input image.
    height, width, _ = image.shape

    # Iterate over the found hands.
    for hand_index, hand_landmarks in enumerate(results.multi_hand_landmarks):

        # Initialize a list to store the detected landmarks of the hand.
        landmarks = []

        # Iterate over the detected landmarks of the hand.
        for landmark in hand_landmarks.landmark:

            # Append the landmark into the list.
            landmarks.append((int(landmark.x * width), int(landmark.y * height),
                                  (landmark.z * width)))

        # Get all the x-coordinate values from the found landmarks of the hand.
        x_coordinates = np.array(landmarks)[:,0]

        # Get all the y-coordinate values from the found landmarks of the hand.
        y_coordinates = np.array(landmarks)[:,1]

        # Get the bounding box coordinates for the hand with the specified padding.
        x1  = int(np.min(x_coordinates) - padd_amount)
        y1  = int(np.min(y_coordinates) - padd_amount)
        x2  = int(np.max(x_coordinates) + padd_amount)
        y2  = int(np.max(y_coordinates) + padd_amount)

        # Initialize a variable to store the label of the hand.
        label = "Unknown"

        # Check if the hand we are iterating upon is the right one.
        if hand_status['Right_index'] == hand_index:

            # Update the label and store the landmarks of the hand in the dictionary.
            label = 'Right Hand'
            output_landmarks['Right'] = landmarks

        # Check if the hand we are iterating upon is the left one.
        elif hand_status['Left_index'] == hand_index:

            # Update the label and store the landmarks of the hand in the dictionary.
            label = 'Left Hand'
            output_landmarks['Left'] = landmarks

        # Check if the bounding box and the classified label is specified to be written.
        if draw:

            # Draw the bounding box around the hand on the output image.
            cv2.rectangle(output_image, (x1, y1), (x2, y2), (155, 0, 255), 3, cv2.LINE_8)

            # Write the classified label of the hand below the bounding box drawn.
            cv2.putText(output_image, label, (x1, y2+25), cv2.FONT_HERSHEY_COMPLEX, 0.7, (20,255,155), 1, cv2.LINE_AA)

    # Check if the output image is specified to be displayed.
    if display:

        # Display the output image.
        plt.figure(figsize=[10,10])
        plt.imshow(output_image[:,:,::-1]);plt.title("Output Image");plt.axis('off');

    # Otherwise
    else:

        # Return the output image and the landmarks dictionary.
        return output_image, output_landmarks
Hands Bounding boxes & Hands Types Detection on Real-Time Webcam Feed
Now we will utilize the function created above to perform hand type classification and draw bounding boxes around the hands on a real-time webcam feed.
# Initialize the VideoCapture object to read from the webcam.
camera_video = cv2.VideoCapture(1)

# Initialize a resizable window.
cv2.namedWindow('Hands Landmarks Detection', cv2.WINDOW_NORMAL)

# Iterate until the webcam is accessed successfully.
while camera_video.isOpened():

    # Read a frame.
    ok, frame = camera_video.read()

    # Check if frame is not read properly then continue to the next iteration to read the next frame.
    if not ok:
        continue

    # Flip the frame horizontally for natural (selfie-view) visualization.
    frame = cv2.flip(frame, 1)

    # Perform Hands landmarks detection.
    frame, results = detectHandsLandmarks(frame, hands_video, display=False)

    # Check if landmarks are found in the frame.
    if results.multi_hand_landmarks:

        # Perform hand(s) type (left or right) classification.
        _, hands_status = getHandType(frame.copy(), results, draw=False, display=False)

        # Draw bounding boxes around the detected hands and write their classified types near them.
        frame, _ = drawBoundingBoxes(frame, results, hands_status, display=False)

    # Display the frame.
    cv2.imshow('Hands Landmarks Detection', frame)

    # Wait for 1ms. If a a key is pressed, retreive the ASCII code of the key.
    k = cv2.waitKey(1) & 0xFF

    # Check if 'ESC' is pressed and break the loop.
    if(k == 27):
        break

# Release the VideoCapture Object and close the windows.
camera_video.release()
cv2.destroyAllWindows()
Output
Great! the classification, along with localization, works pretty accurately on a real-time webcam feed too.
Part 4 (b): Draw Bounding Boxes around the Hands
Create a Function to Draw Customized Landmarks Annotation
Now we will create a function that will draw customized landmarks of the hands. What we are doing differently, is that we are utilizing the depth (z-coordinate) values to increase and decrease the size of the lines and circles whereas Mediapipe’s annotation uses the fixed sizes. As we have learned that z-coordinate represents the landmark depth, so the smaller the value the closer the landmark is to the camera.
We are calculating the average depth of every landmark of a hand and with the decrease in the average depth of a hand, we are increasing the thickness of the annotation circles and the lines of that hand which means the closer the hand is to the camera bigger the annotation will be, to adjust the annotation size with the size of the hand.
def customLandmarksAnnotation(image, landmark_dict):
    '''
    This function draws customized landmarks annotation utilizing the z-coordinate (depth) values of the hands.
    Args:
        image:         The image of the hands on which customized landmarks annotation of the hands needs to be drawn.
        landmark_dict: The dictionary that stores the hand(s) landmarks as different elements with keys as hand
                       types(i.e., left and right).
    Returns:
        output_image: The image of the hands with the customized annotation drawn.
        depth:        A dictionary that contains the average depth of all landmarks of the hand(s) in the image.
    '''

    # Create a copy of the input image to draw annotation on.
    output_image = image.copy()

    # Initialize a dictionary to store the average depth of all landmarks of hand(s).
    depth = {}

    # Initialize a list with the arrays of indexes of the landmarks that will make the required
    # line segments to draw on the hand.
    segments = [np.arange(0,5), np.arange(5,9) , np.arange(9,13), np.arange(13, 17), np.arange(17, 21),
                np.arange(5,18,4), np.array([0,5]), np.array([0,17])]

    # Iterate over the landmarks dictionary.
    for hand_type, hand_landmarks in landmark_dict.items():

        # Get all the z-coordinates (depth) of the landmarks of the hand.
        depth_values = np.array(hand_landmarks)[:,-1]

        # Calculate the average depth of the hand.
        average_depth = int(sum(depth_values) / len(depth_values))

        # Get all the x-coordinates of the landmarks of the hand.
        x_values = np.array(hand_landmarks)[:,0]

        # Get all the y-coordinates of the landmarks of the hand.
        y_values = np.array(hand_landmarks)[:,1]

        # Initialize a list to store the arrays of x and y coordinates of the line segments for the hand.
        line_segments = []

        # Iterate over the arrays of indexes of the landmarks that will make the required line segments.
        for segment_indexes in segments:

            # Get an array of a line segment coordinates of the hand.
            line_segment = np.array([[int(x_values[index]), int(y_values[index])] for index in segment_indexes])

            # Append the line segment coordinates into the list.
            line_segments.append(line_segment)

        # Check if the average depth of the hand is less than 0.
        if average_depth < 0:

            # Set the thickness of the line segments of the hand accordingly to the average depth.
            line_thickness = int(np.ceil(0.1*abs(average_depth))) + 2

            # Set the thickness of the circles of the hand landmarks accordingly to the average depth.
            circle_thickness = int(np.ceil(0.1*abs(average_depth))) + 3

        # Otherwise.
        else:

            # Set the thickness of the line segments of the hand to 2 (i.e. the minimum thickness we are specifying).
            line_thickness = 2

            # Set the thickness of the circles to 3 (i.e. the minimum thickness)
            circle_thickness = 3

        # Draw the line segments on the hand.
        cv2.polylines(output_image, line_segments, False, (100,250,55), line_thickness)

        # Write the average depth of the hand on the output image.
        cv2.putText(output_image,'Depth: {}'.format(average_depth),(10,30), cv2.FONT_HERSHEY_COMPLEX, 1, (20,25,255), 1,
                    cv2.LINE_AA)

        # Iterate over the x and y coordinates of the hand landmarks.
        for x, y in zip(x_values, y_values):

            # Draw a circle on the x and y coordinate of the hand.
            cv2.circle(output_image,(int(x), int(y)), circle_thickness, (55,55,250), -1)

        # Store the calculated average depth in the dictionary.
        depth[hand_type] = average_depth

    # Return the output image and the average depth dictionary of the hand(s).
    return output_image, depth
Mediapipe’s Annotation vs Our Customized Annotation on Real-Time Webcam Feed
Now we will utilize the function created above to draw the customized annotation on a real-time webcam feed and stack it with the results of Mediapipe’s annotation to visualize the difference.
# Initialize the VideoCapture object to read from the webcam.
camera_video = cv2.VideoCapture(1)

# Initialize a resizable window.
cv2.namedWindow('Hands Landmarks Detection', cv2.WINDOW_NORMAL)

# Iterate until the webcam is accessed successfully.
while camera_video.isOpened():

    # Read a frame.
    ok, frame = camera_video.read()

    # Check if frame is not read properly then continue to the next iteration to read the next frame.
    if not ok:
        continue

    # Flip the frame horizontally for natural (selfie-view) visualization.
    frame = cv2.flip(frame, 1)

    # Perform Hands landmarks detection.
    annotated_frame, results = detectHandsLandmarks(frame, hands_video, display=False)

    # Check if landmarks are found in the frame.
    if results.multi_hand_landmarks:

        # Perform hand(s) type (left or right) classification.
        _, hands_status = getHandType(frame.copy(), results, draw=False, display=False)

        # Get the landmarks dictionary that stores each hand landmarks as different elements.
        frame, landmark_dict = drawBoundingBoxes(frame, results, hands_status, draw=False, display=False)

        # Draw customized landmarks annotation ultilizing the z-coordinate (depth) values of the hand(s).
        custom_ann_frame, _ = customLandmarksAnnotation(frame, landmark_dict)

        # Stack the frame annotated using mediapipe with the customized one.
        final_output = np.hstack((annotated_frame, custom_ann_frame))

    # Otherwise.
    else:

        # Stack the frame two time.
        final_output = np.hstack((frame, frame))

    # Display the stacked frame.
    cv2.imshow('Hands Landmarks Detection', final_output)

    # Wait for 1ms. If a a key is pressed, retreive the ASCII code of the key.
    k = cv2.waitKey(1) & 0xFF

    # Check if 'ESC' is pressed and break the loop.
    if(k == 27):
        break

# Release the VideoCapture Object and close the windows.
camera_video.release()
cv2.destroyAllWindows()
Output
As expected, the results were remarkable! The thickness of the annotation circles and the lines of each hand increased with the decrease in the distance, so the hack that Mediapipe uses to calculate the depth works pretty well and is also computationally very reasonable.
Join My Course Computer Vision For Building Cutting Edge Applications Course

The only course out there that goes beyond basic AI Applications and teaches you how to create next-level apps that utilize physics, deep learning, classical image processing, hand and body gestures. Don’t miss your chance to level up and take your career to new heights
You’ll Learn about:
- Creating GUI interfaces for python AI scripts.
- Creating .exe DL applications
- Using a Physics library in Python & integrating it with AI
- Advance Image Processing Skills
- Advance Gesture Recognition with Mediapipe
- Task Automation with AI & CV
- Training an SVM machine Learning Model.
- Creating & Cleaning an ML dataset from scratch.
- Training DL models & how to use CNN’s & LSTMS.
- Creating 10 Advance AI/CV Applications
- & More
Whether you’re a seasoned AI professional or someone just looking to start out in AI, this is the course that will teach you, how to Architect & Build complex, real world and thrilling AI applications
Summary:
In this tutorial, we have learned about a very popular and useful computer vision problem called hand landmarks detection. First, we covered what exactly this is, along with its applications, and then we moved to the implementation details that Mediapipe has used to provide the solution.
Also, we learned how it used a detection/tracker pipeline to provide the speed for which it stands out. After that, we performed 3D hands landmarks detection using Mediapipe’s solution on images and a real-time webcam feed.
Then we learned to classify hands as left or right and draw bounding boxes around them and after that, we learned to draw customized landmarks annotation utilizing the z-coordinate (depth) values of the hands.
Now a drawback of using this hand landmarks detection system is that you have to provide the maximum number of hands possible in the image/frame beforehand and the computationally expensive detector is invoked on every frame until the number of hands detection becomes equal to the provided maximum number of hands.
Another limitation is that the z-coordinate is just the relative distance of the landmark from the wrist, and that distance can also vary depending upon the posture of the hand i.e., whether the hand is closed or wide open. So it does not truly represent the depth, but still, it’s a great hack to calculate the depth from 2D images without using a depth camera.
You can reach out to me personally for a 1 on 1 consultation session in AI/computer vision regarding your project. Our talented team of vision engineers will help you every step of the way. Get on a call with me directly here.


0 Comments